Let Claude, ChatGPT, Cursor and other AI apps use your Quickchat AI Agent as a tool. Connect with a hosted Model Context Protocol (MCP) server URL, no install needed.
When iPhones took off, every company needed an app in the App Store.
Now, as AI chat apps gain traction and MCP becomes the standard, every company will want an MCP so others can plug into their AI.
Most people describe MCP as the USB-C of AI: a universal, standardized way to add a tool to apps like Claude, ChatGPT or Cursor. Here is how we see it: MCP lets your favorite AI app message another AI on your behalf and bring back the answer. With Quickchat AI, anyone can plug your AI Agent into Claude, ChatGPT, Cursor, or any other app that supports the protocol.
Every Quickchat AI Agent has its own hosted MCP server. You copy one URL from the app and paste it into your AI app as a connector. There is nothing to install, no uv, no config file, and no API key to hand out. The AI app gets a single tool that asks your Agent a question and relays the answer from its Knowledge Base.
If you need a refresher on what MCP is, read our step-by-step guide.
What you can do with it
Section titled “What you can do with it”- Let Claude, ChatGPT, Cursor and other MCP-capable apps ask your Agent questions and get answers grounded in its Knowledge Base.
- Share one URL. No install, no terminal, no
claude_desktop_config.jsonto edit. - Keep it private to your team, or make it public so anyone with the link can use it.
- See every conversation in your Quickchat Inbox, including the AI-to-AI exchanges.
Get your MCP server URL
Section titled “Get your MCP server URL”- Create a Quickchat AI account. The Free plan lets you get started right away.
- Set up your Agent’s Knowledge Base, capabilities and settings.
- Open External Apps > MCP and turn Enable MCP on.
- Click Configure MCP and give your Agent a Name, Description and (optional) Command. These matter: an AI app reads them to decide when to call your Agent and what it can help with.
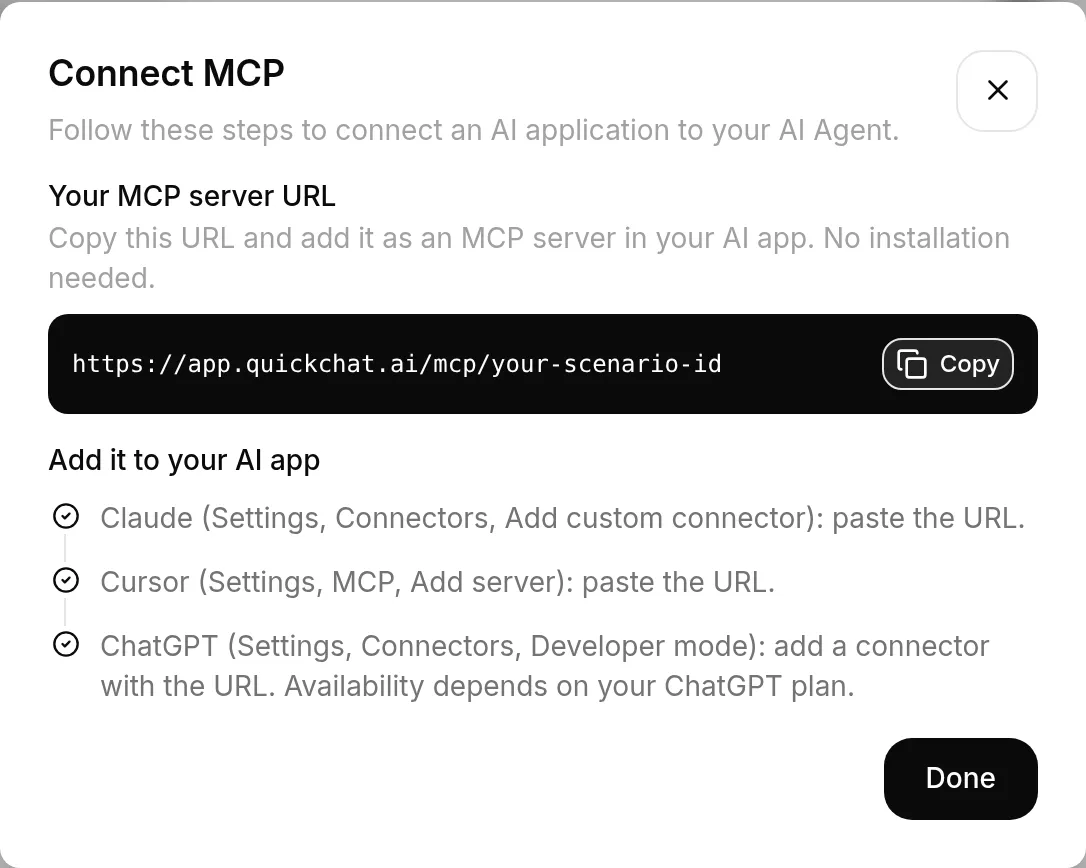
- Click Connect MCP and copy your MCP server URL. It looks like this:
https://app.quickchat.ai/mcp/<your-scenario-id>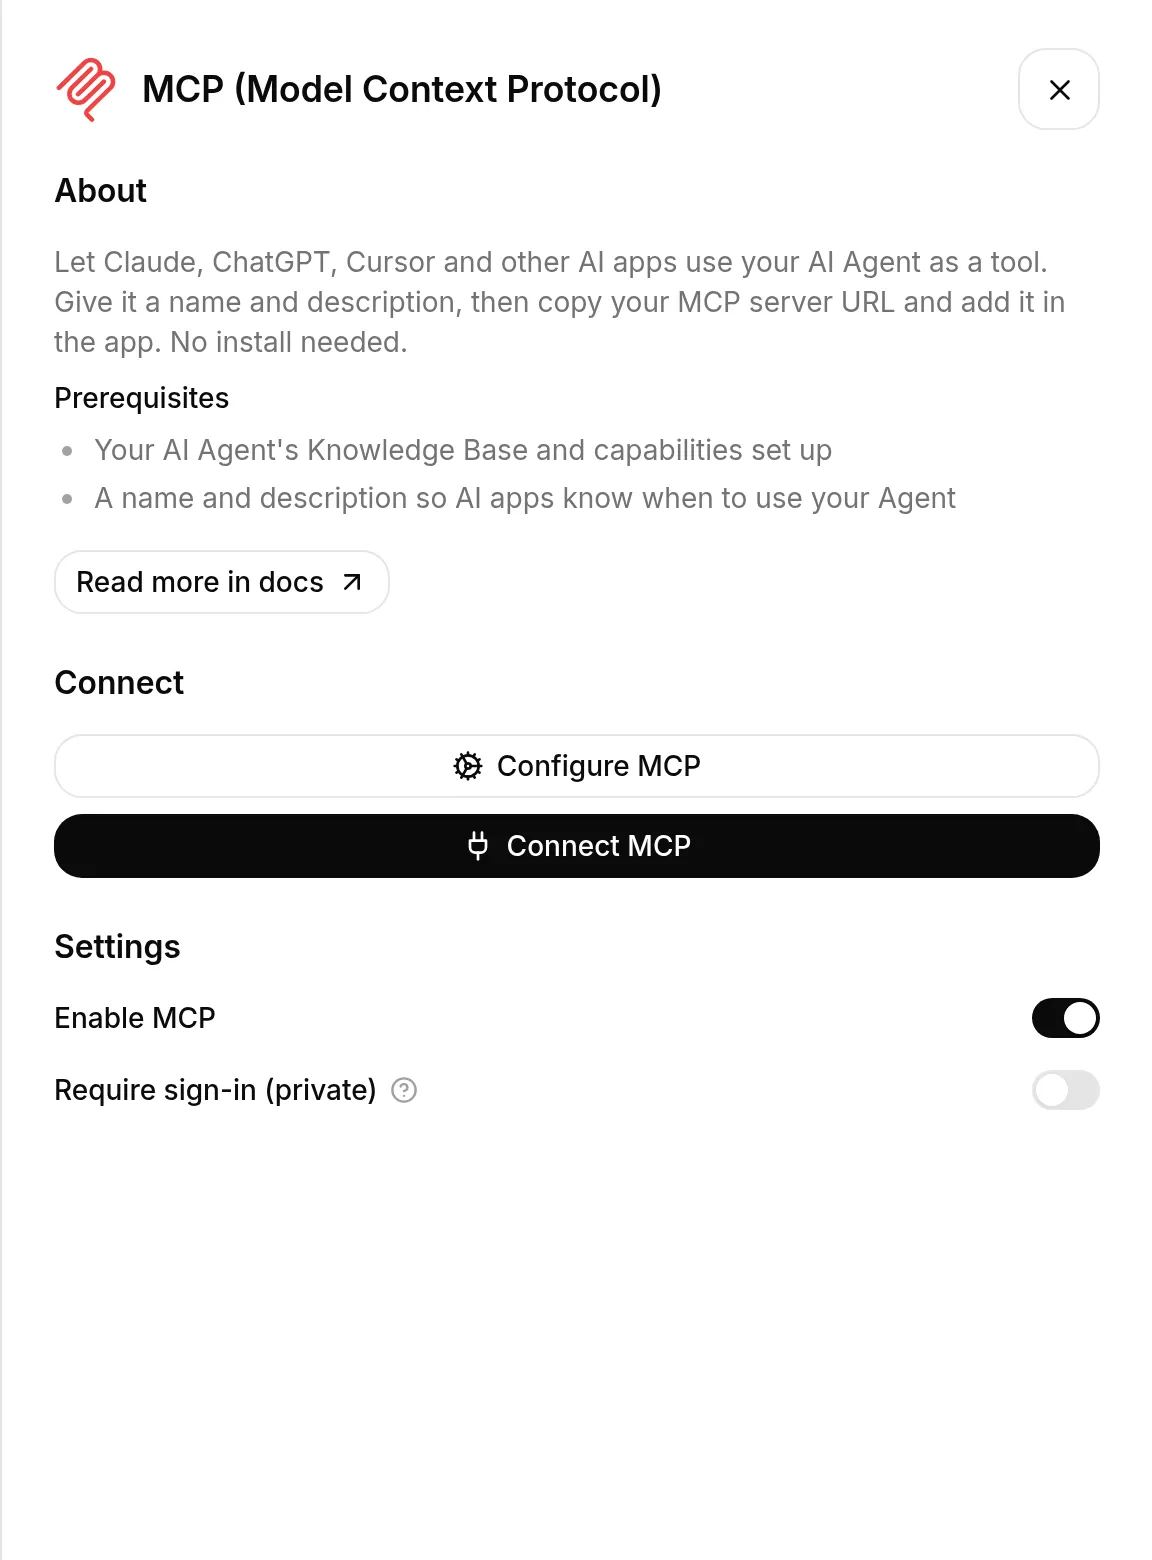
Connect your AI app
Section titled “Connect your AI app”Add the URL as an MCP server (a “connector”) in your AI app. The exact menu differs per app, but the URL is the same.
Claude
Section titled “Claude”Go to Settings > Connectors > Add custom connector and paste the URL.
Cursor
Section titled “Cursor”Go to Settings > MCP > Add server and paste the URL.
ChatGPT
Section titled “ChatGPT”Go to Settings > Connectors > Developer mode and add a connector with the URL. Availability depends on your ChatGPT plan.
Other AI apps
Section titled “Other AI apps”Any app that supports remote MCP servers works the same way: find where it adds an MCP server or connector, and paste your URL. See the MCP client directory for what each app supports.
Public or private
Section titled “Public or private”Your Agent’s MCP is private by default. Only you and teammates with a role on the Agent can connect, and the AI app asks you to sign in with Quickchat once when you add it.
Flip Require sign-in (private) off to make it public. Anyone with the link can then use your Agent without signing in, so keep in mind:
- Every message is a Quickchat AI reply billed to you.
- Public callers share your Agent’s rate limit, so heavy use can eat into your allowance.
The scenario_id in the URL is not a secret (much like a public chat widget), but the private setting is what keeps access limited to your team.
See the conversations
Section titled “See the conversations”Every MCP exchange shows up in your Quickchat Inbox. Note that these are the AI-to-AI transcripts between the calling app and your Agent, not the exact words the end user typed into Claude or ChatGPT.
Changes you make in the dashboard (Name, Description, Knowledge Base) take effect immediately. Connected apps pick them up the next time they refresh the connection.
Useful links
Section titled “Useful links”Go to the Quickchat AI app and let the world connect to your Agent. If you build something cool, share it with us on X or LinkedIn.