Connect Quickchat AI to Discord. Add the shared Quickchat AI bot in one click, give it a name for each server, or use your own Discord app for a custom avatar, direct messages, and AI Actions.
There are two ways to connect your AI Agent to Discord:
- Add to your Discord server: the recommended one-click flow. No Developer Portal and no bot token, live in under a minute.
- Use your own Discord app: the advanced flow where you create a Discord application and supply a bot token yourself.
We recommend the one-click flow. You can switch to your own app later if you need the advanced features.
New to Quickchat AI? Create a free account first, then come back here. You can also read more about Quickchat AI for Discord.
Connect with Discord (recommended)
Section titled “Connect with Discord (recommended)”In the Quickchat AI dashboard, open External Apps in the left sidebar, find Discord, and open it. Under Connect, review Bot name in the new server, which is prefilled with your AI Agent’s name. You can edit it or leave it empty to use Quickchat AI, then click Add to your Discord server. You need the Manage Server permission on the target server.
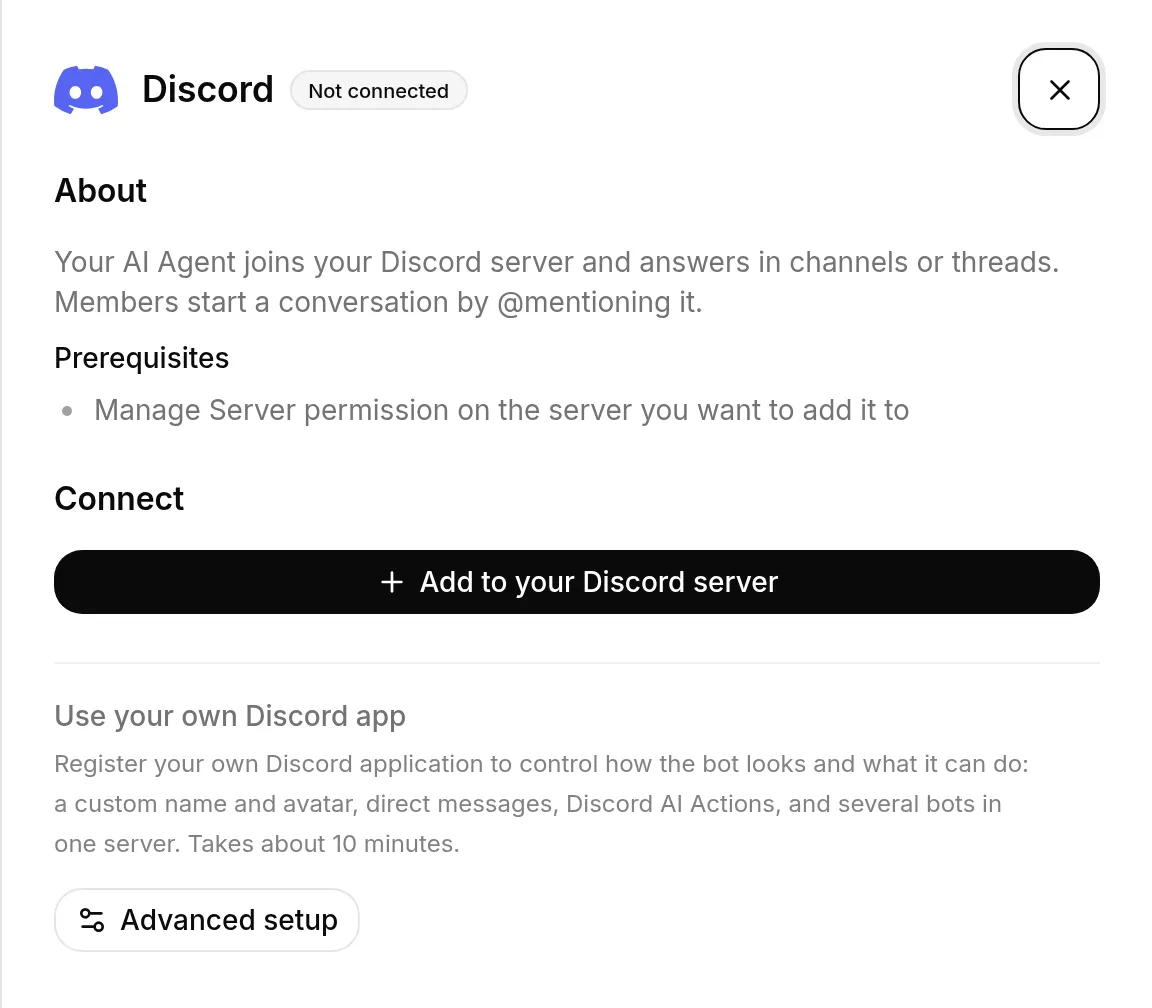
You are redirected to Discord to authorize the shared Quickchat AI app. Pick the server you want and click Authorize. Quickchat applies the name you chose before the bot posts its one-time introduction: “Ready! @mention me or use /ask to chat. Powered by Quickchat AI.” You are brought back to the dashboard, where the server shows as connected.
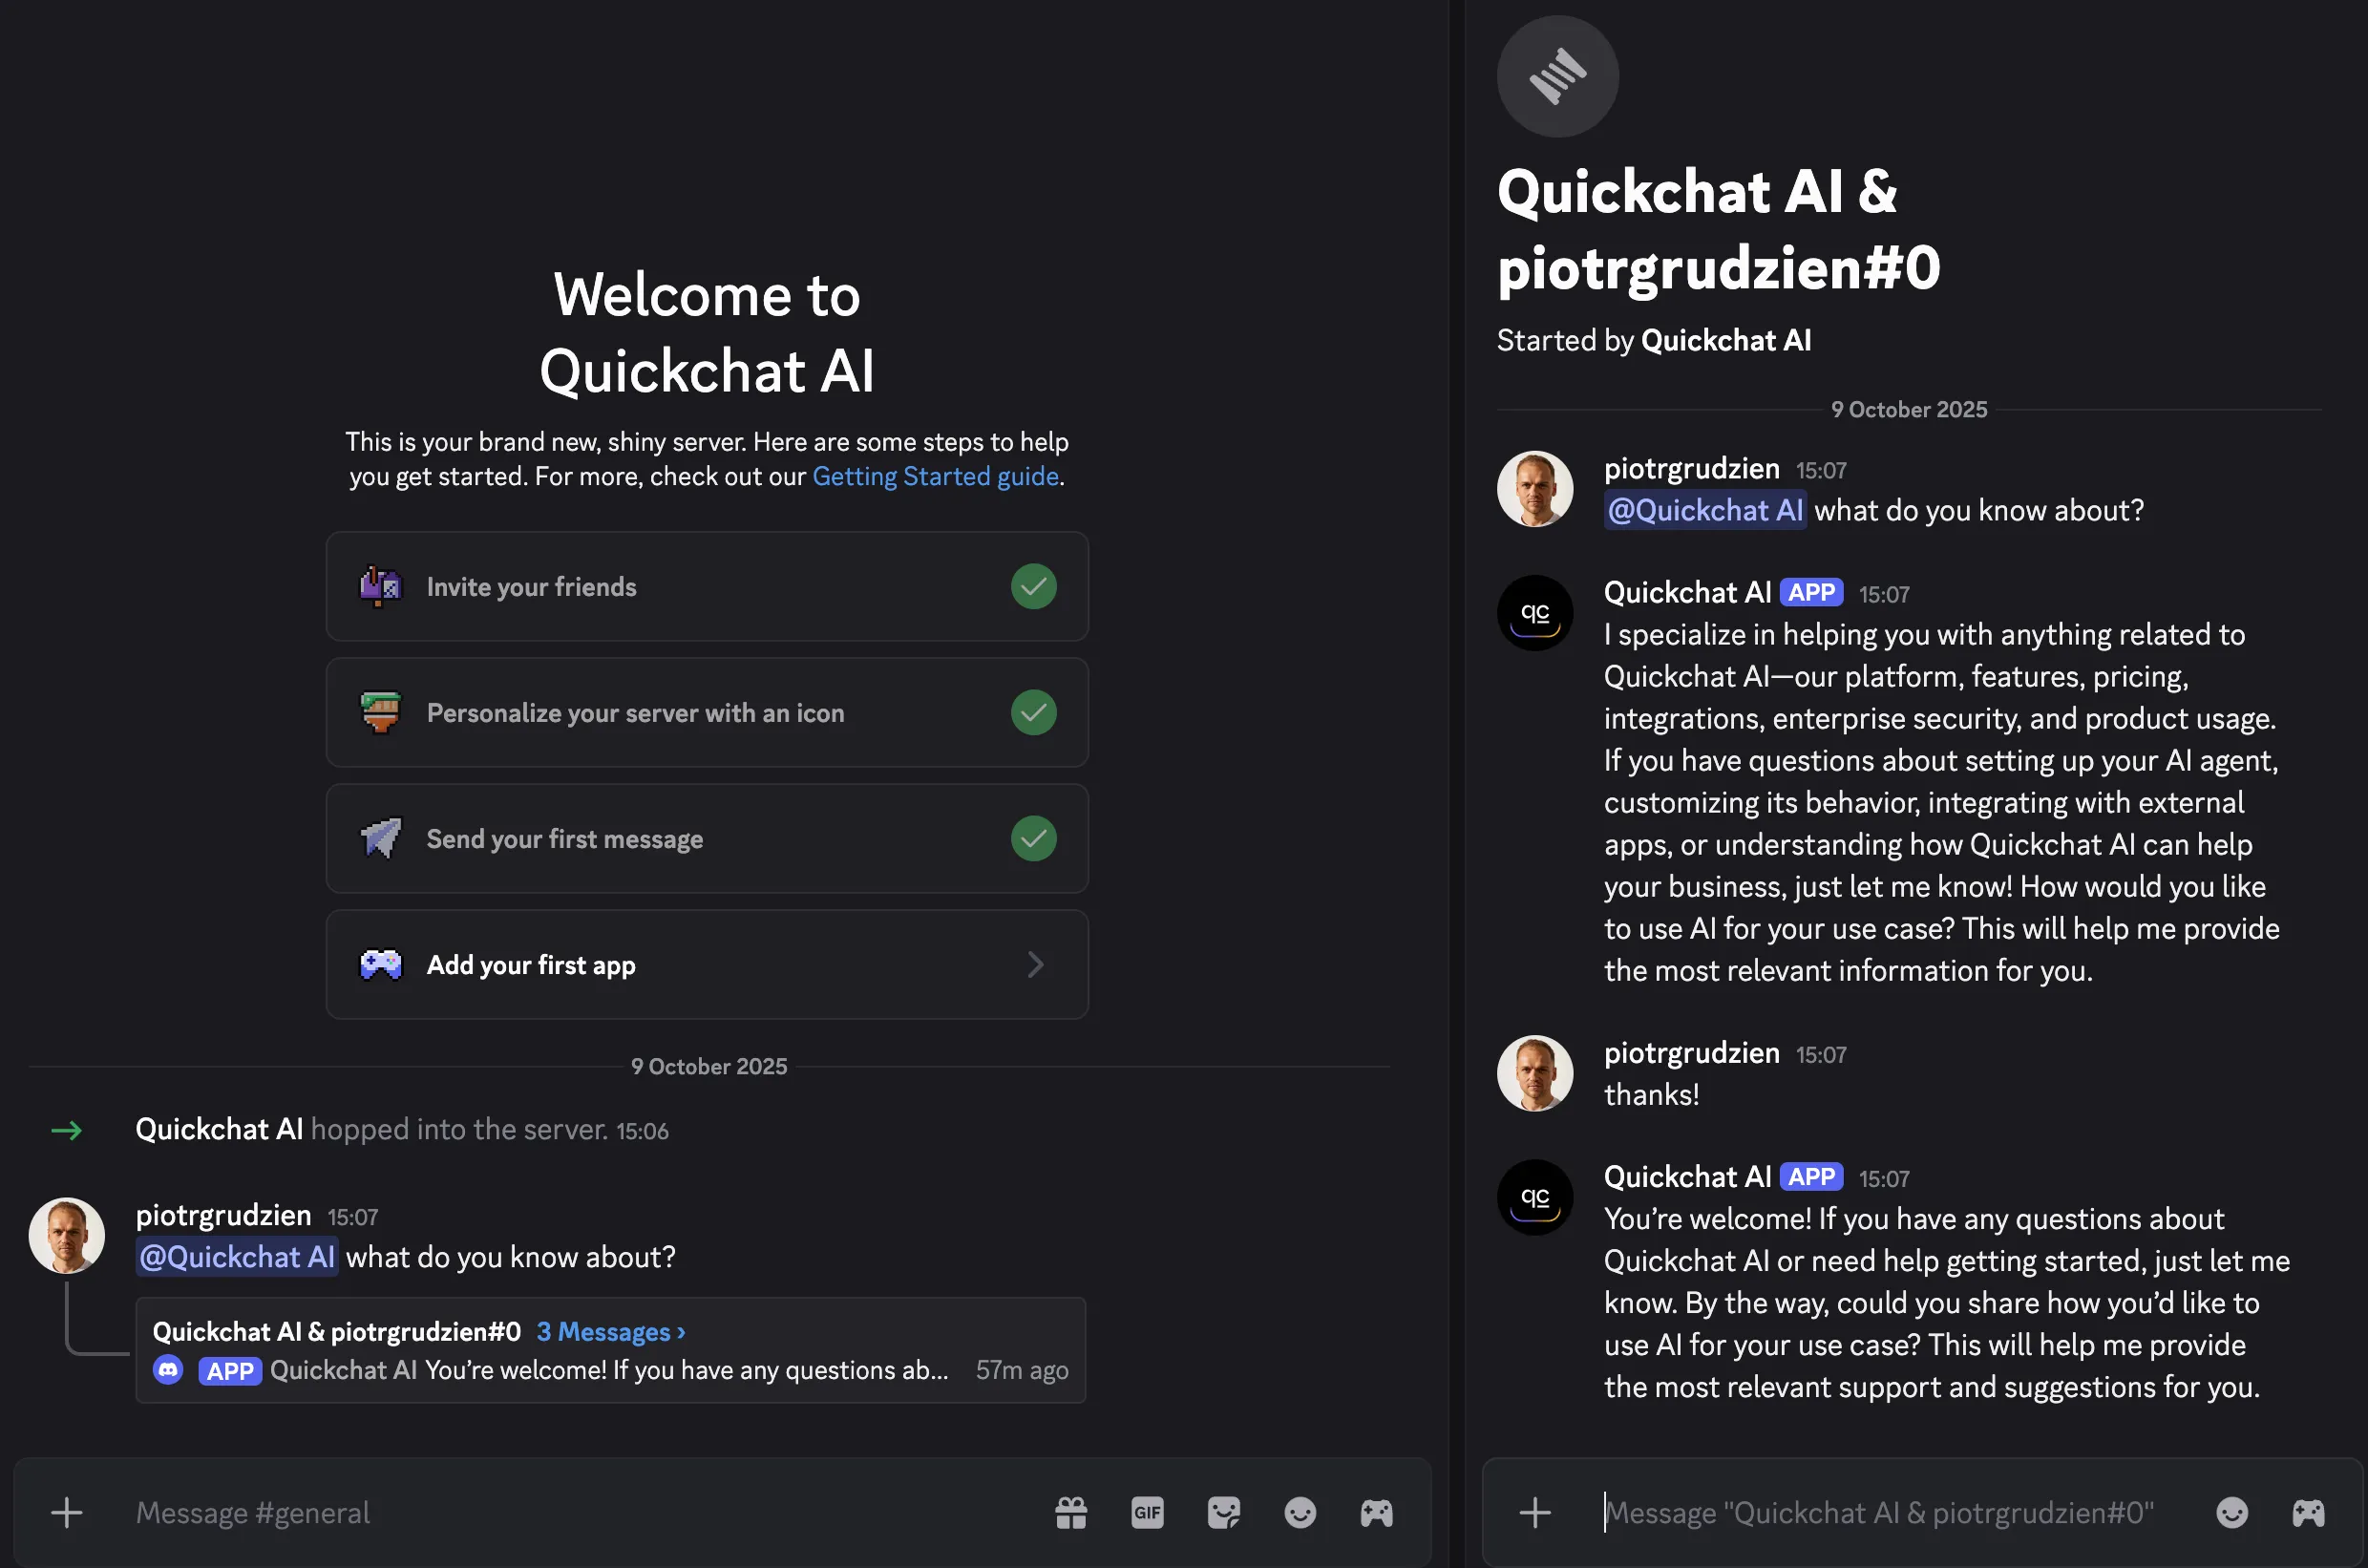
That’s it! 🎉 Your AI Agent is live on Discord. Members start a conversation by @mentioning it in a channel, and it replies in channels or threads.
New Quickchat AI signups get a Discord-branded setup that drops them straight into this flow, so you may have connected your first server during onboarding.
How members talk to the bot
Section titled “How members talk to the bot”The bot does not reply to every message in a channel. It answers when it is @mentioned, when someone uses the /ask command, when someone replies to one of its messages, and inside threads it created. Everything else it ignores on purpose, so it stays quiet in a busy server.
This is worth telling your members, because a plain message that gets no answer looks like a broken bot rather than a bot waiting to be addressed.
/ask is often the easier one to discover: typing / in any channel lists “Ask the Quickchat AI agent a question”, and it works where message content is restricted. It is available on the one-click bot only, so if you run your own Discord app, use @mentions.
Message allowance
Section titled “Message allowance”Every reply is generated by a language model and counts against your plan’s AI message allowance. A busy server gets through a free allowance quickly, and once it runs out the bot says so in the channel instead of answering. The allowance resets each month.
Managing your servers
Section titled “Managing your servers”The Discord page lists every server the shared bot is active in under Connected servers. From there you can:
- Change the bot’s name later. Enter up to 32 characters under Bot name in this server, then click Apply. Clear it and click Apply to restore the shared Quickchat AI name.
- Add to another server with the same one-click flow. Review Bot name in the new server before authorizing, so one AI Agent can use a different name in each server.
- Remove the bot from a server. It leaves that server and stops replying, and you can add it again anytime.
A Discord server can be connected to one AI Agent at a time. If you see “This Discord server is already connected to another AI Agent,” remove it from that Agent first, or choose a different server.
If Discord connects but does not apply the bot name, use Apply on that connected server to retry. If Discord reports a permission problem, click Add to another server, choose the same server, and authorize it again. This updates the bot’s permissions in place, so you do not need to remove it first.
When to use your own Discord app
Section titled “When to use your own Discord app”The one-click bot uses the shared Quickchat AI application and avatar, but you can give it a different name in every connected server. Set up your own Discord app (see below) when you want:
- A custom bot avatar
- Direct messages
- Discord AI Actions. The shared bot does not expose its token as the
{{discord_bot_token}}System Token that these Actions need, so they require your own app. - Several bots on one server
The shared bot and your own bot can run side by side. Your own app only takes over a server once you remove the shared bot from that server.
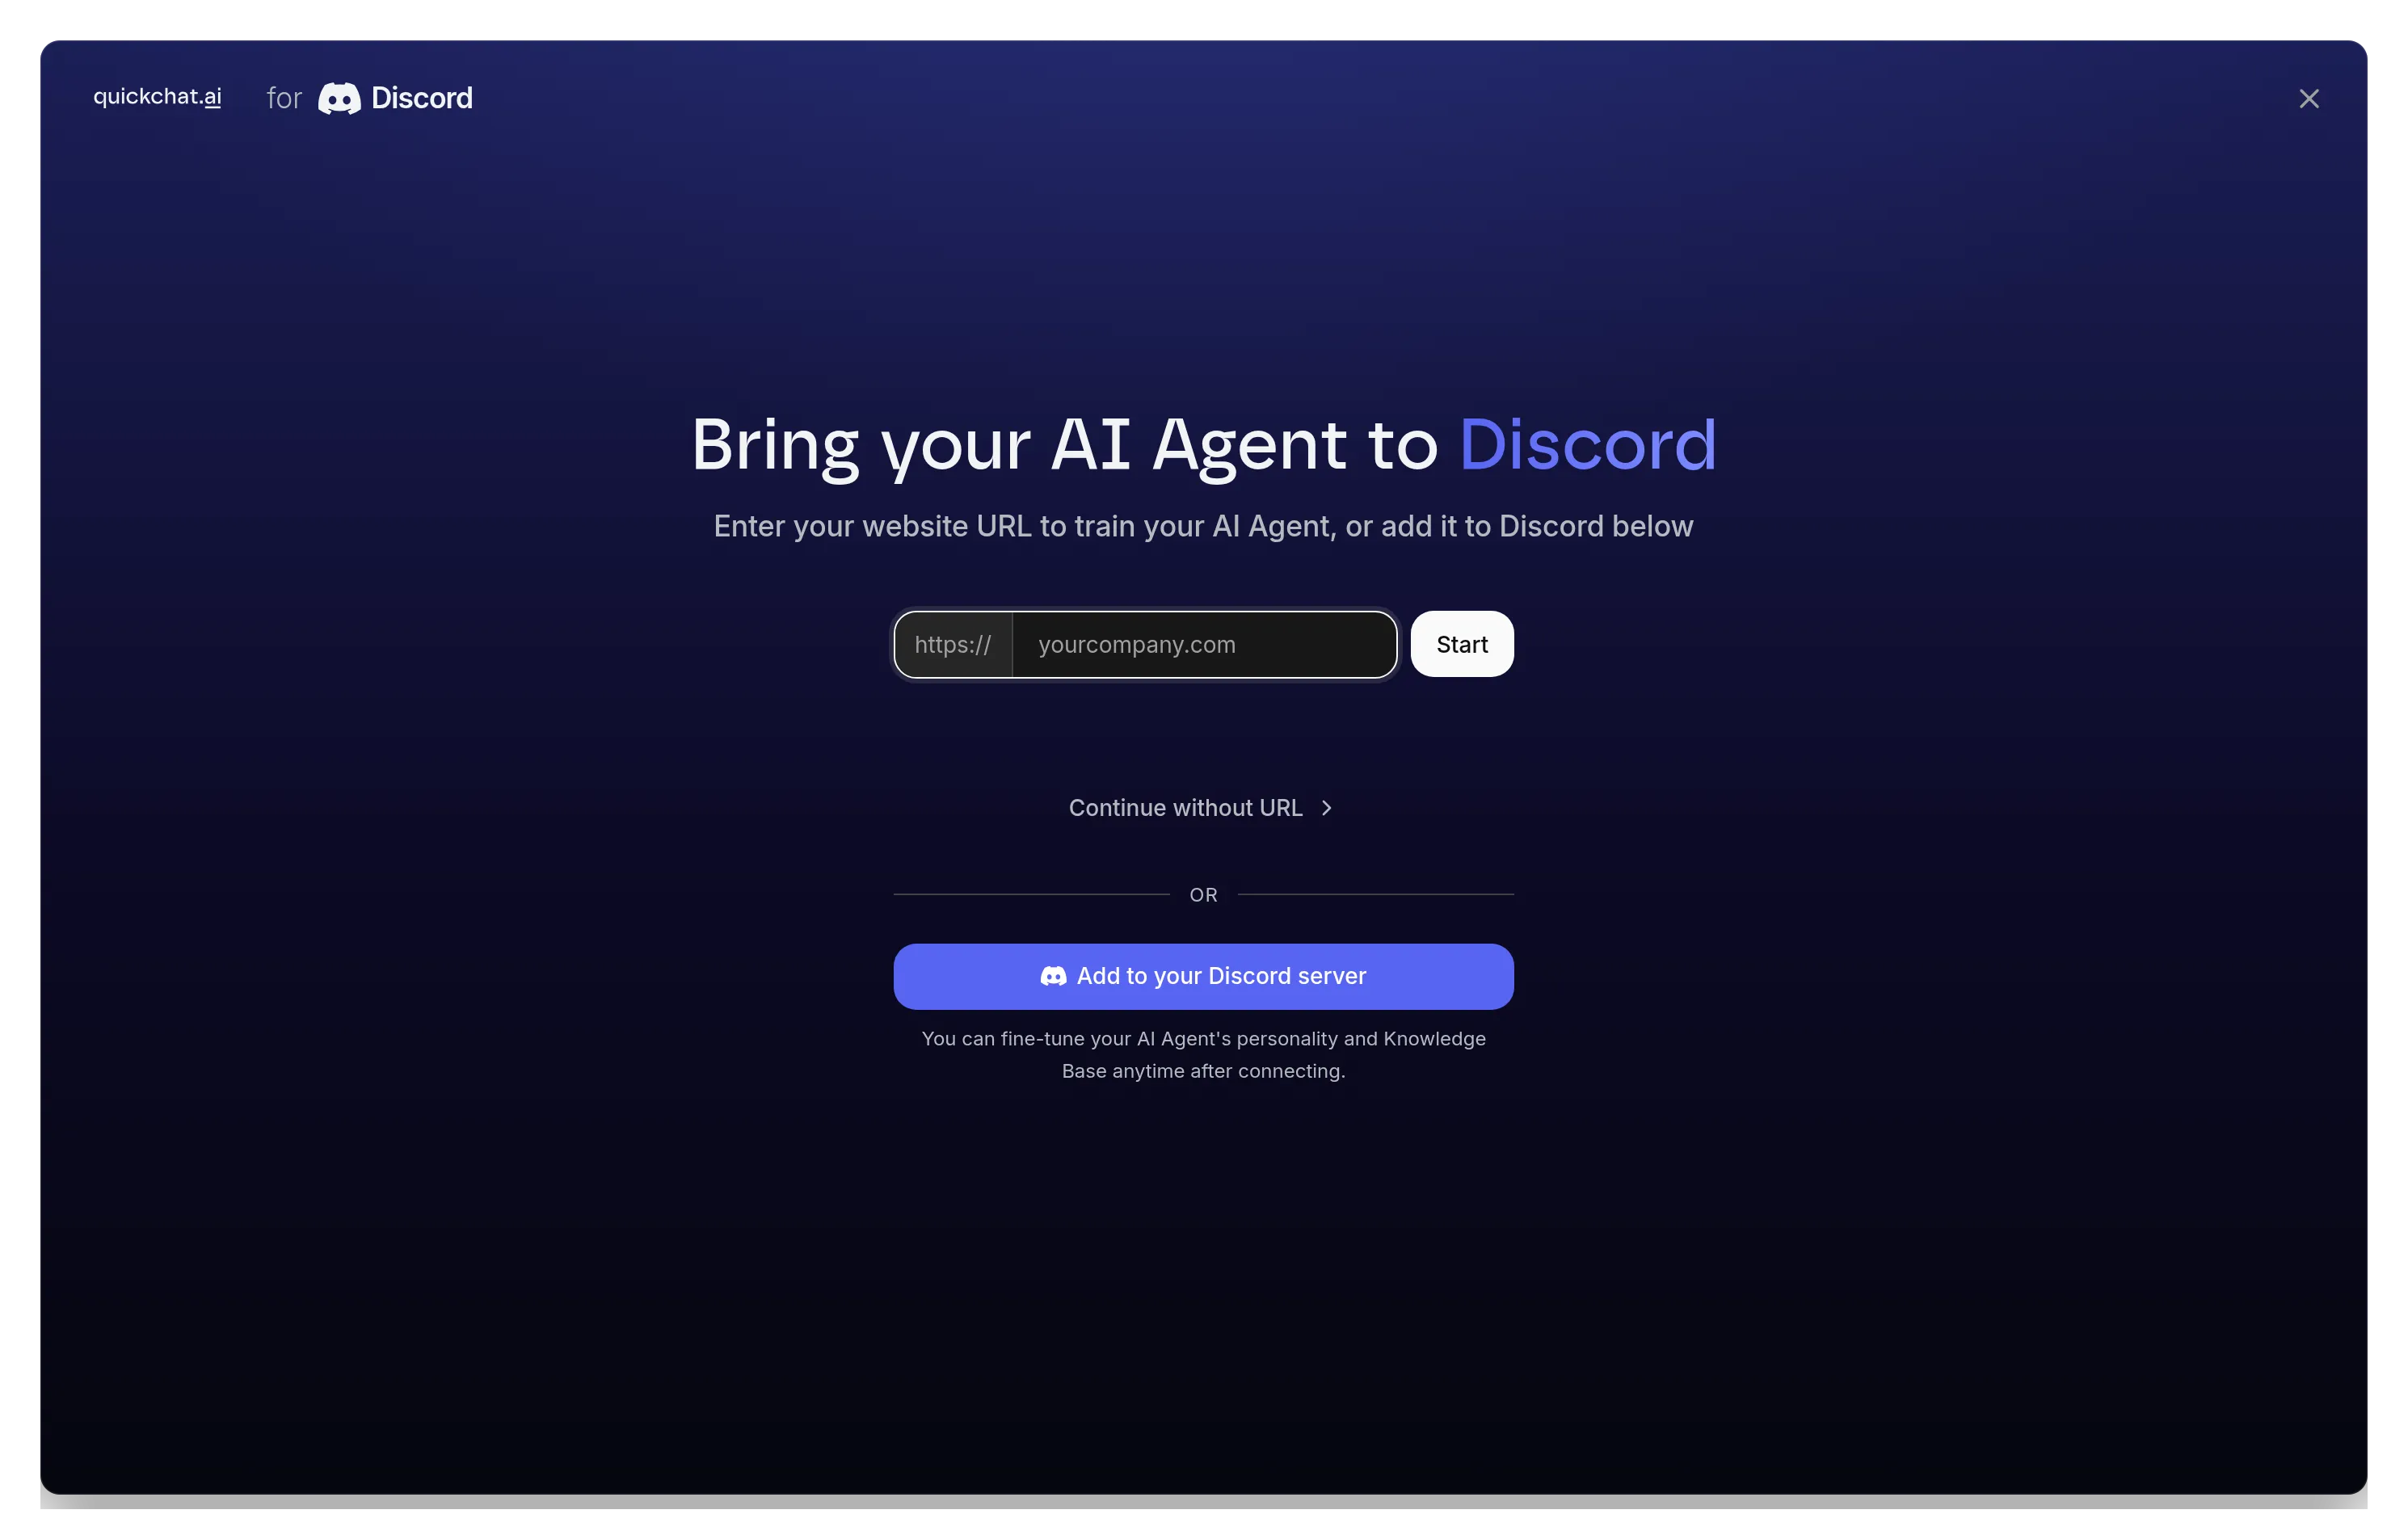
Use your own Discord app (Advanced setup)
Section titled “Use your own Discord app (Advanced setup)”This is the advanced path, and it takes about 10 minutes. In the dashboard, open External Apps → Discord and open Use your own Discord app through the Advanced setup link. You create your own Discord application, add it to your server, and connect it to Quickchat AI with a bot token.
Create a Discord Server
Section titled “Create a Discord Server”To initiate the integration process, you’ll need a Discord Server. If you don’t have a Discord account, visit discord.com and create one. Once logged in, follow this guide to create your Discord server.
Create a Discord Application
Section titled “Create a Discord Application”Go to discord.com/developers/applications while logged in to your Discord account and create a new application.
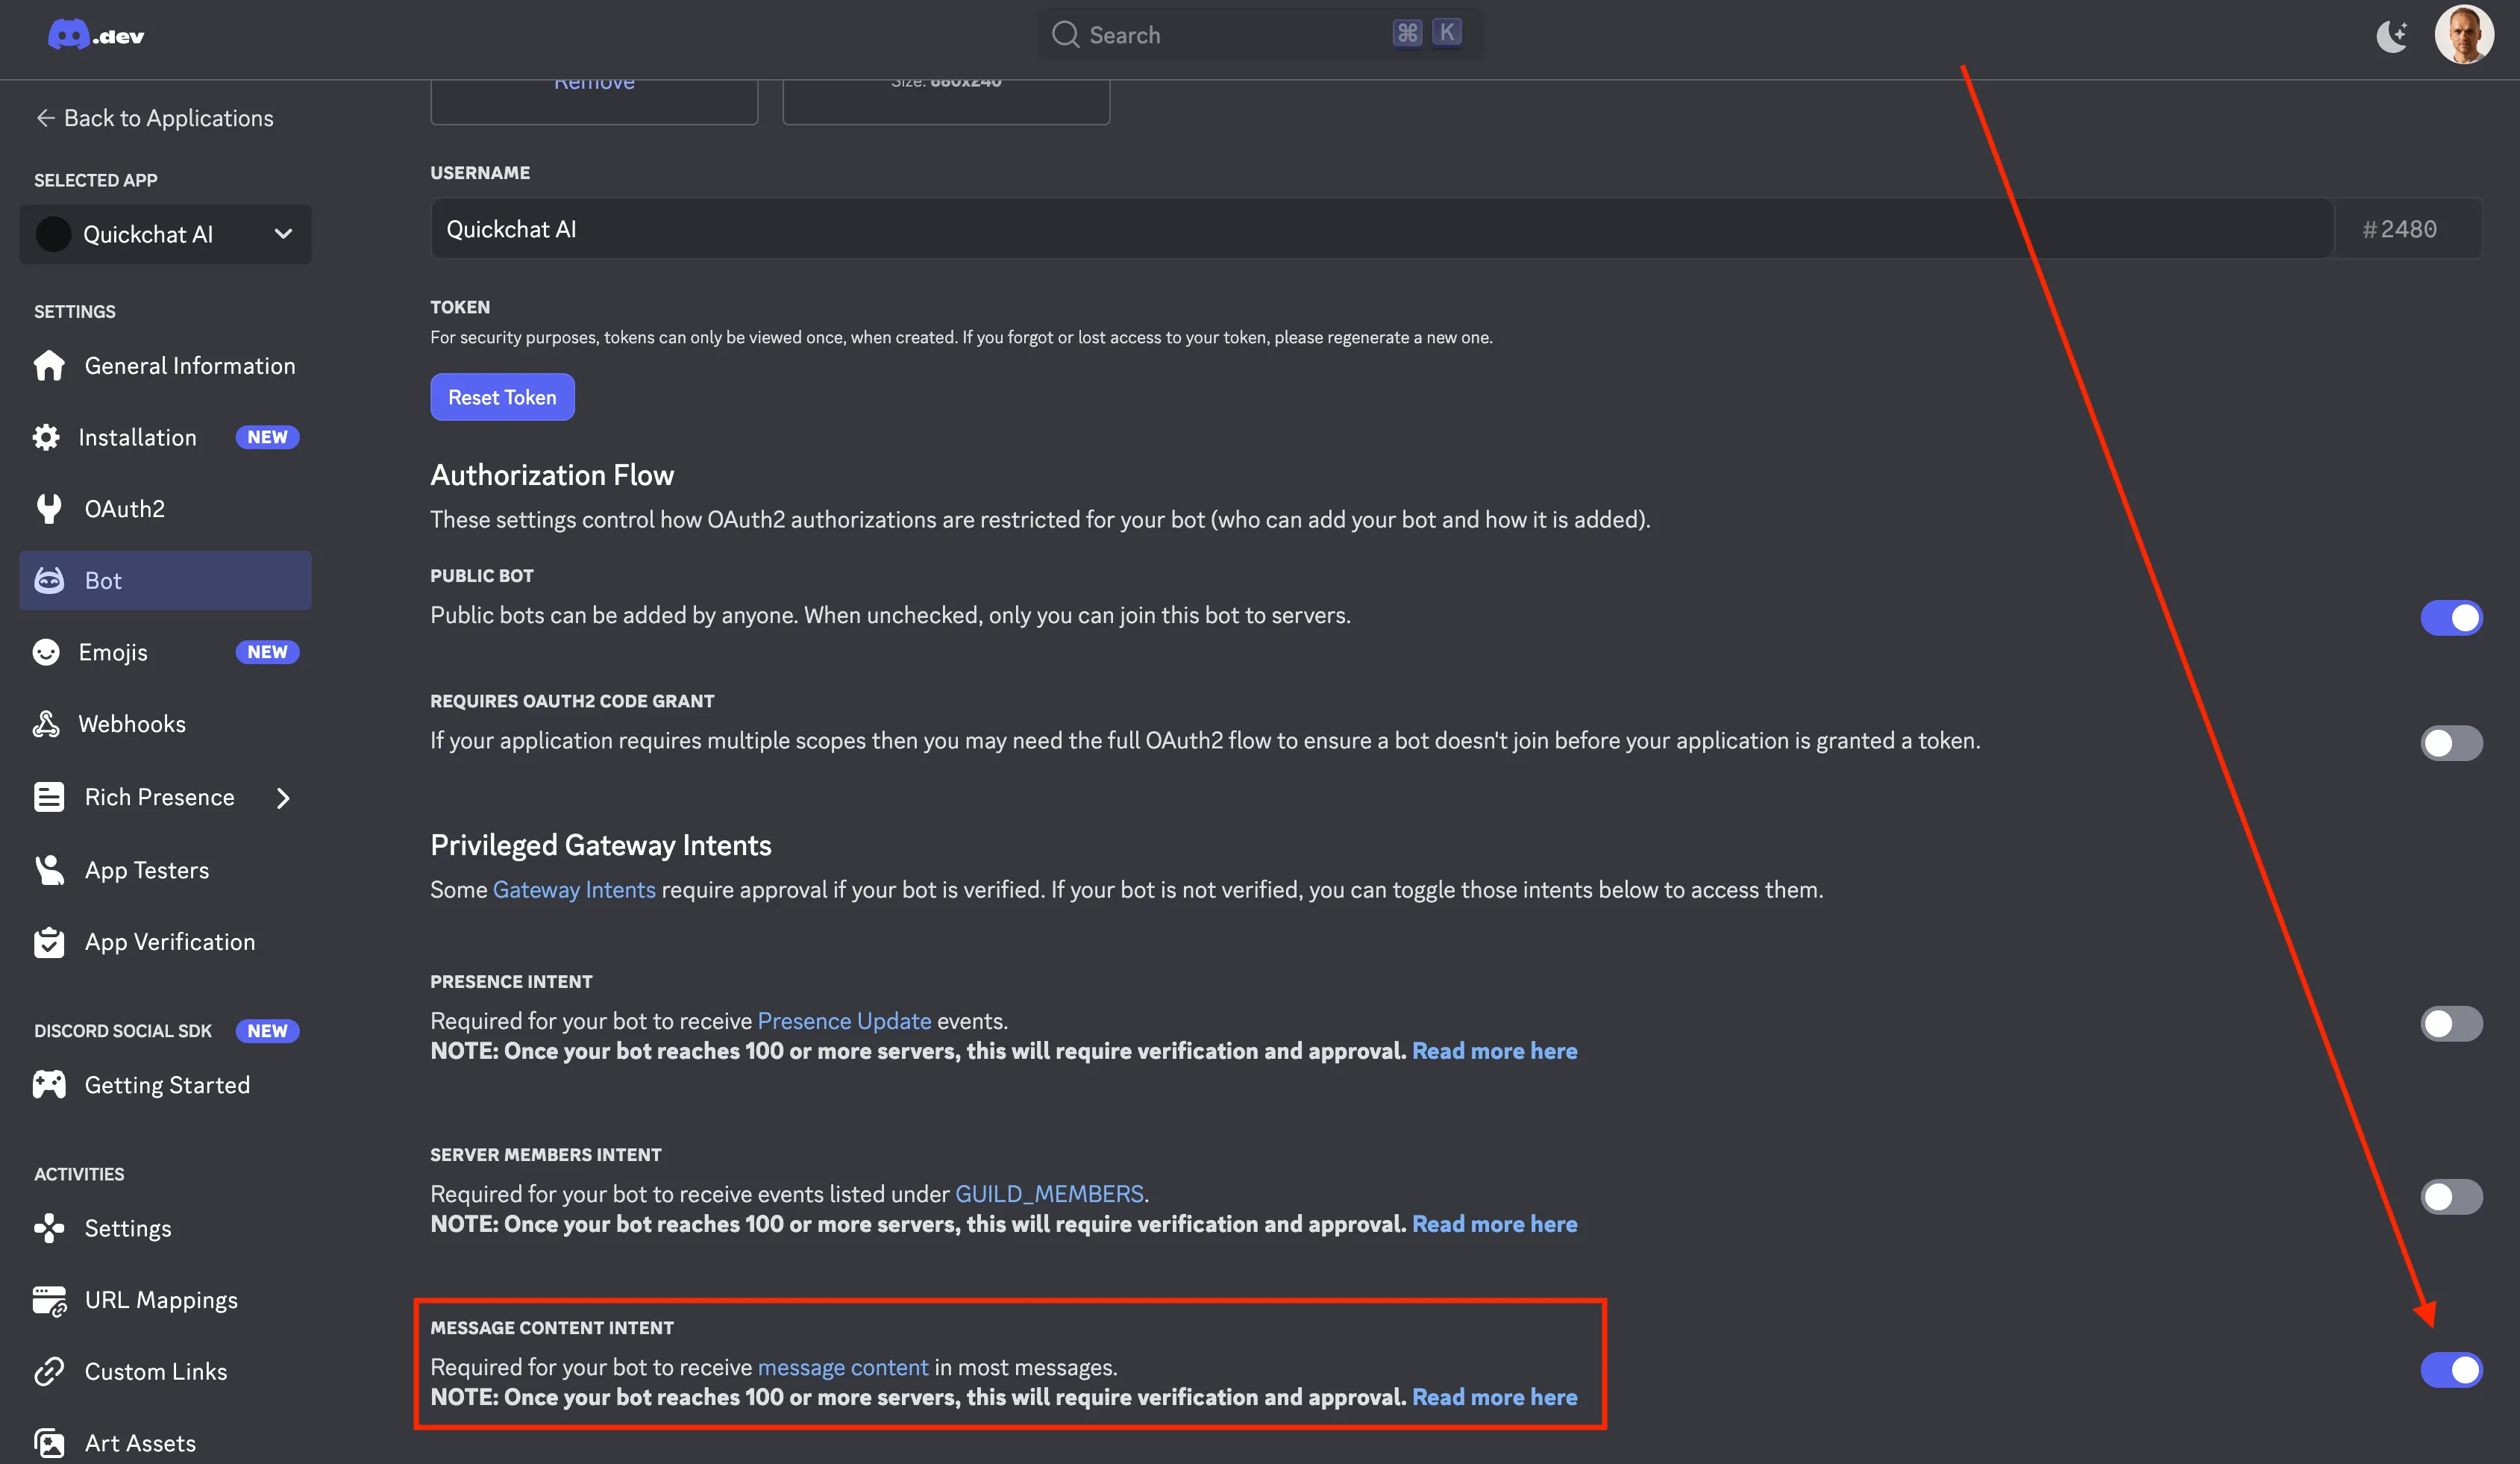
Configure Your Discord Application
Section titled “Configure Your Discord Application”Before adding your bot to the server, enable the Message Content Intent for your application. This allows your bot to read messages sent by users on your server.
Add the Bot to Your Discord Server
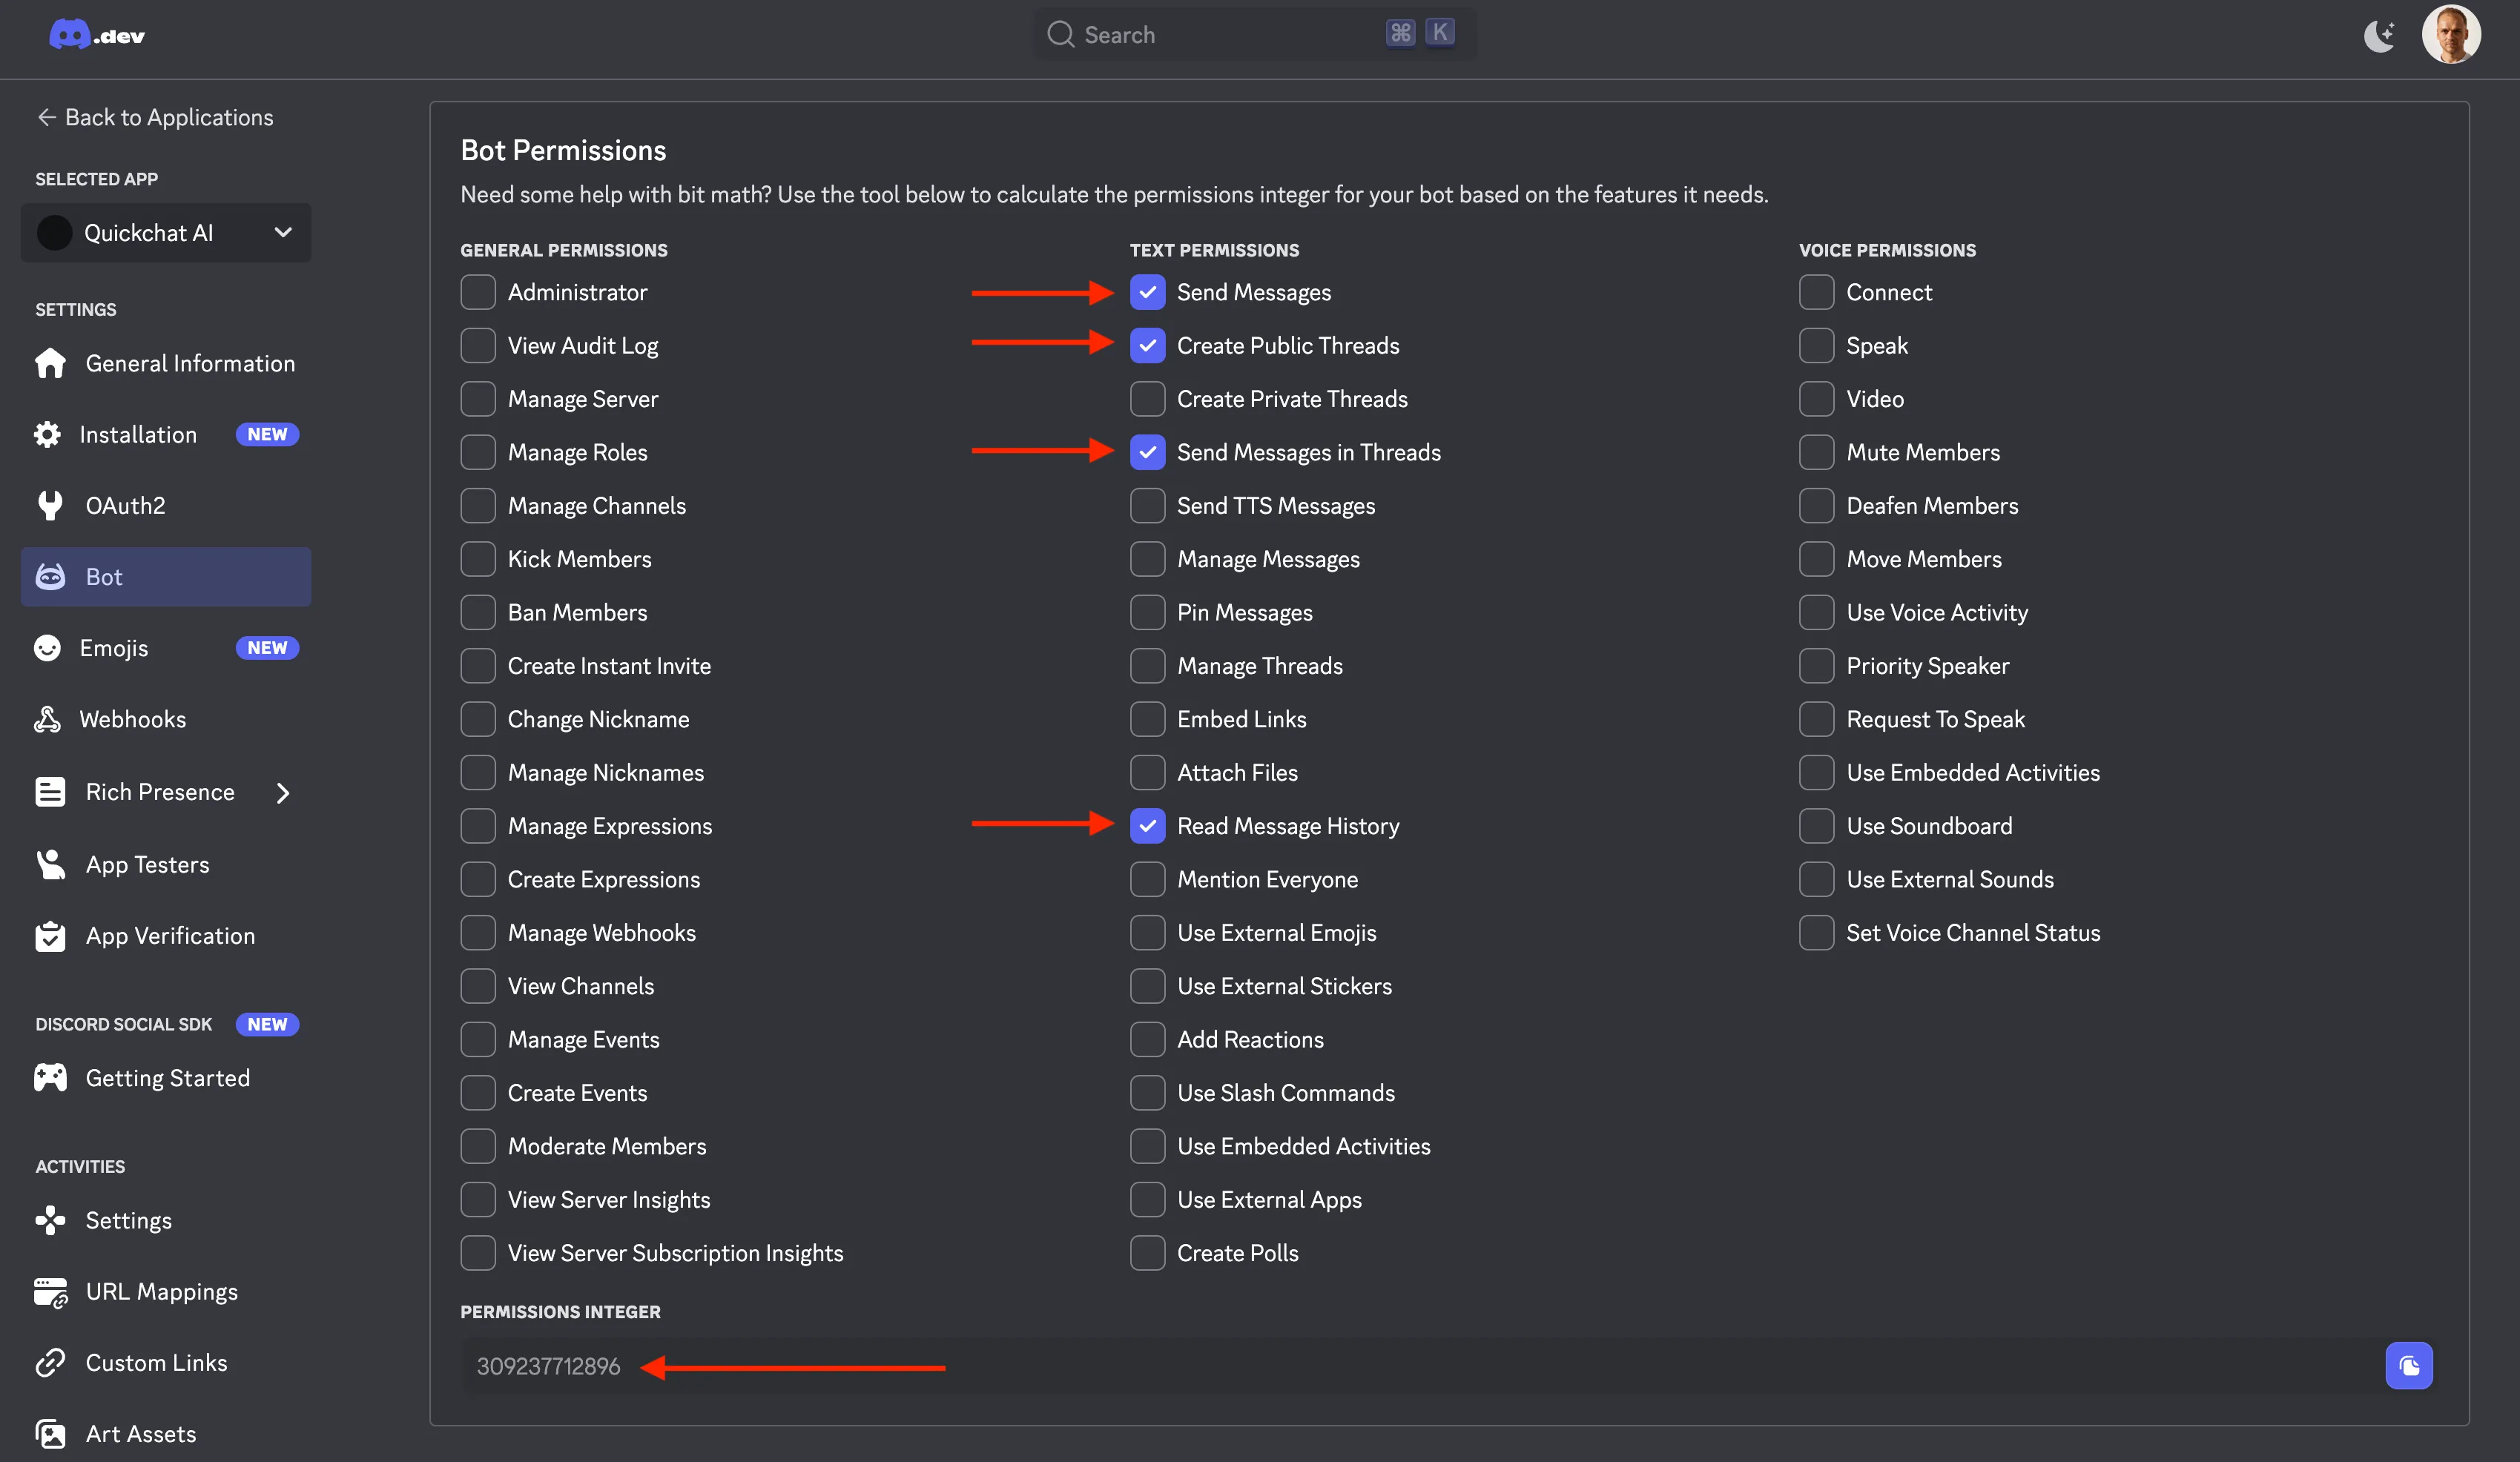
Section titled “Add the Bot to Your Discord Server”Now you need to add your bot to your server. The way to do it is to construct a Discord URL and paste it into your browser:
https://discord.com/api/oauth2/authorize?client_id=<YOUR CLIENT ID>&permissions=309237712896&scope=botWhere does the permissions number come from?
The permissions number (309237712896) comes from requesting the following permissions:
Send MessagesCreate Public ThreadsSend Messages in ThreadsRead Message History
Those are the minimal set of permissions required for your bot to operate correctly. You can see it for yourself by going to discord.com/developers/applications, selecting your application, clicking on Bot on the left and scrolling down:
Where to find YOUR CLIENT ID?
The easiest way will be to look at the address bar in your browser and copy the long number which is part of the address:
https://discord.com/developers/applications/<YOUR CLIENT ID>/bot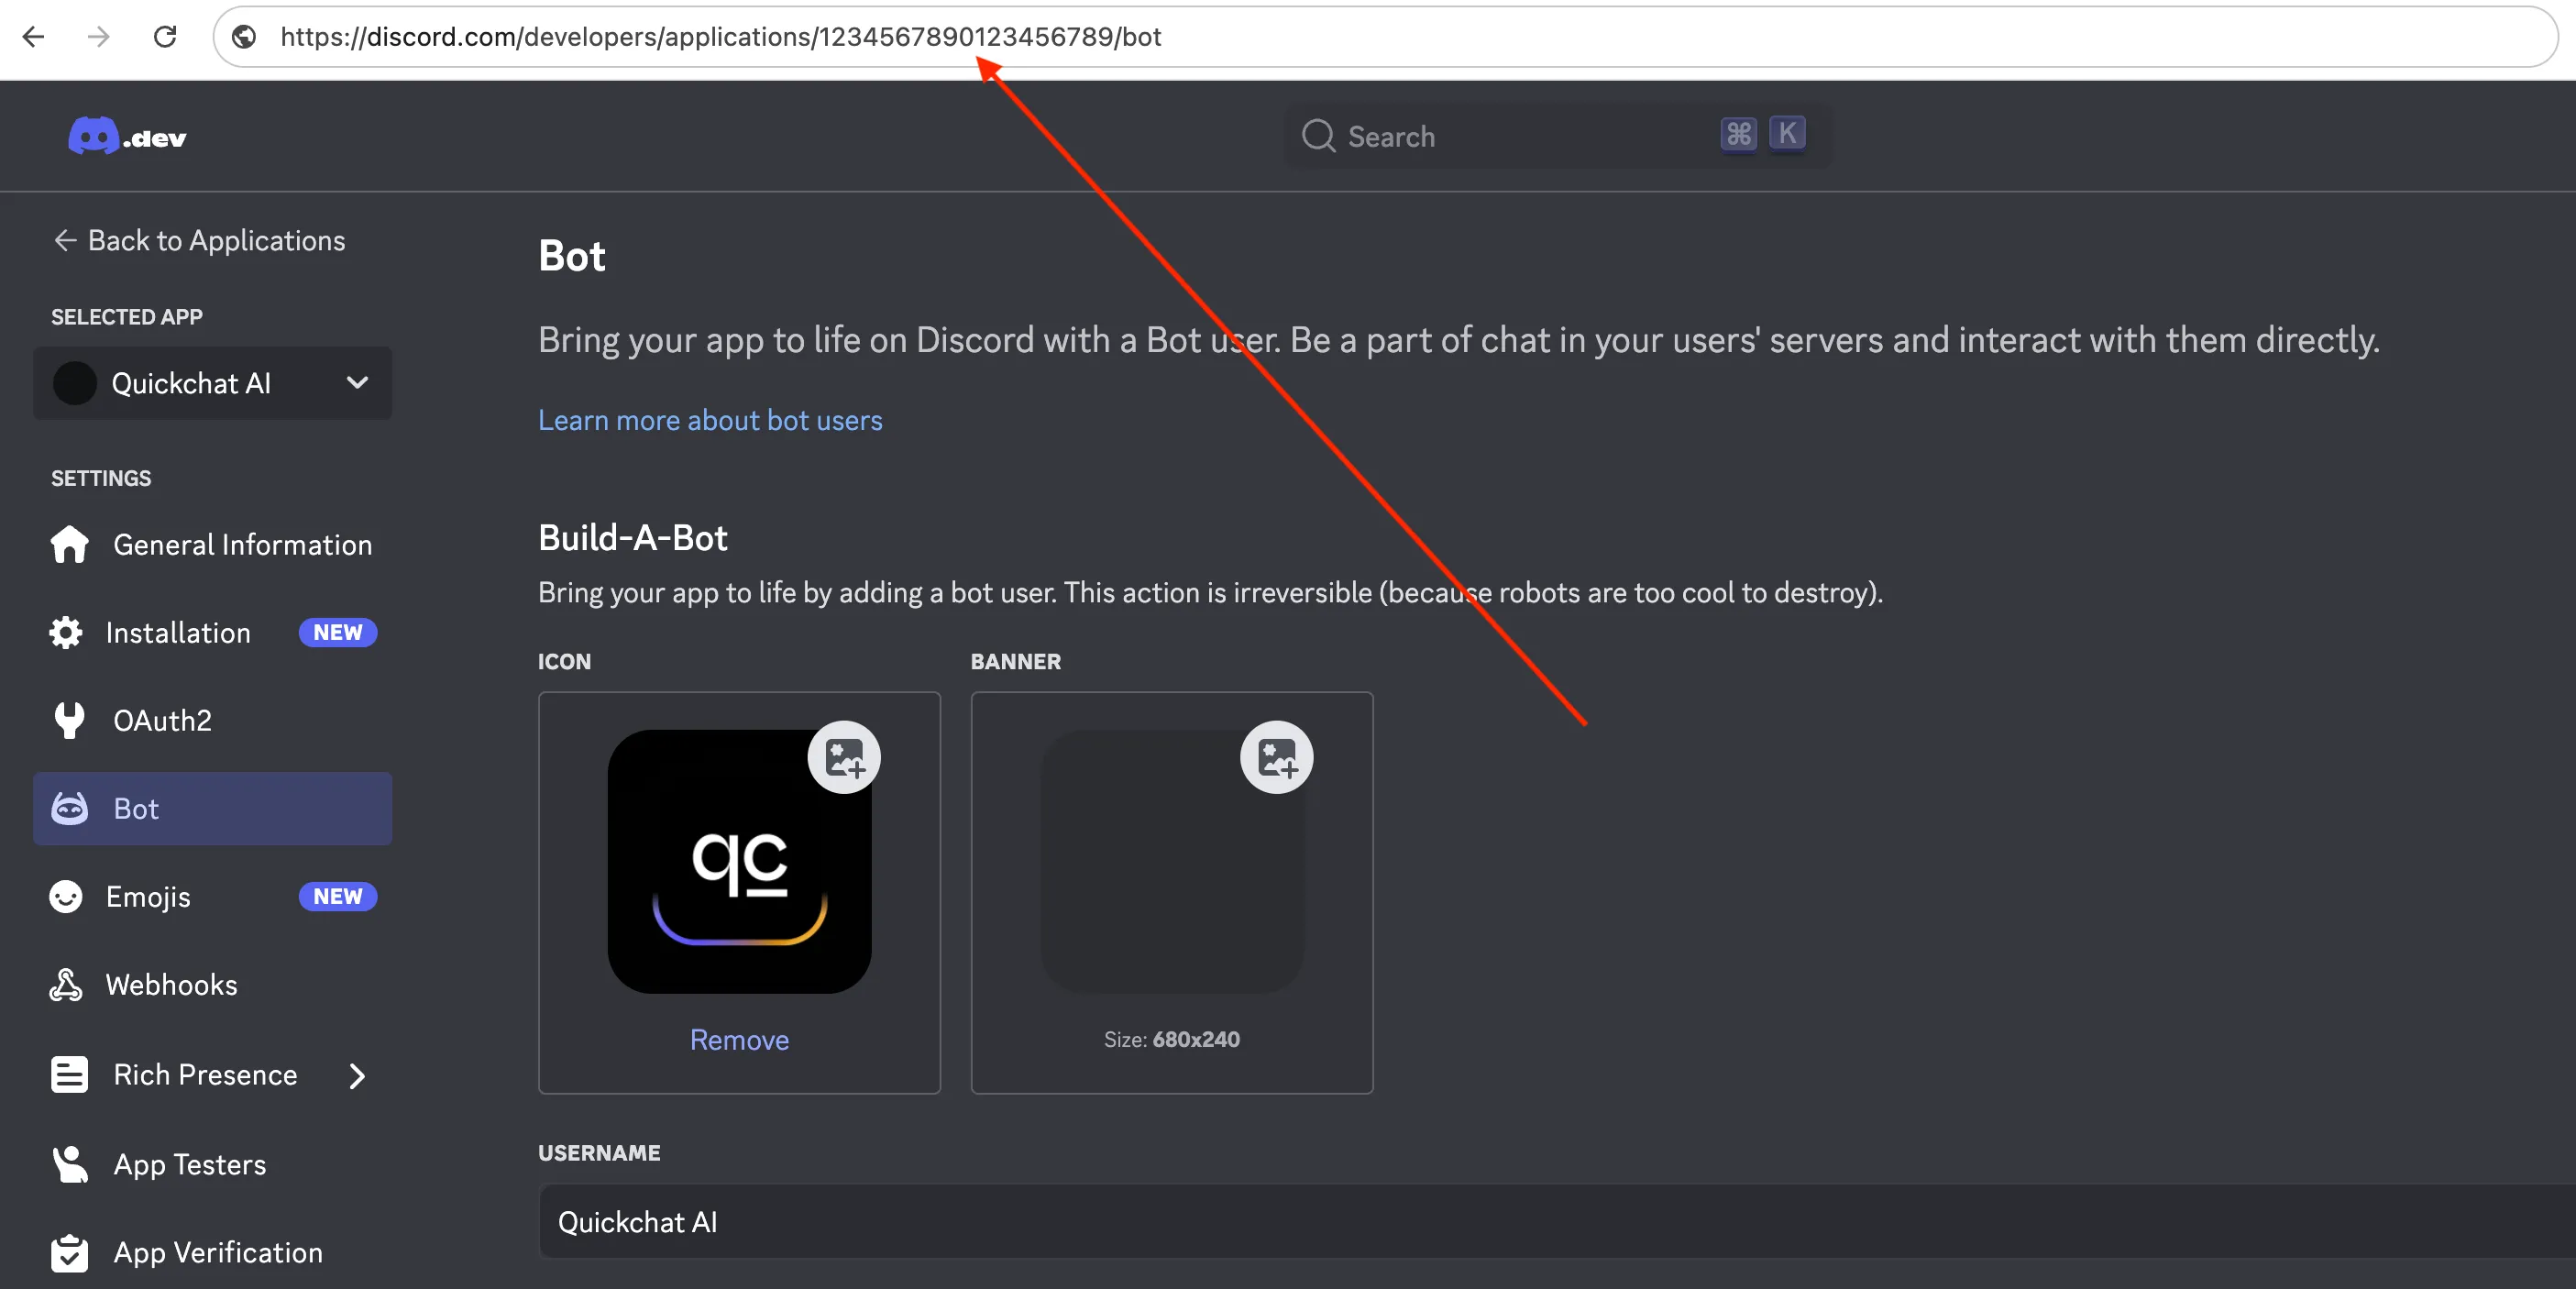
In this case the client id is 1234567890123456789 which means that the full URL you need to go to to add the server will be:
https://discord.com/api/oauth2/authorize?client_id=1234567890123456789&permissions=309237712896&scope=botConnect Your Own Bot to Quickchat AI
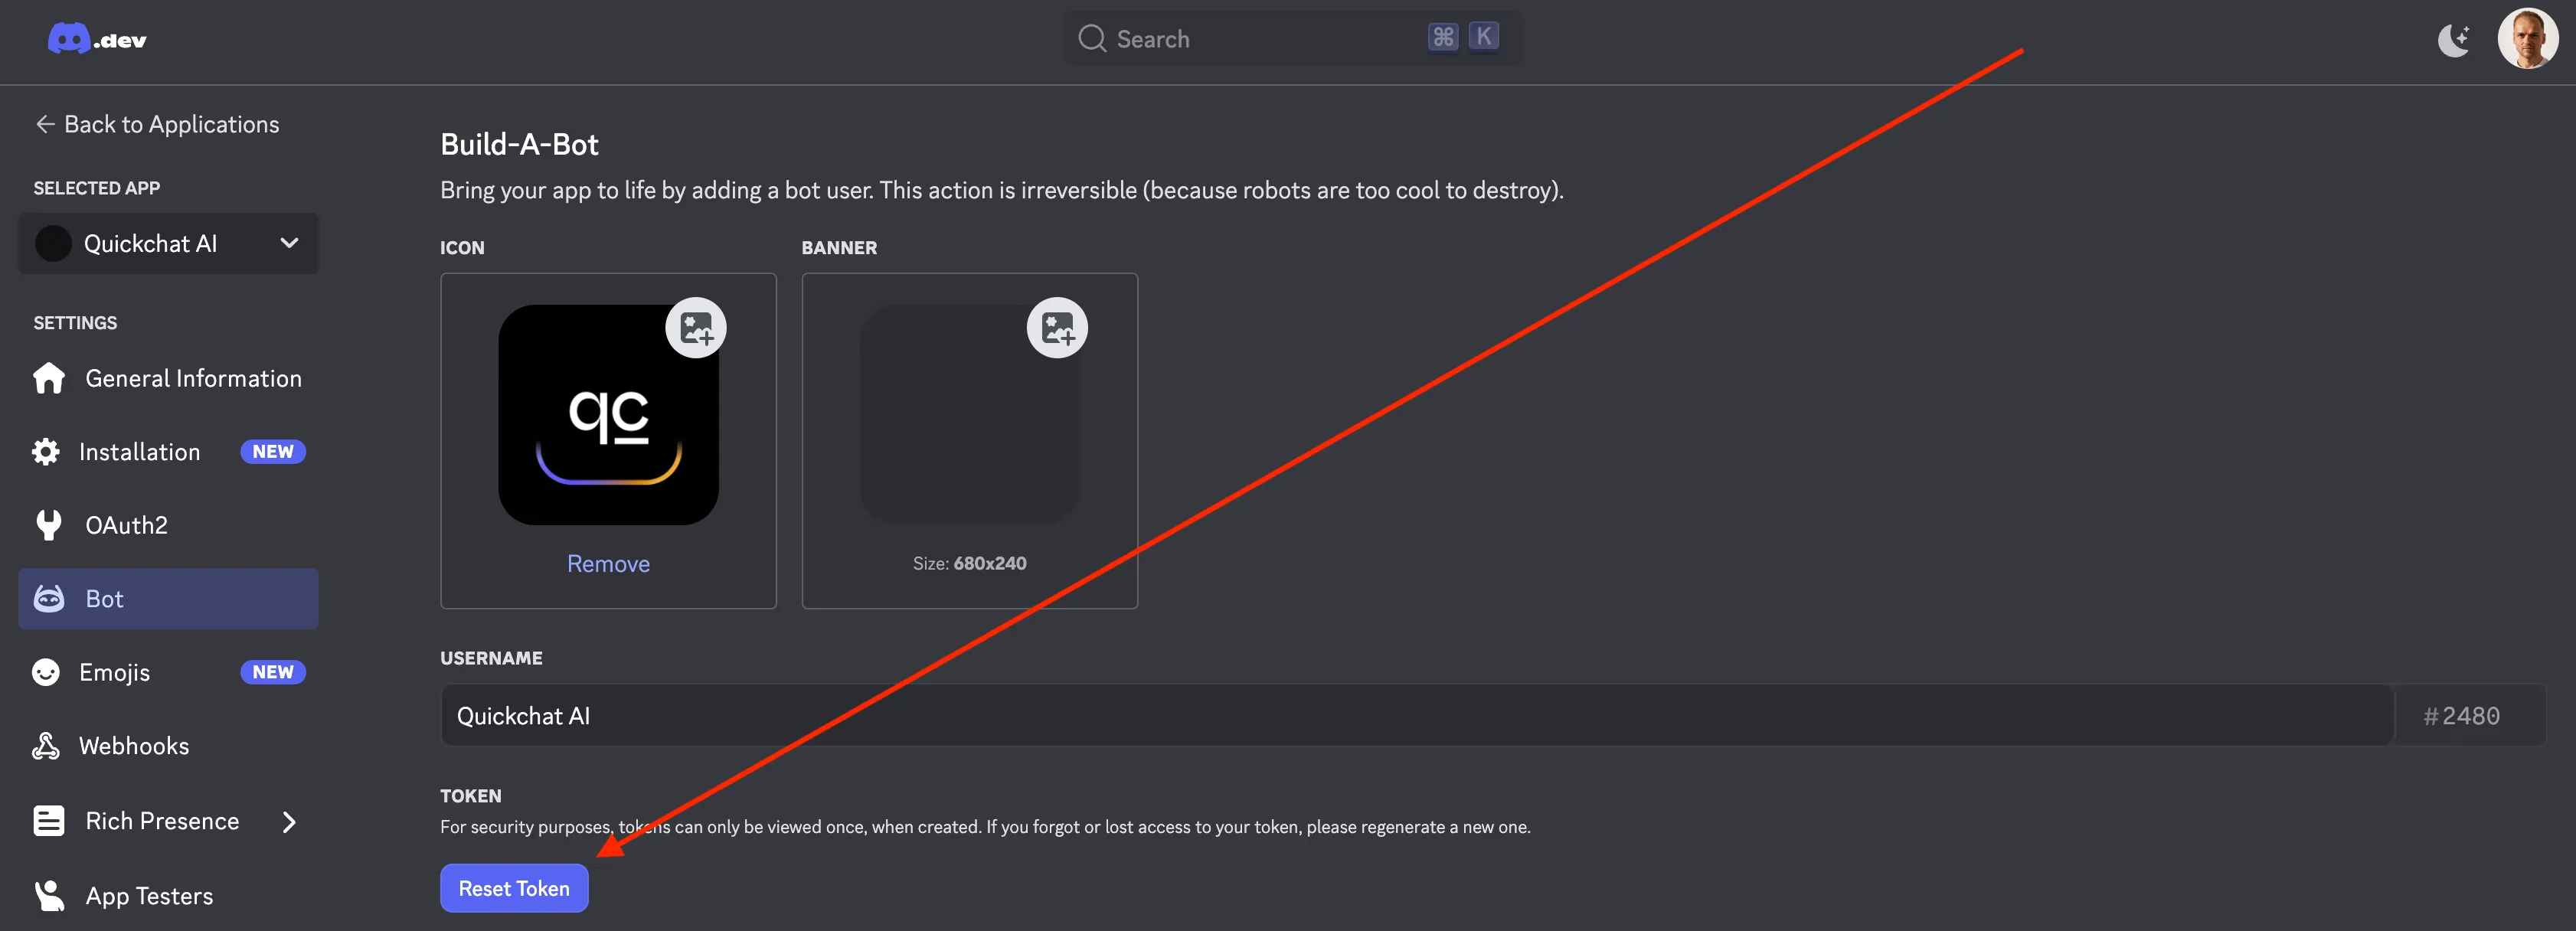
Section titled “Connect Your Own Bot to Quickchat AI”To connect your bot with Quickchat AI, retrieve your Discord Bot Token from the Developer Portal.
- Go to Bot Settings → Reset Token → Copy Token
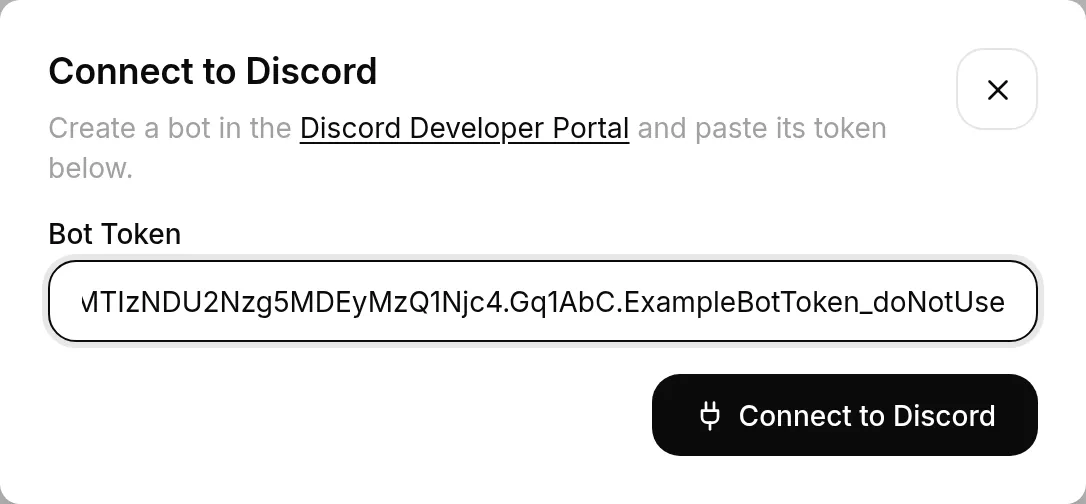
- In the Quickchat AI Dashboard, open External Apps → Discord, choose Use your own Discord app through Advanced setup, and paste your token. Quickchat AI turns the bot on and reports its status as it starts up.
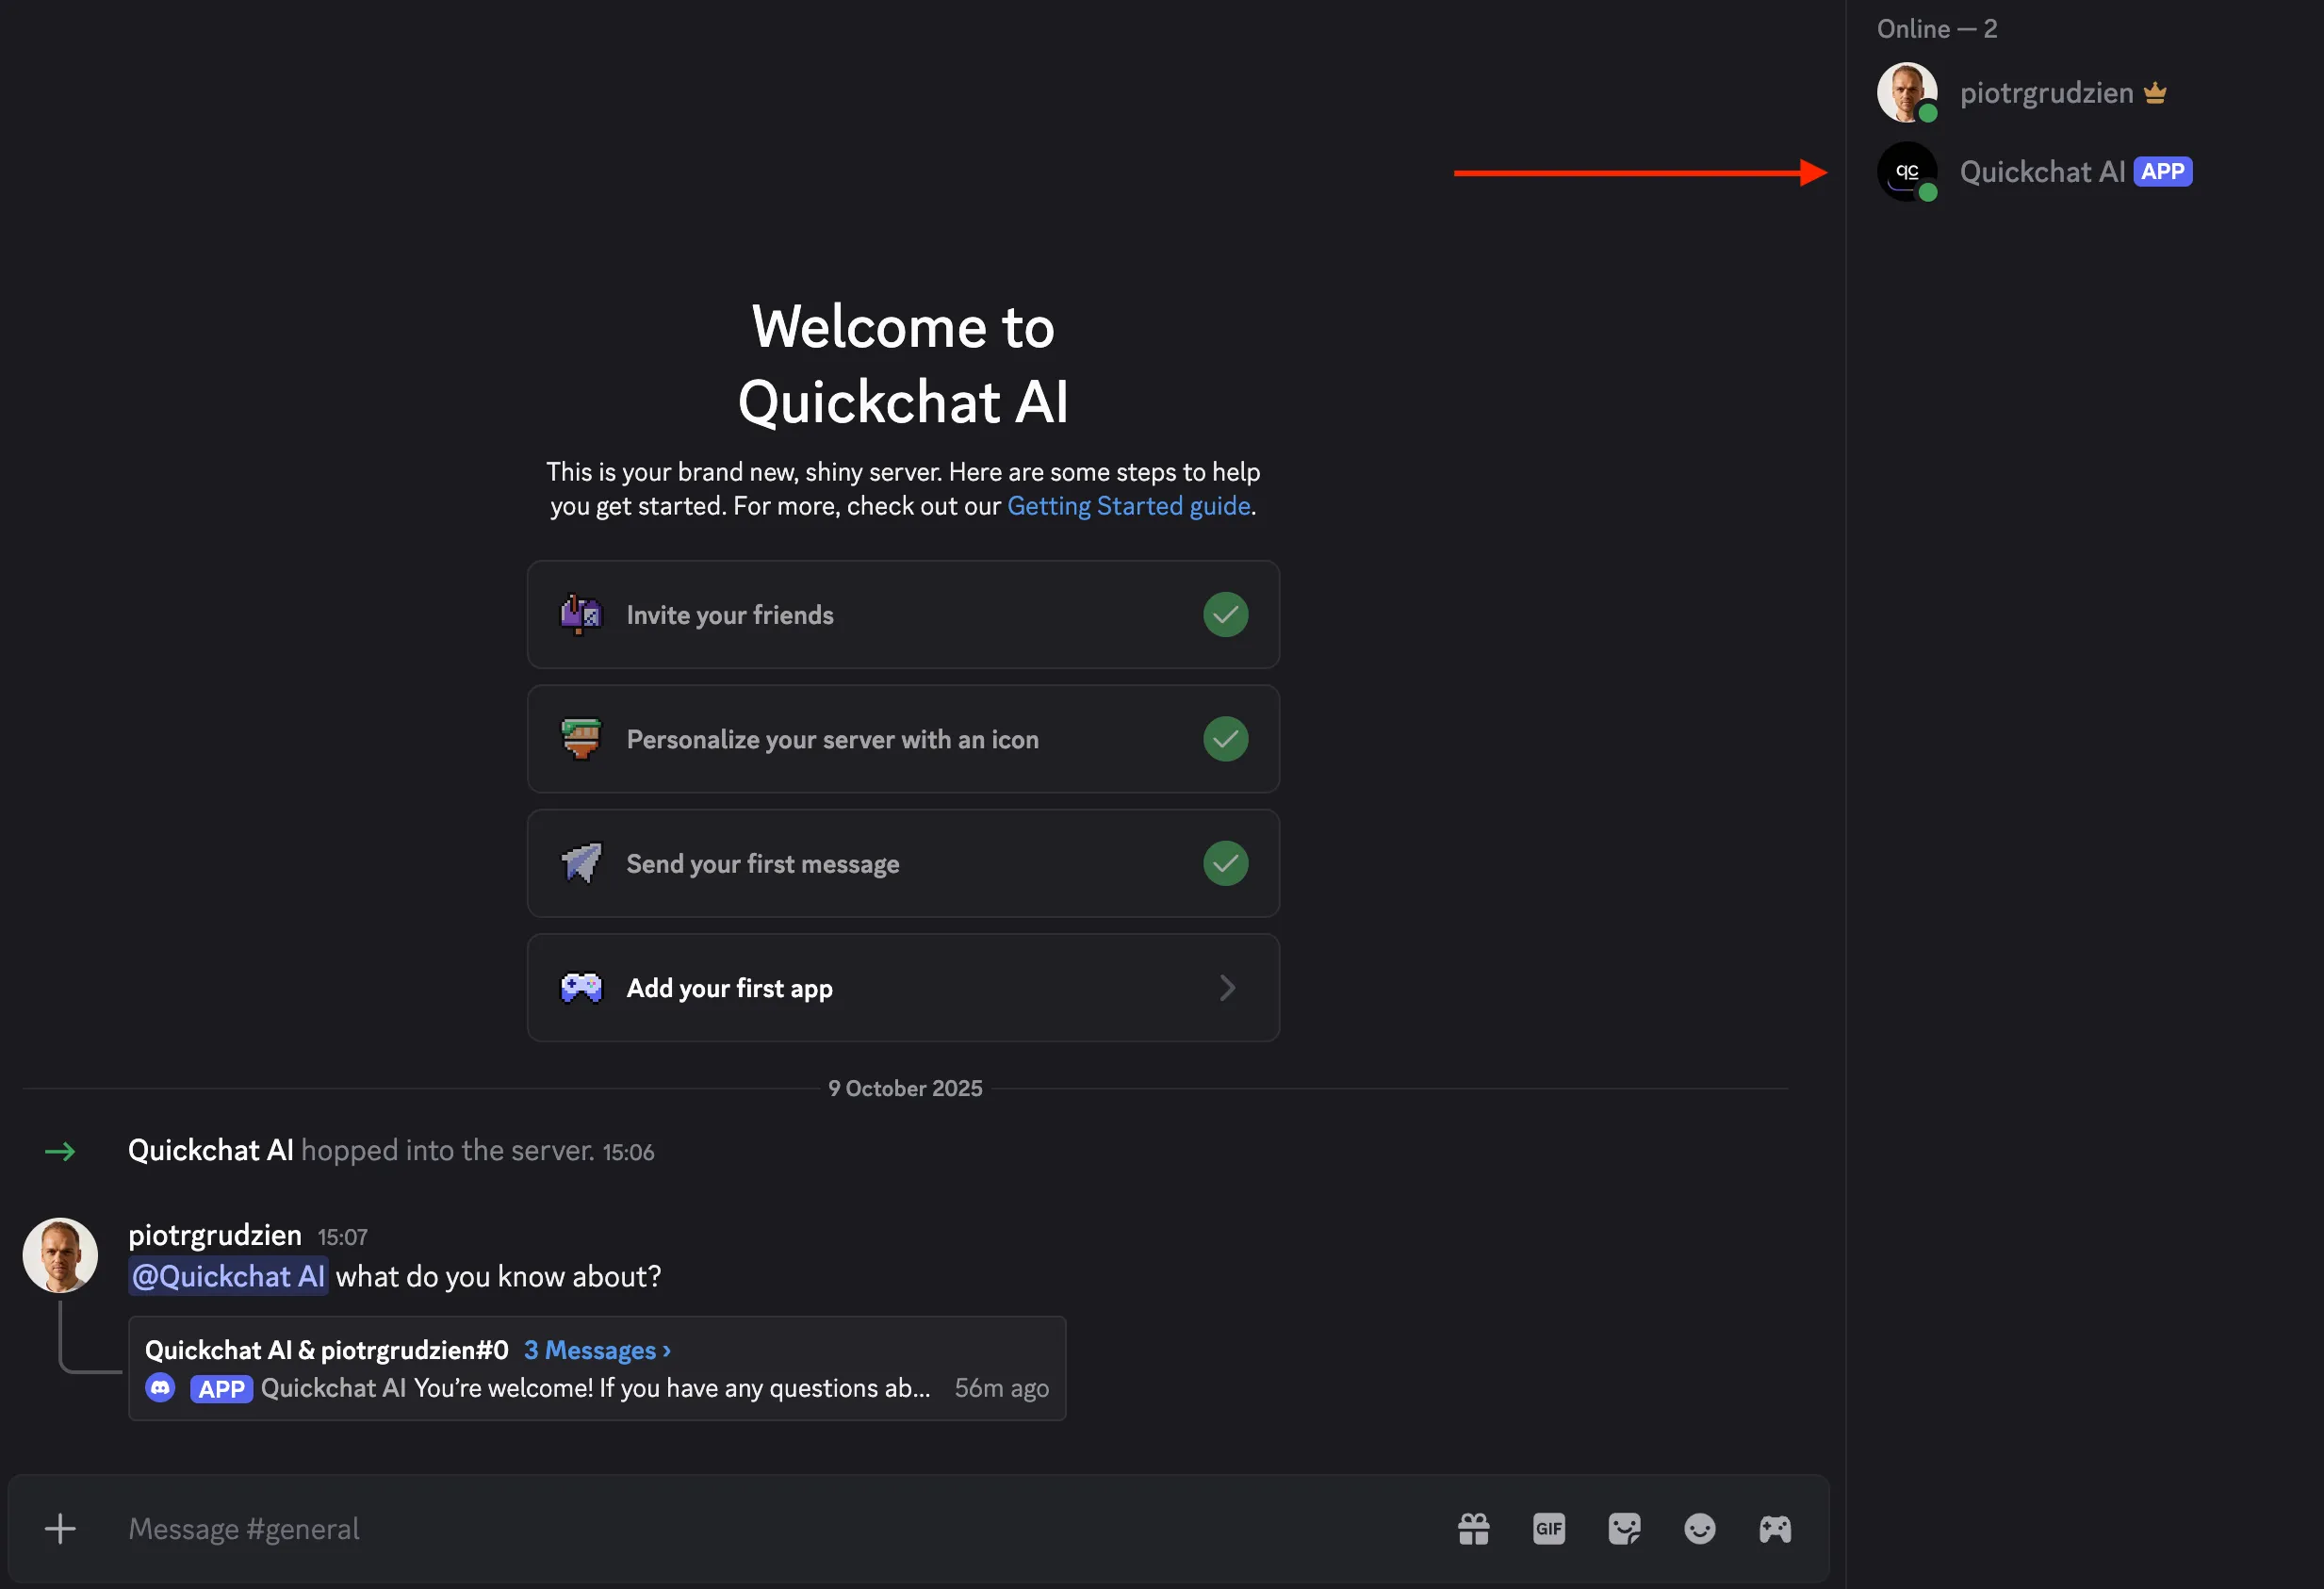
Your AI Bot is Live!
Section titled “Your AI Bot is Live!”Head back to Discord - your bot should be online and ready to chat! Just @mention it to start a conversation. 🤖💬
By default, when @mentioned the bot replies in the same channel. You can change this with the Reply mode setting in the integration: Reply in channel (the default) or Reply in threads. With Reply in threads, the bot answers inside a thread and users can continue the conversation there without mentioning it again.
Troubleshooting
Section titled “Troubleshooting”If Quickchat AI reports an error on the Discord integration page, it links straight here to the matching section below.
One-click connect
Section titled “One-click connect”The one-click flow rarely errors. If the connection does not complete:
- “This Discord server is already connected to another AI Agent”: the server is mapped to a different Agent. Remove it from that Agent first, or choose a different server.
- “You do not have permission to connect Discord for this AI Agent”: connecting a channel is an editor action. Ask an admin or editor on the account to connect it, and make sure you have the Manage Server permission on the Discord server you picked.
- “Discord authorization was cancelled”: you closed Discord’s authorize screen before finishing. Nothing was connected, so click Add to your Discord server and try again.
The bot is in my server but never replies
Section titled “The bot is in my server but never replies”Almost always this means nobody has addressed it yet. The bot answers @mentions, /ask, replies to its own messages, and messages inside threads it created, and ignores everything else. @mention it and see whether it responds.
If it still does not reply, check that its role and the channel’s permission overrides allow View Channel, Send Messages and Read Message History in that specific channel.
If it replied before and has now gone quiet, check whether the AI message allowance for the month has run out.
/ask does not appear when I type /
Section titled “/ask does not appear when I type /”Discord can take up to an hour to distribute commands to every client after a bot joins. Restarting your Discord client usually surfaces it sooner. In the meantime, @mention the bot instead.
The sections below apply to the Use your own Discord app path.
Message Content Intent
Section titled “Message Content Intent”PrivilegedIntentsRequired: your bot connected, but its Message Content Intent is off, so it cannot read messages. In the Developer Portal, open your application, go to Bot → Privileged Gateway Intents, turn on Message Content Intent, and save. The bot restarts automatically, so allow about a minute.
Invalid bot token
Section titled “Invalid bot token”InvalidToken: the token Quickchat AI has is wrong or was regenerated. A bot token is shown only once, and resetting it invalidates the old one. In the Developer Portal, open your application, go to Bot, click Reset Token, copy the new token, then click Reconnect in Quickchat AI and paste it.
Require OAuth2 Code Grant
Section titled “Require OAuth2 Code Grant”If you see “Integration requires code grant” when adding the bot, your application has Require OAuth2 Code Grant enabled, which blocks the simple bot invite flow. In the Developer Portal, open your application, go to Bot, turn Require OAuth2 Code Grant off, save, and open the invite URL again.
The authorization page shows a cake or “baked” message
Section titled “The authorization page shows a cake or “baked” message”That quirky screen is Discord’s success page: the bot was added. To confirm, open your server’s Server Settings → Integrations → Bots and Apps and look for your bot in the list.
Bot not responding after setup
Section titled “Bot not responding after setup”The bot restarts whenever you change its token or settings, so give it up to a minute after saving. If it still does not come online or reply:
- In the Quickchat AI dashboard, open External Apps → Discord and check the connection status. An invalid token or a missing intent is reported there, with a link to the exact fix.
- Confirm Message Content Intent is on (see above) and the token is current (use Reset Token if in doubt).
- @mention the bot in a channel it can access, and verify its role and channel permissions include Send Messages, Create Public Threads, Send Messages in Threads, and Read Message History.
- Choose whether it answers in the channel or in a thread with the Reply mode setting under External Apps → Discord.
Join our Discord server to learn more about how to make the most of Quickchat AI 👉 discord.gg/KqkHwvPRNH