"},
)
data = response.json()
```
**Response** `200 OK`
```json
{
"personality": 0,
"profession": "helpful_assistant",
"creativity_level": 1,
"greeting": "Hello! How can I help you today?
",
"greeting2": "",
"header": "Support Assistant",
"header2": "",
"language_chosen": "en",
"reply_length": 1,
"one_word_description": "Support Agent",
"short_description": "A helpful customer support assistant.",
"ai_commands": ["Be polite", "Stay on topic"]
}
```
| Field | Description |
| -------------------------------- | -------------------------------------------------------------------------------------------------------------------------------------------------------------- |
| `one_word_description` string | AI Agent name. Dashboard: **Identity > Profile > AI Agent Name** (max 200 chars) |
| `short_description` string | System prompt / AI Agent description. Dashboard: **Identity > Profile > AI Agent Description** (max 2000 chars) |
| `ai_commands` array of strings | Behavioral guidelines for the AI. Dashboard: **Identity > Conversation Style > AI Guidelines** (max 500 chars per item, max 5000 chars total across all items) |
| `personality` integer (0–13) | AI personality preset. Dashboard: **Identity > Conversation Style > Personality**. See table below |
| `profession` string | AI profession/role. Dashboard: **Identity > Conversation Style > Profession** (max 200 chars). See table below |
| `creativity_level` integer (0–2) | Dashboard: **Identity > Conversation Style > Creativity**. `0` = Deterministic, `1` = Balanced, `2` = Creative |
| `reply_length` integer (0–2) | Dashboard: **Identity > Conversation Style > Reply Length**. `0` = Short, `1` = Medium, `2` = Long |
| `greeting` string | Primary greeting message (HTML). Dashboard: **Identity > Profile > Greeting messages** (max 1000 chars) |
| `greeting2` string | Secondary greeting message (HTML). Dashboard: **Identity > Profile > Greeting messages** |
| `header` string | Chat header text. Dashboard: **Identity > Profile > Chat header text** (max 200 chars) |
| `header2` string | Secondary header text. Dashboard: **Identity > Profile > Chat header text** (max 200 chars) |
| `language_chosen` string | Comma-separated language codes (e.g. `"en,es,de"`). Dashboard: **Identity > Profile > Languages** (max 10 chars total) |
**Personality values:**
| Value | Label | Description |
| ----- | ----------- | ---------------------------------------------------------------------------- |
| 0 | Classic | Well-rounded, balanced between professionalism and approachability (default) |
| 1 | Humorous | Witty tone with puns and jokes for entertaining interactions |
| 2 | Formal | Formal and serious, concise factual information for business settings |
| 3 | Friendly | Casual conversations with a personal, approachable touch |
| 4 | Sassy | Confident and playful with humor |
| 5 | Intelligent | Detailed, accurate information for comprehensive understanding |
| 6 | Empathetic | Caring, compassionate interactions showing concern for feelings |
| 7 | Bold | Strong opinions and recommendations delivered with confidence |
| 9 | Excited | Lively and energetic engagement |
| 10 | Mysterious | Cryptic, intriguing responses for a unique experience |
| 11 | Inspiring | Promotes positive thinking and goal-reaching in a coach-like fashion |
| 12 | Adventurous | Encourages leaving comfort zones and exploring new opportunities |
| 13 | Elegant | Sophisticated experience for unique and exquisite brands |
**Profession values:**
| Value | Dashboard Label | Description |
| --------------------------------- | ------------------ | ------------------------------------------------------------------------------ |
| `helpful_assistant` | Helpful Assistant | Versatile, multi-purpose. Recommended for most use cases |
| `customer_support_representative` | Support Agent | Empathetic, provides step-by-step solutions and troubleshooting |
| `shopping_assistant` | Shopping Assistant | Proactively offers product recommendations with links |
| `field_expert` | Field Expert | Professional consultant, asks clarifying questions, provides expert guidance |
| `interviewer` | Interviewer | Asks questions instead of providing answers. For surveys, interviews, feedback |
Note
The `one_word_description`, `short_description`, and `ai_commands` fields are also available through the [Knowledge Base Settings](#get-settings) endpoint. These fields are shared — updating via either endpoint modifies the same underlying data.
### Update Chatbot Settings
[Section titled “Update Chatbot Settings”](#update-chatbot-settings)
Scope: write\_all
`PATCH https://app.quickchat.ai/v1/api/chatbot_settings`
**Request Body** — All fields are optional. Only include the fields you want to update.
| Parameter | Description |
| -------------------------------- | ----------------------------------------------------- |
| `personality` integer (0–13) | AI personality preset |
| `profession` string | AI profession/role (max 200 chars) |
| `creativity_level` integer (0–2) | `0` = Deterministic, `1` = Balanced, `2` = Creative |
| `greeting` string | Primary welcome message (HTML, max 1000 chars) |
| `greeting2` string | Secondary welcome message |
| `header` string | Chat header text (max 200 chars) |
| `header2` string | Secondary header text (max 200 chars) |
| `language_chosen` string | Comma-separated language codes (max 10 chars total) |
| `reply_length` integer (0–2) | `0` = Short, `1` = Medium, `2` = Long |
| `one_word_description` string | AI Agent name (max 200 chars) |
| `short_description` string | AI Agent system prompt / description (max 2000 chars) |
| `ai_commands` array of strings | AI Guidelines (max 500 chars per item) |
* Shell
```shell
curl -X PATCH https://app.quickchat.ai/v1/api/chatbot_settings \
-H 'Authorization: Bearer ' \
-H 'Content-Type: application/json' \
-d '{
"greeting": "Welcome! Ask me anything.
",
"creativity_level": 2
}'
```
* Python
```python
import requests
response = requests.patch(
url="https://app.quickchat.ai/v1/api/chatbot_settings",
headers={"Authorization": "Bearer "},
json={
"greeting": "Welcome! Ask me anything.
",
"creativity_level": 2,
},
)
data = response.json()
```
**Response** `200 OK` — Returns the updated chatbot settings (same schema as [Get Chatbot Settings](#get-chatbot-settings) response).
***
# Conversations
> Quickchat AI captures every conversation across all channels. These endpoints let you list and retrieve them.
Quickchat AI automatically captures and analyzes every conversation your AI Agent has across all channels — widget, Slack, WhatsApp, Telegram, and more. The Conversations API gives you programmatic access to this rich dataset for building custom dashboards, feeding downstream analytics pipelines, triggering CRM workflows, or integrating with your existing business intelligence tools.
Every conversation includes AI-powered analysis: **sentiment detection**, **topic classification**, **resolution tracking**, and **automatic flagging** of conversations that may need human attention. Combined with full message history, tracked link clicks, and custom metadata, you have everything you need to understand how visitors interact with your AI Agent.
Conversation data is spread across several endpoints:
* **List Conversations** — Basic info, visitor details, status. Use for dashboards, overviews, and filtered queries
* **Get Conversation Details** — Full info including `unified_analysis` (AI-generated insights) and `client_metadata`
* **Get Conversation Events** — Complete message history, tracked link clicks, and log entries
* **Get/Set Metadata** — Custom key-value data you attach to conversations (see [Conversation Metadata](/api-reference/conversations/conversation-metadata/))
## List Conversations
[Section titled “List Conversations”](#list-conversations)
Scope: read\_all
`GET https://app.quickchat.ai/v1/api_core/conversations`
**Query Parameters**
| Parameter | Description |
| --------------------------------------- | ------------------------------------------------------- |
| `limit` integer | Items per page |
| `offset` integer | Items to skip |
| `query` string | Search by order number, UUID, or message text |
| `assignee_type` string | `"ai_assistant"`, `"human_operator"`, or `"unassigned"` |
| `source` string | `"widget"`, `"slack"`, `"telegram"`, `"whatsapp"`, etc. |
| `resolution_status` string | `"open"` or `"resolved"` |
| `created_timestamp_start_date` datetime | Filter by creation date (start) |
| `created_timestamp_end_date` datetime | Filter by creation date (end) |
| `last_message_at_start_date` datetime | Filter by last message date (start) |
| `last_message_at_end_date` datetime | Filter by last message date (end) |
| `most_frequent_language` string | Filter by detected language |
* Shell
```shell
curl 'https://app.quickchat.ai/v1/api_core/conversations?limit=10&resolution_status=open' \
-H 'Authorization: Bearer '
```
* Python
```python
import requests
response = requests.get(
url="https://app.quickchat.ai/v1/api_core/conversations",
headers={"Authorization": "Bearer "},
params={"limit": 10, "resolution_status": "open"},
)
data = response.json()
```
**Response** `200 OK`
```json
{
"items": [
{
"id": "conv-uuid-1234",
"ord": 42,
"created_at": "2026-01-15T10:30:00Z",
"last_message_at": "2026-01-15T10:35:00Z",
"title": "Return policy question",
"source": "widget",
"terminated": false,
"resolution_status": "open",
"has_unread_messages": true,
"supports_inbox_control": true,
"last_message_content": "What is your return policy?",
"most_frequent_language": "en",
"assignee": {
"type": "ai_assistant"
},
"visitor_name": "John",
"visitor_email": "john@example.com",
"visitor_phone_number": null,
"visitor_label": null
}
],
"offset": 0,
"limit": 10,
"count": 42
}
```
| Field | Description |
| ------------------------------------- | ------------------------------------------------------------------------------------ |
| `id` string | Conversation UUID |
| `ord` integer | Sequential conversation number |
| `created_at` string | Conversation creation timestamp |
| `last_message_at` string | Timestamp of the most recent message |
| `title` string | AI-generated conversation title |
| `source` string | Channel the conversation originated from (e.g., `"widget"`, `"slack"`, `"whatsapp"`) |
| `terminated` boolean | Whether the conversation has ended |
| `resolution_status` string | `"open"` or `"resolved"` |
| `has_unread_messages` boolean | Whether there are unread messages |
| `supports_inbox_control` boolean | Whether the conversation source supports inbox control (assign, handoff) |
| `last_message_content` string | Content of the last message in the conversation |
| `most_frequent_language` string | Most frequently detected language in the conversation |
| `assignee` object | Current assignee (`type`: `"ai_assistant"`, `"human_operator"`, or `"unassigned"`) |
| `visitor_name` string or null | Visitor’s name (from pre-chat form or channel profile) |
| `visitor_email` string or null | Visitor’s email address |
| `visitor_phone_number` string or null | Visitor’s phone number |
| `visitor_label` string or null | Custom label assigned to the visitor |
## Get Conversation Details
[Section titled “Get Conversation Details”](#get-conversation-details)
Scope: read\_all
`GET https://app.quickchat.ai/v1/api_core/conversations/{conversation_id}/`
* Shell
```shell
curl https://app.quickchat.ai/v1/api_core/conversations/conv-uuid-1234/ \
-H 'Authorization: Bearer '
```
* Python
```python
import requests
response = requests.get(
url="https://app.quickchat.ai/v1/api_core/conversations/conv-uuid-1234/",
headers={"Authorization": "Bearer "},
)
data = response.json()
```
**Response** `200 OK`
```json
{
"id": "conv-uuid-1234",
"ord": 42,
"created_at": "2026-01-15T10:30:00Z",
"last_message_at": "2026-01-15T10:35:00Z",
"title": "Return policy question",
"source": "widget",
"terminated": false,
"resolution_status": "open",
"has_unread_messages": true,
"supports_inbox_control": true,
"last_message_content": "What is your return policy?",
"most_frequent_language": "en",
"assignee": {
"type": "ai_assistant"
},
"url": null,
"client_metadata": {"userId": 12},
"last_visitor_message_at": "2026-01-15T10:34:00Z",
"unified_analysis": {
"sentiment": "neutral",
"resolution_status": "open",
"topic": "Return policy",
"is_flagged": false,
"flag_reason": null
},
"visitor_name": "John",
"visitor_email": "john@example.com",
"visitor_phone_number": null,
"visitor_label": null
}
```
The detail response includes all fields from the list response, plus:
| Field | Description |
| --------------------------------- | ------------------------------------------------------------ |
| `url` string or null | URL of the page where the conversation started (widget only) |
| `client_metadata` object or null | Custom key-value pairs attached to the conversation |
| `last_visitor_message_at` string | Timestamp of the last visitor message |
| `unified_analysis` object or null | AI-generated analysis of the conversation (see below) |
**`unified_analysis` fields:**
| Field | Description |
| ---------------------------- | ---------------------------------------------------------------------------------- |
| `sentiment` string | AI-detected conversation sentiment (e.g., `"positive"`, `"neutral"`, `"negative"`) |
| `resolution_status` string | AI-assessed resolution status (may differ from top-level `resolution_status`) |
| `topic` string | AI-detected conversation topic |
| `is_flagged` boolean | Whether the AI flagged this conversation for human review |
| `flag_reason` string or null | Reason the conversation was flagged |
resolution\_status vs unified\_analysis.resolution\_status
The top-level `resolution_status` field (`"open"` or `"resolved"`) is the canonical status set manually or by automation rules.
The `unified_analysis.resolution_status` is computed by AI analysis and may differ — for example, the AI might classify a conversation as resolved based on content analysis even though the top-level status is still `"open"`. Use the top-level field for filtering and workflow; use `unified_analysis` for analytics and insights.
## Get Conversation Events
[Section titled “Get Conversation Events”](#get-conversation-events)
Retrieve all events (messages, tracked links, logs) for a conversation.
Scope: read\_all
`GET https://app.quickchat.ai/v1/api_core/conversations/{conversation_id}/events/`
**Query Parameters**
| Parameter | Description |
| ---------------- | -------------- |
| `limit` integer | Items per page |
| `offset` integer | Items to skip |
* Shell
```shell
curl 'https://app.quickchat.ai/v1/api_core/conversations/conv-uuid-1234/events/?limit=20' \
-H 'Authorization: Bearer '
```
* Python
```python
import requests
response = requests.get(
url="https://app.quickchat.ai/v1/api_core/conversations/conv-uuid-1234/events/",
headers={"Authorization": "Bearer "},
params={"limit": 20},
)
data = response.json()
```
**Response** `200 OK`
```json
{
"items": [
{
"type": "message",
"data": {
"id": "msg-uuid-001",
"ord": 1,
"created_at": "2026-01-15T10:30:00Z",
"content": "Hello! How can I help you today?",
"author": "ai_assistant",
"handoff_state": null,
"message_insights": null,
"feedback": null,
"client_metadata": null,
"sources_generated": [],
"is_welcome": true,
"attachments": []
}
},
{
"type": "message",
"data": {
"id": "msg-uuid-002",
"ord": 2,
"created_at": "2026-01-15T10:31:00Z",
"content": "What is your return policy?",
"author": "visitor",
"handoff_state": null,
"message_insights": null,
"feedback": null,
"client_metadata": null,
"sources_generated": [],
"is_welcome": false,
"attachments": []
}
}
],
"offset": 0,
"limit": 20,
"count": 2
}
```
**Event types:** `message`, `tracked_link`, `log`
**Author types:** `ai_assistant`, `visitor`, `human_operator`
| Field | Description |
| -------------------------------------- | ---------------------------------------------------------------- |
| `type` string | Event type: `"message"`, `"tracked_link"`, or `"log"` |
| `data.id` string | Message unique identifier |
| `data.ord` integer | Sequential message number |
| `data.created_at` string | Timestamp of the event |
| `data.content` string | Message content |
| `data.author` string | `"ai_assistant"`, `"visitor"`, or `"human_operator"` |
| `data.handoff_state` string or null | Handoff state if applicable |
| `data.message_insights` object or null | AI-generated message insights |
| `data.feedback` object or null | User feedback on the message |
| `data.client_metadata` object or null | Custom metadata attached to the message |
| `data.sources_generated` array | Knowledge Base articles the AI used when generating its response |
| `data.is_welcome` boolean | Whether this is a welcome message |
| `data.attachments` array | File attachments |
***
# Conversation Metadata
> Attach custom key-value data to conversations, bridging your own systems and your AI Agent.
Conversation Metadata lets you attach custom key-value data to conversations, creating a powerful bridge between your systems and your AI Agent. Metadata flows through your entire Quickchat workflow:
* **Feed via API** — Use these endpoints to programmatically attach metadata to any conversation (e.g., from your CRM, helpdesk, or backend)
* **Feed via widget/embed** — Pass metadata as initialization parameters when loading the widget, or inject it dynamically during an active conversation using the JavaScript SDK
* **Visible in the Dashboard** — Metadata appears in the conversation detail view in the Inbox, so your team always has context
* **Included in exports** — Metadata is included when you export conversations from the Dashboard, making it available for offline analysis
* **Used in AI Actions** — Metadata values can be injected directly as `{{metadata_}}` placeholders into [AI Actions](/api-reference/ai-actions/). See [AI Action Variables](/ai-agent/variables/) for the full reference of available placeholders
* **Available to the AI Agent** — Your AI Agent is aware of metadata values and can reference them during conversations. For example, pass a customer’s name or plan tier, and the AI will personalize its responses accordingly
Metadata is the way to dynamically steer and personalize each conversation. Pass customer IDs, account tiers, referral sources, A/B test variants, or any context your AI Agent needs. This capability will be significantly expanded in future releases.
Metadata is validated against a JSON schema if one is configured in the Dashboard.
## Get Metadata
[Section titled “Get Metadata”](#get-metadata)
Scope: read\_all
`GET https://app.quickchat.ai/v1/api_core/conversations/{conv_id}/metadata`
* Shell
```shell
curl https://app.quickchat.ai/v1/api_core/conversations/conv-uuid-1234/metadata \
-H 'Authorization: Bearer '
```
* Python
```python
import requests
response = requests.get(
url="https://app.quickchat.ai/v1/api_core/conversations/conv-uuid-1234/metadata",
headers={"Authorization": "Bearer "},
)
data = response.json()
```
**Response** `200 OK`
```json
{
"metadata": {
"ticket_id": "T-1234",
"priority": "high"
}
}
```
## Set Metadata
[Section titled “Set Metadata”](#set-metadata)
Create or update metadata for a conversation.
Scope: write\_all
`POST https://app.quickchat.ai/v1/api_core/conversations/{conv_id}/metadata`
**Request Body**
| Parameter | Description |
| --------------------------- | --------------------------- |
| `metadata` object, required | Key-value metadata to store |
* Shell
```shell
curl -X POST https://app.quickchat.ai/v1/api_core/conversations/conv-uuid-1234/metadata \
-H 'Authorization: Bearer ' \
-H 'Content-Type: application/json' \
-d '{
"metadata": {
"ticket_id": "T-1234",
"priority": "high"
}
}'
```
* Python
```python
import requests
response = requests.post(
url="https://app.quickchat.ai/v1/api_core/conversations/conv-uuid-1234/metadata",
headers={"Authorization": "Bearer "},
json={
"metadata": {"ticket_id": "T-1234", "priority": "high"}
},
)
data = response.json()
```
**Response** `200 OK`
```json
{
"metadata": {
"ticket_id": "T-1234",
"priority": "high"
}
}
```
***
# Conversation Rating
> Collect visitor feedback on their AI Agent experience, with visitors prompted to rate the conversation at the end.
Conversation Rating lets you collect visitor feedback on their AI Agent experience. When enabled, visitors are prompted at the end of their conversation to rate their experience — providing direct, actionable signal on how well your AI Agent is performing.
Ratings appear in the Dashboard under **Conversations > Inbox** alongside each conversation, and are included in conversation exports. Use this data to identify knowledge gaps, refine your AI Agent’s configuration, and track satisfaction trends over time.
Corresponds to **Conversations > Inbox > Feedback settings** in the Dashboard.
## Get Conversation Rating Configuration
[Section titled “Get Conversation Rating Configuration”](#get-conversation-rating-configuration)
Scope: read\_all
`GET https://app.quickchat.ai/v1/api/conversation_ratings/configuration`
* Shell
```shell
curl https://app.quickchat.ai/v1/api/conversation_ratings/configuration \
-H 'Authorization: Bearer '
```
* Python
```python
import requests
response = requests.get(
url="https://app.quickchat.ai/v1/api/conversation_ratings/configuration",
headers={"Authorization": "Bearer "},
)
data = response.json()
```
**Response** `200 OK`
```json
{
"conv_rating_active": true,
"conv_rating_popup_active": true,
"conv_rating_question_codes": ["HELPFUL_THUMBS", "EXPERIENCE_THUMBS"]
}
```
| Field | Description |
| --------------------------------------------- | ------------------------------------------------------------------------------------- |
| `conv_rating_active` boolean | Enable visitor feedback collection at the end of conversations |
| `conv_rating_popup_active` boolean | Show a popup prompt asking for feedback (must match `conv_rating_active`) |
| `conv_rating_question_codes` array of strings | Types of feedback questions shown. Default: `["HELPFUL_THUMBS", "EXPERIENCE_THUMBS"]` |
## Update Conversation Rating Configuration
[Section titled “Update Conversation Rating Configuration”](#update-conversation-rating-configuration)
Scope: write\_all
`PATCH https://app.quickchat.ai/v1/api/conversation_ratings/configuration`
Note
`conv_rating_active` and `conv_rating_popup_active` must be set to the same value.
* Shell
```shell
curl -X PATCH https://app.quickchat.ai/v1/api/conversation_ratings/configuration \
-H 'Authorization: Bearer ' \
-H 'Content-Type: application/json' \
-d '{
"conv_rating_active": true,
"conv_rating_popup_active": true
}'
```
* Python
```python
import requests
response = requests.patch(
url="https://app.quickchat.ai/v1/api/conversation_ratings/configuration",
headers={"Authorization": "Bearer "},
json={
"conv_rating_active": True,
"conv_rating_popup_active": True,
},
)
data = response.json()
```
**Response** `200 OK` — Returns the updated conversation rating configuration.
***
# Handoff Configuration
> Human Handoff transfers conversations to human operators when a personal touch is needed. Configure it via the API.
Human Handoff enables your AI Agent to automatically transfer conversations to human operators when it detects situations that need a personal touch. **Handoff is AI-driven** — the AI continuously evaluates the conversation against configurable guidelines and triggers a handoff when appropriate, without any manual intervention.
**How automatic handoff works:**
1. During a conversation, the AI evaluates each message against your **generic guidelines** (e.g., user frustration, lack of knowledge) and **custom guidelines** you define
2. When a guideline triggers, the AI shows the visitor a confirmation message asking if they’d like to speak with a human
3. If the visitor confirms, the conversation is transferred to a human operator, with an optional AI-generated summary of the conversation so far
4. If working hours are configured and the request falls outside them, a custom message is shown instead
**Additional handoff methods:**
* **Keyword triggers** — Visitors can type specific phrases (e.g., “speak to human”, “agent”) to request handoff directly
* **Manual handoff from Dashboard** — Operators can take over any conversation from the Inbox by changing the conversation assignee
**Topic-based Routing** is an advanced feature that routes handoffs to specific operators based on the conversation topic. Each routing profile defines a topic, a description of when it applies, and a list of operators who handle that topic. When a handoff triggers, the AI matches the conversation to the most relevant routing profile and notifies the assigned operators. Configure routing profiles via the `routing_profiles` array in the PUT request.
## Get Handoff Configuration
[Section titled “Get Handoff Configuration”](#get-handoff-configuration)
Scope: read\_all
`GET https://app.quickchat.ai/v1/api/human_handoff/configuration`
* Shell
```shell
curl https://app.quickchat.ai/v1/api/human_handoff/configuration \
-H 'Authorization: Bearer '
```
* Python
```python
import requests
response = requests.get(
url="https://app.quickchat.ai/v1/api/human_handoff/configuration",
headers={"Authorization": "Bearer "},
)
data = response.json()
```
**Response** `200 OK`
The response contains several nested objects:
**`settings`** — Core handoff configuration:
| Field | Description |
| --------------------------------------------------- | --------------------------------------------------------------------------------------------------------- |
| `is_active` boolean | Whether human handoff is enabled |
| `keywords` array of strings | Trigger keywords that prompt a handoff (e.g., `["speak to human", "agent"]`) |
| `ai_summary_active` boolean | Send an AI-generated conversation summary to the human operator when handoff occurs |
| `topic_based_routing_active` boolean | Whether topic-based routing to specific operators is enabled (read-only, configured via routing profiles) |
| `question_message` string | Message shown to the visitor asking if they want to be connected to a human |
| `confirmation_message` string | Message shown after the visitor confirms handoff (max 500 chars) |
| `confirmation_outside_working_hours_message` string | Message shown when handoff is requested outside working hours (max 500 chars) |
| `working_hours_active` boolean | Restrict handoff to working hours only |
| `timezone` string | Timezone for working hours (e.g., `"Europe/London"`) |
| `send_email_notification` boolean | Send email notifications to operators on handoff |
| `emails` array of strings | Email addresses to notify |
**`availability`** — Working hours schedule (array of slots):
| Field | Description |
| ------------------- | ------------------------------------------------------ |
| `id` integer | Availability slot ID |
| `day_span` string | Day or day range (e.g., `"monday"`, `"monday-friday"`) |
| `start_time` string | Start time in `"HH:MM"` format |
| `end_time` string | End time in `"HH:MM"` format |
**`generic_guidelines`** — Predefined handoff trigger rules (array):
| Field | Description |
| -------------------- | -------------------------------------------------------------------------------------------------------------------------------------- |
| `name` string | Guideline type: `"user_frustration"`, `"customer_support_suggestion"`, `"lack_of_knowledge"`, `"irrelevant_advice"`, `"media_message"` |
| `description` string | Description of when this guideline triggers |
| `is_active` boolean | Whether this guideline is enabled |
**`custom_guidelines`** — User-defined handoff trigger rules (array):
| Field | Description |
| -------------------- | ----------------------------------------------------------- |
| `id` integer | Guideline ID |
| `name` string | Custom guideline name (max 100 chars) |
| `description` string | When this guideline should trigger handoff (max 2000 chars) |
| `is_active` boolean | Whether this guideline is enabled |
**`routing_profiles`** — Topic-based routing directs handoffs to the right operators based on what the conversation is about.
When a handoff triggers, the AI evaluates the conversation against all active routing profiles and matches it to the most relevant topic. The operators listed in that profile are then notified. If no routing profile matches, the default notification behavior (email list in `settings.emails`) is used.
**Example:** You have a “Billing” routing profile assigned to your finance team and a “Technical Support” profile assigned to engineers. When a customer asks about an invoice and triggers a handoff, the AI matches the conversation to “Billing” and notifies only the finance team — not the engineers.
Configure routing profiles in the Dashboard under **Handoff > Topic-based Routing**, or via the `routing_profiles` array in the [PUT request](/api-reference/conversations/handoff-configuration/#update-handoff-configuration).
| Field | Description |
| ---------------------------- | -------------------------------------------------------------------------------------------------------------------------- |
| `id` integer | Routing profile ID |
| `name` string | Topic name (e.g., “Billing”, “Technical Support”) (max 100 chars) |
| `description` string | When this profile should match — describe the types of conversations that should route to these operators (max 2000 chars) |
| `is_active` boolean | Whether this routing profile is enabled |
| `user_ids` array of integers | IDs of operators who should be notified when this profile matches |
## Update Handoff Configuration
[Section titled “Update Handoff Configuration”](#update-handoff-configuration)
Scope: write\_all
`PUT https://app.quickchat.ai/v1/api/human_handoff/configuration`
Caution
PUT replaces the entire handoff configuration atomically. You must include all sections (`settings`, `availability`, `generic_guidelines`, `custom_guidelines`, `routing_profiles`) in the request body. Omitting a section or providing partial data will result in validation errors. To make incremental changes, first GET the current configuration, modify the fields you need, and PUT the full object back.
* Shell
```shell
# First, fetch the current configuration
CONFIG=$(curl -s https://app.quickchat.ai/v1/api/human_handoff/configuration \
-H 'Authorization: Bearer ')
# Modify and PUT back (example: enable handoff)
echo "$CONFIG" | jq '.settings.is_active = true' | \
curl -X PUT https://app.quickchat.ai/v1/api/human_handoff/configuration \
-H 'Authorization: Bearer ' \
-H 'Content-Type: application/json' \
-d @-
```
* Python
```python
import requests
headers = {"Authorization": "Bearer "}
# Fetch current configuration
config = requests.get(
url="https://app.quickchat.ai/v1/api/human_handoff/configuration",
headers=headers,
).json()
# Modify and PUT back
config["settings"]["is_active"] = True
response = requests.put(
url="https://app.quickchat.ai/v1/api/human_handoff/configuration",
headers=headers,
json=config,
)
data = response.json()
```
**Response** `200 OK` — Returns the updated handoff configuration.
***
# Knowledge Base
> The Knowledge Base is the core of your AI Agent's expertise. These endpoints manage its settings and trigger retraining.
The Knowledge Base is the core of your AI Agent’s expertise — it contains all the information your AI uses to answer questions. These endpoints let you manage the Knowledge Base configuration and trigger retraining after content changes.
The Knowledge Base draws from [Articles](/api-reference/knowledge-base/articles/) you create, import from websites, or upload as files. After making changes to articles, you need to [retrain](/api-reference/knowledge-base/#retrain-knowledge-base) the Knowledge Base for updates to take effect in conversations.
## Get Settings
[Section titled “Get Settings”](#get-settings)
Retrieve your Knowledge Base configuration.
Scope: read\_all
`GET https://app.quickchat.ai/v1/api/knowledge_base/`
* Shell
```shell
curl https://app.quickchat.ai/v1/api/knowledge_base/ \
-H 'Authorization: Bearer '
```
* Python
```python
import requests
response = requests.get(
url="https://app.quickchat.ai/v1/api/knowledge_base/",
headers={"Authorization": "Bearer "},
)
data = response.json()
```
**Response** `200 OK`
```json
{
"one_word_description": "Support Agent",
"short_description": "A helpful customer support assistant.",
"ai_commands": ["Be polite", "Stay on topic"],
"retrain_state": null
}
```
| Field | Description |
| ------------------------------ | ---------------------------------------------------------------------------------------------------------------------------------- |
| `one_word_description` string | AI Agent name. Dashboard: **Identity > Profile > AI Agent Name** |
| `short_description` string | System prompt / AI Agent description. Dashboard: **Identity > Profile > AI Agent Description** |
| `ai_commands` array of strings | Behavioral guidelines. Dashboard: **Identity > Conversation Style > AI Guidelines** |
| `retrain_state` string or null | Current training status: `null` (up to date or never trained), `"to_be_retrained"`, `"in_progress"`, `"up_to_date"`, or `"failed"` |
Note
These three fields (`one_word_description`, `short_description`, `ai_commands`) are shared with [Chatbot Settings](/api-reference/chatbot-settings/). Updating via either endpoint modifies the same underlying data.
## Update Settings
[Section titled “Update Settings”](#update-settings)
Scope: write\_all
`PATCH https://app.quickchat.ai/v1/api/knowledge_base/`
**Request Body**
| Parameter | Description |
| ------------------------------ | ------------------------------------ |
| `one_word_description` string | AI Agent name |
| `short_description` string | System prompt / AI Agent description |
| `ai_commands` array of strings | AI Guidelines |
* Shell
```shell
curl -X PATCH https://app.quickchat.ai/v1/api/knowledge_base/ \
-H 'Authorization: Bearer ' \
-H 'Content-Type: application/json' \
-d '{
"one_word_description": "Sales Bot"
}'
```
* Python
```python
import requests
response = requests.patch(
url="https://app.quickchat.ai/v1/api/knowledge_base/",
headers={"Authorization": "Bearer "},
json={"one_word_description": "Sales Bot"},
)
data = response.json()
```
**Response** `200 OK` — Returns the updated Knowledge Base settings (same schema as [Get Settings](/api-reference/knowledge-base/#get-settings)).
## Retrain Knowledge Base
[Section titled “Retrain Knowledge Base”](#retrain-knowledge-base)
Trigger an asynchronous retraining of the Knowledge Base.
Scope: write\_all
`POST https://app.quickchat.ai/v1/api/knowledge_base/retrain/`
* Shell
```shell
curl -X POST https://app.quickchat.ai/v1/api/knowledge_base/retrain/ \
-H 'Authorization: Bearer '
```
* Python
```python
import requests
response = requests.post(
url="https://app.quickchat.ai/v1/api/knowledge_base/retrain/",
headers={"Authorization": "Bearer "},
)
```
**Response** `202 Accepted`
Note
Retraining is needed after publishing article changes to ensure the AI Agent uses the latest content. You can monitor progress via the `retrain_state` field in [Get Settings](/api-reference/knowledge-base/#get-settings) — it changes from `"to_be_retrained"` to `"in_progress"` to `"up_to_date"`.
***
# Article Language URLs
> Associate language-specific source links with articles so the chat widget can show the right URL for each language.
Language URLs let you associate language-specific source links with articles. When the AI references an article during a conversation, the chat widget displays the URL matching the conversation’s detected language (`most_frequent_language`). This is useful for multilingual deployments where the same content has different URLs per locale (e.g., `example.com/en/returns` vs `example.com/es/devoluciones`).
## Get Language URL
[Section titled “Get Language URL”](#get-language-url)
Scope: read\_all
`GET https://app.quickchat.ai/v1/api/knowledge_base/articles/{article_id}/lang_urls/{language}`
* Shell
```shell
curl https://app.quickchat.ai/v1/api/knowledge_base/articles/1234/lang_urls/en \
-H 'Authorization: Bearer '
```
* Python
```python
import requests
response = requests.get(
url="https://app.quickchat.ai/v1/api/knowledge_base/articles/1234/lang_urls/en",
headers={"Authorization": "Bearer "},
)
data = response.json()
```
**Response** `200 OK`
```json
{
"url": "https://example.com/en/return-policy"
}
```
## Create Language URL
[Section titled “Create Language URL”](#create-language-url)
Scope: write\_all
`POST https://app.quickchat.ai/v1/api/knowledge_base/articles/{article_id}/lang_urls/{language}`
**Request Body**
| Parameter | Description |
| ---------------------- | ------------------------------------- |
| `url` string, required | URL for the language-specific version |
* Shell
```shell
curl -X POST https://app.quickchat.ai/v1/api/knowledge_base/articles/1234/lang_urls/en \
-H 'Authorization: Bearer ' \
-H 'Content-Type: application/json' \
-d '{"url": "https://example.com/en/return-policy"}'
```
* Python
```python
import requests
response = requests.post(
url="https://app.quickchat.ai/v1/api/knowledge_base/articles/1234/lang_urls/en",
headers={"Authorization": "Bearer "},
json={"url": "https://example.com/en/return-policy"},
)
data = response.json()
```
**Response** `200 OK`
```json
{
"url": "https://example.com/en/return-policy"
}
```
## Update Language URL
[Section titled “Update Language URL”](#update-language-url)
Scope: write\_all
`PATCH https://app.quickchat.ai/v1/api/knowledge_base/articles/{article_id}/lang_urls/{language}`
**Request Body**
| Parameter | Description |
| ---------------------- | ----------- |
| `url` string, required | Updated URL |
**Response** `200 OK` — Returns the updated URL object.
## Delete Language URL
[Section titled “Delete Language URL”](#delete-language-url)
Scope: write\_all
`DELETE https://app.quickchat.ai/v1/api/knowledge_base/articles/{article_id}/lang_urls/{language}`
* Shell
```shell
curl -X DELETE https://app.quickchat.ai/v1/api/knowledge_base/articles/1234/lang_urls/en \
-H 'Authorization: Bearer '
```
* Python
```python
import requests
response = requests.delete(
url="https://app.quickchat.ai/v1/api/knowledge_base/articles/1234/lang_urls/en",
headers={"Authorization": "Bearer "},
)
```
**Response** `200 OK`
***
# Articles
> Articles are the building blocks of your Knowledge Base. Create, list, update, and delete the content your AI Agent uses to answer questions.
Articles are the building blocks of your AI Agent’s Knowledge Base. Each article represents a piece of knowledge — a help page, FAQ entry, product description, or any content your AI should know about.
There are three article types: **Articles** (full documents with title and body), **Paragraphs** (short standalone text entries), and **URL articles** (automatically created when importing web content). You can create articles manually via the API, import them from websites using [Import External Content](/api-reference/knowledge-base/import-external-content/), upload files via [File Upload](/api-reference/knowledge-base/file-upload/), or sync from [Intercom](/api-reference/knowledge-base/intercom-knowledge-base/).
After creating or updating articles, remember to [retrain the Knowledge Base](/api-reference/knowledge-base/#retrain-knowledge-base) for changes to take effect.
## Create Article
[Section titled “Create Article”](#create-article)
Scope: write\_all
`POST https://app.quickchat.ai/v1/api/knowledge_base/articles/`
**Request Body**
| Parameter | Description |
| -------------------------- | -------------------------------------- |
| `content` string, required | Article content |
| `type` string | `"Article"` (default) or `"Paragraph"` |
| `title` string | Article title |
Article Types
* **`"Article"`** — A full knowledge base document with title and content. Use for FAQ entries, help articles, product descriptions.
* **`"Paragraph"`** — A short standalone text entry without a title. Use for brief facts, one-liner answers, quick reference data.
* **`"URL"`** (read-only) — Created automatically when content is imported from a website. Contains the scraped page content with the source URL. Cannot be set on creation.
- Shell
```shell
curl -X POST https://app.quickchat.ai/v1/api/knowledge_base/articles/ \
-H 'Authorization: Bearer ' \
-H 'Content-Type: application/json' \
-d '{
"content": "Our return policy allows returns within 30 days.",
"title": "Return Policy"
}'
```
- Python
```python
import requests
response = requests.post(
url="https://app.quickchat.ai/v1/api/knowledge_base/articles/",
headers={"Authorization": "Bearer "},
json={
"content": "Our return policy allows returns within 30 days.",
"title": "Return Policy",
},
)
data = response.json()
```
**Response** `201 Created`
```json
{
"id": 1234,
"article_id": "abc-123",
"type": "Article",
"title": "Return Policy",
"description": "",
"content": "Our return policy allows returns within 30 days.",
"state": "draft",
"deploy_state": "draft",
"version": null,
"max_available_version": null,
"url": null,
"tags": [],
"created_timestamp": "2026-01-15",
"last_modified_timestamp": "2026-01-15",
"downloaded_timestamp": "2026-01-15",
"last_updated_timestamp": "2026-01-15",
"last_updated_from_external_source_timestamp": null
}
```
| Field | Description |
| ------------------------------------------------------------ | -------------------------------------------------------------------------- |
| `id` integer | Article numeric ID. This is the canonical identifier used in all URL paths |
| `article_id` string | Legacy string identifier. May be empty — use `id` instead |
| `type` string | `"Article"`, `"Paragraph"`, or `"URL"` |
| `title` string | Article title |
| `description` string | Article description |
| `content` string | Article content |
| `deploy_state` string | `"draft"` or `"published"` — controls article visibility |
| `state` string | Internal processing status (see note below) |
| `version` integer or null | Current version number |
| `max_available_version` integer or null | Highest available version |
| `url` string or null | Source URL (for URL-type articles) |
| `tags` array of strings | Associated tags |
| `created_timestamp` string | Creation date |
| `last_modified_timestamp` string | Last modification date |
| `downloaded_timestamp` string | Download date |
| `last_updated_timestamp` string | Last update date |
| `last_updated_from_external_source_timestamp` string or null | Last external source update |
Understanding Article States
Articles have two state fields:
* **`deploy_state`**: Controls whether the article is a `"draft"` or `"published"`. This is the primary field you should use to manage article visibility.
* **`state`**: Reflects the internal processing status. For most API users, this field can be ignored — it tracks backend processing steps and may show values like `"done"` or `"published"`.
## List Articles
[Section titled “List Articles”](#list-articles)
Scope: read\_all
`GET https://app.quickchat.ai/v1/api/knowledge_base/articles/`
**Query Parameters**
| Parameter | Description |
| ---------------- | --------------------------------------------- |
| `limit` integer | Items per page |
| `offset` integer | Items to skip |
| `types` string | Filter by type: `Article`, `Paragraph`, `URL` |
| `tags` string | Filter by tag |
| `url` string | Filter by URL |
| `title` string | Filter by title |
| `query` string | Search by content |
* Shell
```shell
curl 'https://app.quickchat.ai/v1/api/knowledge_base/articles/?limit=10&offset=0' \
-H 'Authorization: Bearer '
```
* Python
```python
import requests
response = requests.get(
url="https://app.quickchat.ai/v1/api/knowledge_base/articles/",
headers={"Authorization": "Bearer "},
params={"limit": 10, "offset": 0},
)
data = response.json()
```
**Response** `200 OK`
```json
{
"items": [
{
"id": 1234,
"article_id": "abc-123",
"type": "Article",
"title": "Return Policy",
"description": "",
"state": "published",
"deploy_state": "published",
"version": 1,
"max_available_version": 1,
"url": null,
"tags": ["policies"],
"created_timestamp": "2026-01-15",
"last_modified_timestamp": "2026-01-15",
"downloaded_timestamp": "2026-01-15",
"last_updated_timestamp": "2026-01-15",
"last_updated_from_external_source_timestamp": null
}
],
"offset": 0,
"limit": 10,
"count": 1
}
```
Note
The list response does **not** include the `content` field. Use [Get Article](/api-reference/knowledge-base/articles/#get-article) to retrieve the full content of a specific article.
## Get Article
[Section titled “Get Article”](#get-article)
Scope: read\_all
`GET https://app.quickchat.ai/v1/api/knowledge_base/articles/{article_id}`
* Shell
```shell
curl https://app.quickchat.ai/v1/api/knowledge_base/articles/1234 \
-H 'Authorization: Bearer '
```
* Python
```python
import requests
response = requests.get(
url="https://app.quickchat.ai/v1/api/knowledge_base/articles/1234",
headers={"Authorization": "Bearer "},
)
data = response.json()
```
**Response** `200 OK` — Returns the full article object (same schema as [Create Article](/api-reference/knowledge-base/articles/#create-article) response), including the `content` field.
## Update Article
[Section titled “Update Article”](#update-article)
Scope: write\_all
`PATCH https://app.quickchat.ai/v1/api/knowledge_base/articles/{article_id}`
**Request Body**
| Parameter | Description |
| ----------------------- | ---------------------------------- |
| `content` string | Updated article content |
| `title` string | Updated title |
| `tags` array of strings | Updated tags |
| `save_mode` string | `"draft"` (default) or `"publish"` |
Caution
The `save_mode: "draft"` option only sets the `deploy_state` flag — it does **not** prevent the article content from being used by the AI once the Knowledge Base is retrained. For programmatic workflows, use `save_mode: "publish"` and trigger a [retrain](/api-reference/knowledge-base/#retrain-knowledge-base) when you’re ready for changes to take effect.
* Shell
```shell
curl -X PATCH https://app.quickchat.ai/v1/api/knowledge_base/articles/1234 \
-H 'Authorization: Bearer ' \
-H 'Content-Type: application/json' \
-d '{
"title": "Updated Return Policy",
"content": "Returns accepted within 60 days.",
"save_mode": "publish"
}'
```
* Python
```python
import requests
response = requests.patch(
url="https://app.quickchat.ai/v1/api/knowledge_base/articles/1234",
headers={"Authorization": "Bearer "},
json={
"title": "Updated Return Policy",
"content": "Returns accepted within 60 days.",
"save_mode": "publish",
},
)
data = response.json()
```
**Response** `200 OK` — Returns the updated article object.
## Delete Articles
[Section titled “Delete Articles”](#delete-articles)
Delete one or more articles by ID.
Scope: write\_all
`DELETE https://app.quickchat.ai/v1/api/knowledge_base/articles/`
**Request Body** — JSON array of article IDs.
* Shell
```shell
curl -X DELETE https://app.quickchat.ai/v1/api/knowledge_base/articles/ \
-H 'Authorization: Bearer ' \
-H 'Content-Type: application/json' \
-d '[1234, 5678]'
```
* Python
```python
import requests
response = requests.delete(
url="https://app.quickchat.ai/v1/api/knowledge_base/articles/",
headers={"Authorization": "Bearer "},
json=[1234, 5678],
)
```
**Response** `200 OK`
## Search Articles
[Section titled “Search Articles”](#search-articles)
Search through article content with text matching.
Scope: read\_all
`GET https://app.quickchat.ai/v1/api/knowledge_base/articles/search`
**Query Parameters**
| Parameter | Description |
| --------------------------------- | -------------------------------------------------- |
| `query` string, required | Search query |
| `is_case_insensitive` boolean | Case-insensitive search (default: `true`) |
| `with_title_url_and_tags` boolean | Include title/URL/tags in search (default: `true`) |
| `strict_search` boolean | Require exact match (default: `false`) |
| `num_of_display_articles` integer | Number of articles to display (default: `5`) |
| `num_of_data_articles` integer | Number of articles to search (default: `15`) |
* Shell
```shell
curl 'https://app.quickchat.ai/v1/api/knowledge_base/articles/search?query=return%20policy' \
-H 'Authorization: Bearer '
```
* Python
```python
import requests
response = requests.get(
url="https://app.quickchat.ai/v1/api/knowledge_base/articles/search",
headers={"Authorization": "Bearer "},
params={"query": "return policy"},
)
data = response.json()
```
**Response** `200 OK`
```json
{
"article_snippets": [
{
"article_id": 1234,
"expository_sentence": "Our return policy allows returns within 30 days.",
"query_words_ids": [
{"start_char": 4, "end_char": 10, "text": "return"}
]
}
],
"article_snapshots": {
"items": [],
"offset": 0,
"count": 1
}
}
```
## List Paragraphs
[Section titled “List Paragraphs”](#list-paragraphs)
List all Paragraph-type articles. Paragraphs are short standalone text entries without a title — as opposed to full Articles which have both a title and content body.
Scope: read\_all
`GET https://app.quickchat.ai/v1/api/knowledge_base/articles/paragraphs`
**Query Parameters**
| Parameter | Description |
| ---------------- | ----------------- |
| `limit` integer | Items per page |
| `offset` integer | Items to skip |
| `query` string | Filter by content |
* Shell
```shell
curl 'https://app.quickchat.ai/v1/api/knowledge_base/articles/paragraphs?limit=10' \
-H 'Authorization: Bearer '
```
* Python
```python
import requests
response = requests.get(
url="https://app.quickchat.ai/v1/api/knowledge_base/articles/paragraphs",
headers={"Authorization": "Bearer "},
params={"limit": 10},
)
data = response.json()
```
**Response** `200 OK`
```json
{
"items": [
{
"id": 1,
"content": "Our return policy allows returns within 30 days."
}
],
"offset": 0,
"count": 1
}
```
***
# File Upload
> Upload files such as PDFs to be processed and added to the Knowledge Base as articles.
Upload files to be processed and added to the Knowledge Base as articles.
## Upload PDF
[Section titled “Upload PDF”](#upload-pdf)
Scope: write\_all
`POST https://app.quickchat.ai/v1/api/knowledge_base/file_upload_api/pdf`
Upload a PDF file. The content is extracted and added as an article.
* Shell
```shell
curl -X POST https://app.quickchat.ai/v1/api/knowledge_base/file_upload_api/pdf \
-H 'Authorization: Bearer ' \
-F 'pdf_file=@document.pdf'
```
* Python
```python
import requests
with open("document.pdf", "rb") as f:
response = requests.post(
url="https://app.quickchat.ai/v1/api/knowledge_base/file_upload_api/pdf",
headers={"Authorization": "Bearer "},
files={"pdf_file": f},
)
data = response.json()
```
**Response** `200 OK`
```json
{
"status": "success",
"message": "File processed successfully.",
"article": {
"id": 1234,
"title": "document.pdf"
}
}
```
| Field | Description |
| ---------------- | ----------------------------- |
| `status` string | Processing status |
| `message` string | Human-readable result message |
| `article` object | The created article |
## Upload File
[Section titled “Upload File”](#upload-file)
Scope: write\_all
`POST https://app.quickchat.ai/v1/api/knowledge_base/file_upload_api/`
Upload a supported file (PDF, DOCX). The content is extracted and added as an article.
* Shell
```shell
curl -X POST https://app.quickchat.ai/v1/api/knowledge_base/file_upload_api/ \
-H 'Authorization: Bearer ' \
-F 'file=@document.docx'
```
* Python
```python
import requests
with open("document.docx", "rb") as f:
response = requests.post(
url="https://app.quickchat.ai/v1/api/knowledge_base/file_upload_api/",
headers={"Authorization": "Bearer "},
files={"file": f},
)
data = response.json()
```
**Response** `200 OK` — Same schema as [Upload PDF](/api-reference/knowledge-base/file-upload/#upload-pdf).
***
# Import External Content
> Import content from external sources into the Knowledge Base. These endpoints process content asynchronously.
Import content from external sources into the Knowledge Base. These endpoints process content asynchronously.
Async Processing
All import endpoints process content asynchronously. After submitting an import request, the content is scraped and added to the Knowledge Base in the background. The Knowledge Base is automatically marked for retraining once the import completes.
To monitor progress:
1. Check `retrain_state` via [Get Knowledge Base Settings](/api-reference/knowledge-base/#get-settings) — it changes to `"to_be_retrained"` then `"in_progress"` then `"up_to_date"`
2. Use [List Articles](/api-reference/knowledge-base/articles/#list-articles) to verify imported articles appear
## Scrape Website
[Section titled “Scrape Website”](#scrape-website)
Scrape a single webpage or an entire website and import the content.
Scope: write\_all
`POST https://app.quickchat.ai/v1/api/knowledge_base/import_external/website`
**Request Body**
| Parameter | Description |
| -------------------------- | ----------------------------------------------------------------------- |
| `url` string, required | URL to scrape |
| `mode` string | `"individual"` (default), `"site_wide"`, or `"individual_with_summary"` |
| `phrases` array of strings | Key phrases to extract |
| `html_selector` string | CSS selector to target specific content |
* Shell
```shell
curl -X POST https://app.quickchat.ai/v1/api/knowledge_base/import_external/website \
-H 'Authorization: Bearer ' \
-H 'Content-Type: application/json' \
-d '{
"url": "https://example.com/docs",
"mode": "individual"
}'
```
* Python
```python
import requests
response = requests.post(
url="https://app.quickchat.ai/v1/api/knowledge_base/import_external/website",
headers={"Authorization": "Bearer "},
json={"url": "https://example.com/docs", "mode": "individual"},
)
data = response.json()
```
**Response** `202 Accepted`
```json
{
"status": "success",
"url": "https://example.com/docs",
"article": {}
}
```
## Import YouTube Transcript
[Section titled “Import YouTube Transcript”](#import-youtube-transcript)
Import the transcript from a YouTube video.
Scope: write\_all
`POST https://app.quickchat.ai/v1/api/knowledge_base/import_external/youtube`
**Request Body**
| Parameter | Description |
| ------------------------------------- | --------------------------------------- |
| `url` string, required | YouTube video URL |
| `toast_process_uuid` string, required | UUID v4 for tracking the import process |
* Shell
```shell
curl -X POST https://app.quickchat.ai/v1/api/knowledge_base/import_external/youtube \
-H 'Authorization: Bearer ' \
-H 'Content-Type: application/json' \
-d '{
"url": "https://www.youtube.com/watch?v=dQw4w9WgXcQ",
"toast_process_uuid": "550e8400-e29b-41d4-a716-446655440000"
}'
```
* Python
```python
import uuid
import requests
response = requests.post(
url="https://app.quickchat.ai/v1/api/knowledge_base/import_external/youtube",
headers={"Authorization": "Bearer "},
json={
"url": "https://www.youtube.com/watch?v=dQw4w9WgXcQ",
"toast_process_uuid": str(uuid.uuid4()),
},
)
```
**Response** `202 Accepted` — The transcript is processed asynchronously.
## Import Sitemap
[Section titled “Import Sitemap”](#import-sitemap)
Import content from all links in an XML sitemap.
Scope: write\_all
`POST https://app.quickchat.ai/v1/api/knowledge_base/import_external/site-map`
**Request Body**
| Parameter | Description |
| --------------------------- | -------------------------------------------------------- |
| `site_map` string, required | URL to an XML sitemap |
| `link_filter_regex` string | Regex to filter which links to import (default: `".*"`) |
| `html_selector` string | CSS selector to target specific content |
| `summarize` boolean | Whether to summarize imported content (default: `false`) |
* Shell
```shell
curl -X POST https://app.quickchat.ai/v1/api/knowledge_base/import_external/site-map \
-H 'Authorization: Bearer ' \
-H 'Content-Type: application/json' \
-d '{
"site_map": "https://example.com/sitemap.xml"
}'
```
* Python
```python
import requests
response = requests.post(
url="https://app.quickchat.ai/v1/api/knowledge_base/import_external/site-map",
headers={"Authorization": "Bearer "},
json={"site_map": "https://example.com/sitemap.xml"},
)
data = response.json()
```
**Response** `202 Accepted`
```json
{
"status": "success",
"links": ["https://example.com/page1", "https://example.com/page2"]
}
```
## Scrape List of Links
[Section titled “Scrape List of Links”](#scrape-list-of-links)
Import content from a specific list of URLs.
Scope: write\_all
`POST https://app.quickchat.ai/v1/api/knowledge_base/import_external/scrape-list`
**Request Body**
| Parameter | Description |
| ---------------------------------- | -------------------------------------------------------- |
| `links` array of strings, required | List of URLs to scrape (non-empty) |
| `tags` array of strings | Tags to apply to imported articles |
| `html_selector` string | CSS selector to target specific content |
| `summarize` boolean | Whether to summarize imported content (default: `false`) |
* Shell
```shell
curl -X POST https://app.quickchat.ai/v1/api/knowledge_base/import_external/scrape-list \
-H 'Authorization: Bearer ' \
-H 'Content-Type: application/json' \
-d '{
"links": ["https://example.com/page1", "https://example.com/page2"],
"tags": ["imported"]
}'
```
* Python
```python
import requests
response = requests.post(
url="https://app.quickchat.ai/v1/api/knowledge_base/import_external/scrape-list",
headers={"Authorization": "Bearer "},
json={
"links": ["https://example.com/page1", "https://example.com/page2"],
"tags": ["imported"],
},
)
data = response.json()
```
**Response** `202 Accepted`
```json
{
"status": "success",
"links": ["https://example.com/page1", "https://example.com/page2"]
}
```
## Delete Links
[Section titled “Delete Links”](#delete-links)
Remove previously imported URL-type articles from the Knowledge Base.
Scope: write\_all
`DELETE https://app.quickchat.ai/v1/api/knowledge_base/import_external`
**Request Body**
| Parameter | Description |
| ---------------------------------- | ------------------------------ |
| `links` array of strings, required | List of URLs to remove (min 1) |
Note
All provided URLs must exist in the Knowledge Base as URL-type articles. If any URL doesn’t match an existing article, the request returns `404`.
* Shell
```shell
curl -X DELETE https://app.quickchat.ai/v1/api/knowledge_base/import_external \
-H 'Authorization: Bearer ' \
-H 'Content-Type: application/json' \
-d '{
"links": ["https://example.com/page1"]
}'
```
* Python
```python
import requests
response = requests.delete(
url="https://app.quickchat.ai/v1/api/knowledge_base/import_external",
headers={"Authorization": "Bearer "},
json={
"links": ["https://example.com/page1"],
},
)
```
**Response** `200 OK`
***
# Intercom Knowledge Base
> Migrate your Intercom knowledge to Quickchat AI, or run both side by side during a switch from Intercom's Fin AI.
**Migrate your Intercom knowledge to Quickchat AI in minutes.** If you’re using Intercom’s Fin AI and want to switch to Quickchat AI — or run both side by side — these endpoints make it seamless. Your entire Intercom Help Center (the articles that power Fin AI’s responses) can be synced to Quickchat’s Knowledge Base with a single API call.
**How it works:**
1. Connect your Intercom account via the [Quickchat Dashboard](https://app.quickchat.ai/) or the [Intercom App Store integration](https://www.intercom.com/app-store/?app_package_code=quickchat)
2. Use **Import Intercom Articles** to pull all your Help Center articles into Quickchat’s Knowledge Base
3. Use **Refresh Intercom Articles** to keep content in sync as you update articles in Intercom
4. If you decide to disconnect, **Delete Intercom Articles** cleanly removes all synced content
This means your AI Agent immediately has access to the same knowledge that Fin AI uses, with zero manual content migration. For a full walkthrough of the Intercom integration, see the [Intercom channel guide](/channels/intercom/). To learn more about switching from Fin AI, visit [Quickchat as a Fin AI alternative](https://quickchat.ai/intercom-fin-ai-alternative).
## Refresh Intercom Articles
[Section titled “Refresh Intercom Articles”](#refresh-intercom-articles)
Re-fetch content from Intercom for existing articles.
Scope: write\_all
`POST https://app.quickchat.ai/v1/api/knowledge_base/intercom/refresh_articles`
**Request Body**
| Parameter | Description |
| ------------------------------- | ----------------------------------------------- |
| `article_ids` array of integers | Specific article IDs to refresh (default: all) |
| `fetch_new_articles` boolean | Whether to fetch new articles (default: `true`) |
**Response** `204 No Content`
## Import Intercom Articles
[Section titled “Import Intercom Articles”](#import-intercom-articles)
Import all articles from Intercom.
Scope: write\_all
`POST https://app.quickchat.ai/v1/api/knowledge_base/intercom/import`
**Response** `200 OK` — Returns a list of imported article snapshots.
## Delete Intercom Articles
[Section titled “Delete Intercom Articles”](#delete-intercom-articles)
Remove all Intercom-sourced articles from the Knowledge Base.
Scope: write\_all
`POST https://app.quickchat.ai/v1/api/knowledge_base/intercom/delete`
**Response** `204 No Content`
***
# Tags
> Tags help you organize and categorize Knowledge Base articles. Create, list, and assign them via the API.
Tags help you organize and categorize your Knowledge Base articles. They serve three key purposes:
1. **Visual organization in the Inbox** — Tags appear as labels on articles in the Dashboard, making it easy to visually identify and filter content by topic, department, or category.
2. **AI Action targeting** — When you configure AI Actions in the Dashboard, you use tags to tell the AI which subset of articles to search. For example, a “Search Returns” action can target only articles tagged `returns`, giving the AI focused, relevant results instead of searching the entire Knowledge Base.
3. **Programmatic filtering** — Use the `tags` parameter in [List Articles](/api-reference/knowledge-base/articles/#list-articles) to retrieve only articles matching a specific tag, enabling targeted content management workflows.
4. **AI search relevance** — The AI Agent is tag-aware when searching the Knowledge Base for answers. Descriptive tags help the AI narrow down the most relevant articles, improving answer accuracy and response quality.
## List Tags
[Section titled “List Tags”](#list-tags)
Retrieve all tags used across Knowledge Base articles.
Scope: read\_all
`GET https://app.quickchat.ai/v1/api/knowledge_base/tags/`
* Shell
```shell
curl https://app.quickchat.ai/v1/api/knowledge_base/tags/ \
-H 'Authorization: Bearer '
```
* Python
```python
import requests
response = requests.get(
url="https://app.quickchat.ai/v1/api/knowledge_base/tags/",
headers={"Authorization": "Bearer "},
)
tags = response.json()
```
**Response** `200 OK`
```json
["policies", "faq", "product-info"]
```
***
# Widget Configuration
> Read and update the website widget configuration via the API.
## Widget Configuration
[Section titled “Widget Configuration”](#widget-configuration)
The **widget** is a chat interface that you embed on your website — it appears as a floating bubble in the corner of the page that visitors can click to open a conversation with your AI Agent. The widget is fully customizable: you control its colors, size, position, greeting messages, and behavior.
These settings also affect the **embed**, which is a full-page or inline version of the same chat interface that you can place directly into your webpage layout (as opposed to the floating bubble). Both the widget and embed share the same configuration for appearance, messaging, and behavior.
With these endpoints, you can programmatically customize how Quickchat AI appears on your website — match your brand colors, set up pre-chat forms to collect visitor information, configure typing indicators, enable voice input, and more. For setup instructions, see the [Website channel guide](/channels/website/).
### Get Widget Configuration
[Section titled “Get Widget Configuration”](#get-widget-configuration)
Scope: read\_all
`GET https://app.quickchat.ai/v1/api/widget/configuration`
* Shell
```shell
curl https://app.quickchat.ai/v1/api/widget/configuration \
-H 'Authorization: Bearer '
```
* Python
```python
import requests
response = requests.get(
url="https://app.quickchat.ai/v1/api/widget/configuration",
headers={"Authorization": "Bearer "},
)
data = response.json()
```
**Response** `200 OK`
```json
{
"welcome_message": "Hello! How can I help?
",
"welcome_message2": "",
"header": "Support",
"subtitle": "We typically reply within minutes",
"conversation_starters": ["What are your opening hours?", "How do I track my order?", "Talk to a human"],
"popup_active": true,
"input_placeholder": "Type your message...",
"primary_color": "rgb(0, 122, 255)",
"voice_active": false,
"header_color": "rgb(0, 122, 255)",
"header_collapse": false,
"header_text_color": true,
"typing": true,
"window_auto_open": false,
"white_label": false,
"prechat_active": false,
"prechat_header_text": null,
"prechat_button_text": null,
"prechat_message_text": null,
"background_disclaimer_text": null,
"streaming_active": true,
"link_tracking_active": false,
"window_height": 600,
"window_width": 400,
"size": "medium",
"location": "bottom-right",
"launcher_label": "Ask AI",
"launcher_draggable": false,
"avatar_image": "https://storage.googleapis.com/quickchat-files/appquickchat/media/chat_avatars/default_bubble.png",
"bubble_icon_image": "https://storage.googleapis.com/quickchat-files/appquickchat/media/chat_avatars/default_bubble.png",
"default_avatar_image": "https://storage.googleapis.com/quickchat-files/appquickchat/media/chat_avatars/default_bubble.png",
"theme": "light",
"widget_theme_custom": {
"colors": {
"background": "#ffffff",
"header": "#ffffff",
"header_text": "#030712",
"accent": "#27272a",
"accent_hover": "#374151",
"accent_text": "#ffffff",
"bubble": "#27272a",
"bubble_text": "#ffffff",
"ai_bubble_text": "#030712",
"tertiary": "#afafb2",
"link": null,
"input_background": "#ffffff",
"input_text": "#030712",
"input_placeholder": "#9ca3af",
"border": "#e5e7eb",
"sidebar": {
"background": "#f5f5f5",
"text": null,
"accent": "#e5e5e5",
"accent_text": null
}
},
"radius": { "bubble": "full", "input": "full", "button": "full" },
"font": { "size": "base" }
}
}
```
#### Content & Messaging
[Section titled “Content & Messaging”](#content--messaging)
| Field | Description |
| ------------------------------------------------ | ------------------------------------------------------------------------------------------------------------------------ |
| `welcome_message` string | Primary welcome message displayed when widget opens (HTML). Dashboard: **Website > Greeting** |
| `welcome_message2` string | Secondary welcome message shown below the primary greeting |
| `header` string | Text displayed in the widget header bar. Dashboard: **Website > Header** |
| `subtitle` string | Subtitle text shown below the header. Dashboard: **Website > Subtitle** |
| `input_placeholder` string | Placeholder text in the message input field (e.g., “Type your message…”) |
| `conversation_starters` array of strings or null | Suggested opening prompts shown as clickable buttons when the widget opens. Up to 3 entries, each up to \~100 characters |
| `background_disclaimer_text` string or null | Disclaimer text shown at the bottom of the chat window |
#### Appearance
[Section titled “Appearance”](#appearance)
| Field | Description |
| ---------------------------------- | ------------------------------------------------------------------------------------------------------------------------------------------------------------------------------------------------------------------------------------------------------------------------------------------------------------------------------------------------------------------------------------------------------------------------------------------------------------------------------------------------------------------------------------------------------------------------------------------------------------------------------------------------------------------------------------------------------------------------------------- |
| `primary_color` string | Widget accent color as CSS rgb value (e.g., `"rgb(0, 122, 255)"`). Used for buttons, links, and user message bubbles |
| `header_color` string | Header background color as CSS rgb value |
| `header_text_color` boolean | Header text brightness. `true` = white/light text (for dark headers), `false` = dark text (for light headers). **Note: despite the name, this is a boolean, not a color string** |
| `size` string | Launcher size preset: `"small"`, `"medium"`, or `"large"` (shown in the dashboard as Small, Input Only, and Classic) |
| `location` string | Widget position on the page: `"top-left"`, `"top-right"`, `"bottom-left"`, or `"bottom-right"` |
| `launcher_label` string or null | Text on the **small** launcher button (`size: "small"`), max 25 characters. `null` uses the default (`"Ask AI"`); `""` shows an icon-only launcher |
| `launcher_draggable` boolean | Allow visitors to drag the launcher to a different position on the page |
| `window_height` integer | Widget height in pixels (400-1200) |
| `window_width` integer | Widget width in pixels (300-700) |
| `avatar_image` string or null | URL of the **AI Agent Avatar**, shown both in the chat header and as the floating bubble icon. Upload via PATCH as base64. `null` means the avatar was deleted and the widget shows no avatar |
| `bubble_icon_image` string or null | **Deprecated.** Always mirrors `avatar_image` — the bubble icon and the chat avatar are now one image (see [AI Agent Avatar unification](#ai-agent-avatar-unification)) |
| `default_avatar_image` string | Read-only. URL of the default AI Agent Avatar that `use_default_avatar` restores |
| `theme` string | Color theme mode: `"light"` or `"dark"` (fixed presets) or `"custom"` (applies the `widget_theme_custom` palette) |
| `widget_theme_custom` object | Custom palette applied when `theme` is `"custom"`. Contains `colors` (header, accent, message bubble, AI text, `link`, input, border, and more, as hex or `rgb()`/`rgba()`), `radius` (`"sm"`/`"base"`/`"lg"`/`"full"` for bubbles, input, and buttons), and `font.size` (`"sm"`/`"base"`/`"lg"`). On PATCH, send the whole object — missing keys reset to defaults. `colors.link` defaults to `null`, meaning links inherit the surrounding text color. `colors.sidebar` (`background`, `text`, `accent`, `accent_text`) themes the standalone Chat Page sidebar only (ignored by the bubble and embed views); its `text` and `accent_text` default to `null`, meaning a readable color is auto-derived from the matching background |
#### Behavior
[Section titled “Behavior”](#behavior)
| Field | Description |
| ------------------------------ | -------------------------------------------------------------------------------------------------------------------------------------------------- |
| `popup_active` boolean | Show a popup prompt near the widget bubble to encourage visitors to start a conversation |
| `window_auto_open` boolean | Automatically open the widget when the page loads (instead of showing just the bubble) |
| `header_collapse` boolean | Allow visitors to collapse the header area for more chat space |
| `typing` boolean | Show a typing indicator animation while the AI is generating a response |
| `streaming_active` boolean | Stream AI responses word-by-word instead of showing the complete message at once |
| `voice_active` boolean | Enable voice input — visitors can send messages using their microphone |
| `link_tracking_active` boolean | Track when visitors click links in AI responses. Tracked clicks appear as `tracked_link` events in [Conversation Events](#get-conversation-events) |
| `white_label` boolean | Remove “Powered by Quickchat” branding from the widget |
#### Pre-chat Form
[Section titled “Pre-chat Form”](#pre-chat-form)
| Field | Description |
| ------------------------------------- | ------------------------------------------------------------------------------------- |
| `prechat_active` boolean | Enable the pre-chat form. When active, visitors must fill in the form before chatting |
| `prechat_header_text` string or null | Header text for the pre-chat form |
| `prechat_button_text` string or null | Label for the submit button on the pre-chat form |
| `prechat_message_text` string or null | Body text/instructions shown in the pre-chat form (HTML) |
### Update Widget Configuration
[Section titled “Update Widget Configuration”](#update-widget-configuration)
Scope: write\_all
`PATCH https://app.quickchat.ai/v1/api/widget/configuration`
**Request Body** — All fields are optional. Only include the fields you want to update.
Note
For `avatar_image`, send base64-encoded image data (max 5 MB). The response returns the stored image URL. Sending `avatar_image: null` deletes the avatar (the widget then shows no avatar), and sending `use_default_avatar: true` restores the default AI Agent Avatar.
#### AI Agent Avatar unification
[Section titled “AI Agent Avatar unification”](#ai-agent-avatar-unification)
The chat avatar (header logo) and the floating bubble icon (launcher) were merged into a single image, the **AI Agent Avatar**, stored in `avatar_image`. The bubble icon always mirrors it — there is no longer an independent launcher image. If you integrate with this endpoint directly, note the following behavior changes:
* Uploading via `bubble_icon_image` is **deprecated**: it now sets the unified AI Agent Avatar, which also replaces the image shown in the chat header. Use `avatar_image` instead.
* `bubble_icon_image: null` is a **no-op**. It used to clear the launcher icon; since the launcher mirrors the avatar, delete via `avatar_image: null` instead.
* Agents that never customized their avatar show the default AI Agent Avatar (see `default_avatar_image` in the response) in both the header and the launcher.
- Shell
```shell
curl -X PATCH https://app.quickchat.ai/v1/api/widget/configuration \
-H 'Authorization: Bearer ' \
-H 'Content-Type: application/json' \
-d '{
"primary_color": "rgb(255, 87, 34)",
"header": "Sales Assistant",
"window_auto_open": true
}'
```
- Python
```python
import requests
response = requests.patch(
url="https://app.quickchat.ai/v1/api/widget/configuration",
headers={"Authorization": "Bearer "},
json={
"primary_color": "rgb(255, 87, 34)",
"header": "Sales Assistant",
"window_auto_open": True,
},
)
data = response.json()
```
**Response** `200 OK` — Returns the updated widget configuration (same schema as [Get Widget Configuration](#get-widget-configuration) response).
***
# Discord
> Step-by-step guide to integrating your Quickchat AI Agent with Discord. Create a bot, configure permissions, and go live on your server.
In this guide, we’ll go through how to integrate your AI Agent into your Discord server. Here’s an overview of what we’ll cover:
1. Create a Discord server
2. Create a Discord application
3. Configure Your Discord Application
4. Add the Bot to Your Discord Server
5. Integrate your Discord bot with Quickchat AI
## Watch the Video
[Section titled “Watch the Video”](#watch-the-video)
[Play](https://youtube.com/watch?v=tNXuqBUZZ-4)
## Creating and configuring a Discord Server
[Section titled “Creating and configuring a Discord Server”](#creating-and-configuring-a-discord-server)
### Create a Discord Server
[Section titled “Create a Discord Server”](#create-a-discord-server)
To initiate the integration process, you’ll need a Discord Server. If you don’t have a Discord account, visit [discord.com](https://discord.com) and create one. Once logged in, follow [this guide to create your Discord server](https://support.discord.com/hc/en-us/articles/204849977-How-do-I-create-a-server-).
### Create a Discord Application
[Section titled “Create a Discord Application”](#create-a-discord-application)
Go to [discord.com/developers/applications](https://discord.com/developers/applications) while logged in to your Discord account and create a new application.
### Configure Your Discord Application
[Section titled “Configure Your Discord Application”](#configure-your-discord-application)
Before adding your bot to the server, enable the **Message Content Intent** for your application. This allows your bot to read messages sent by users on your server.
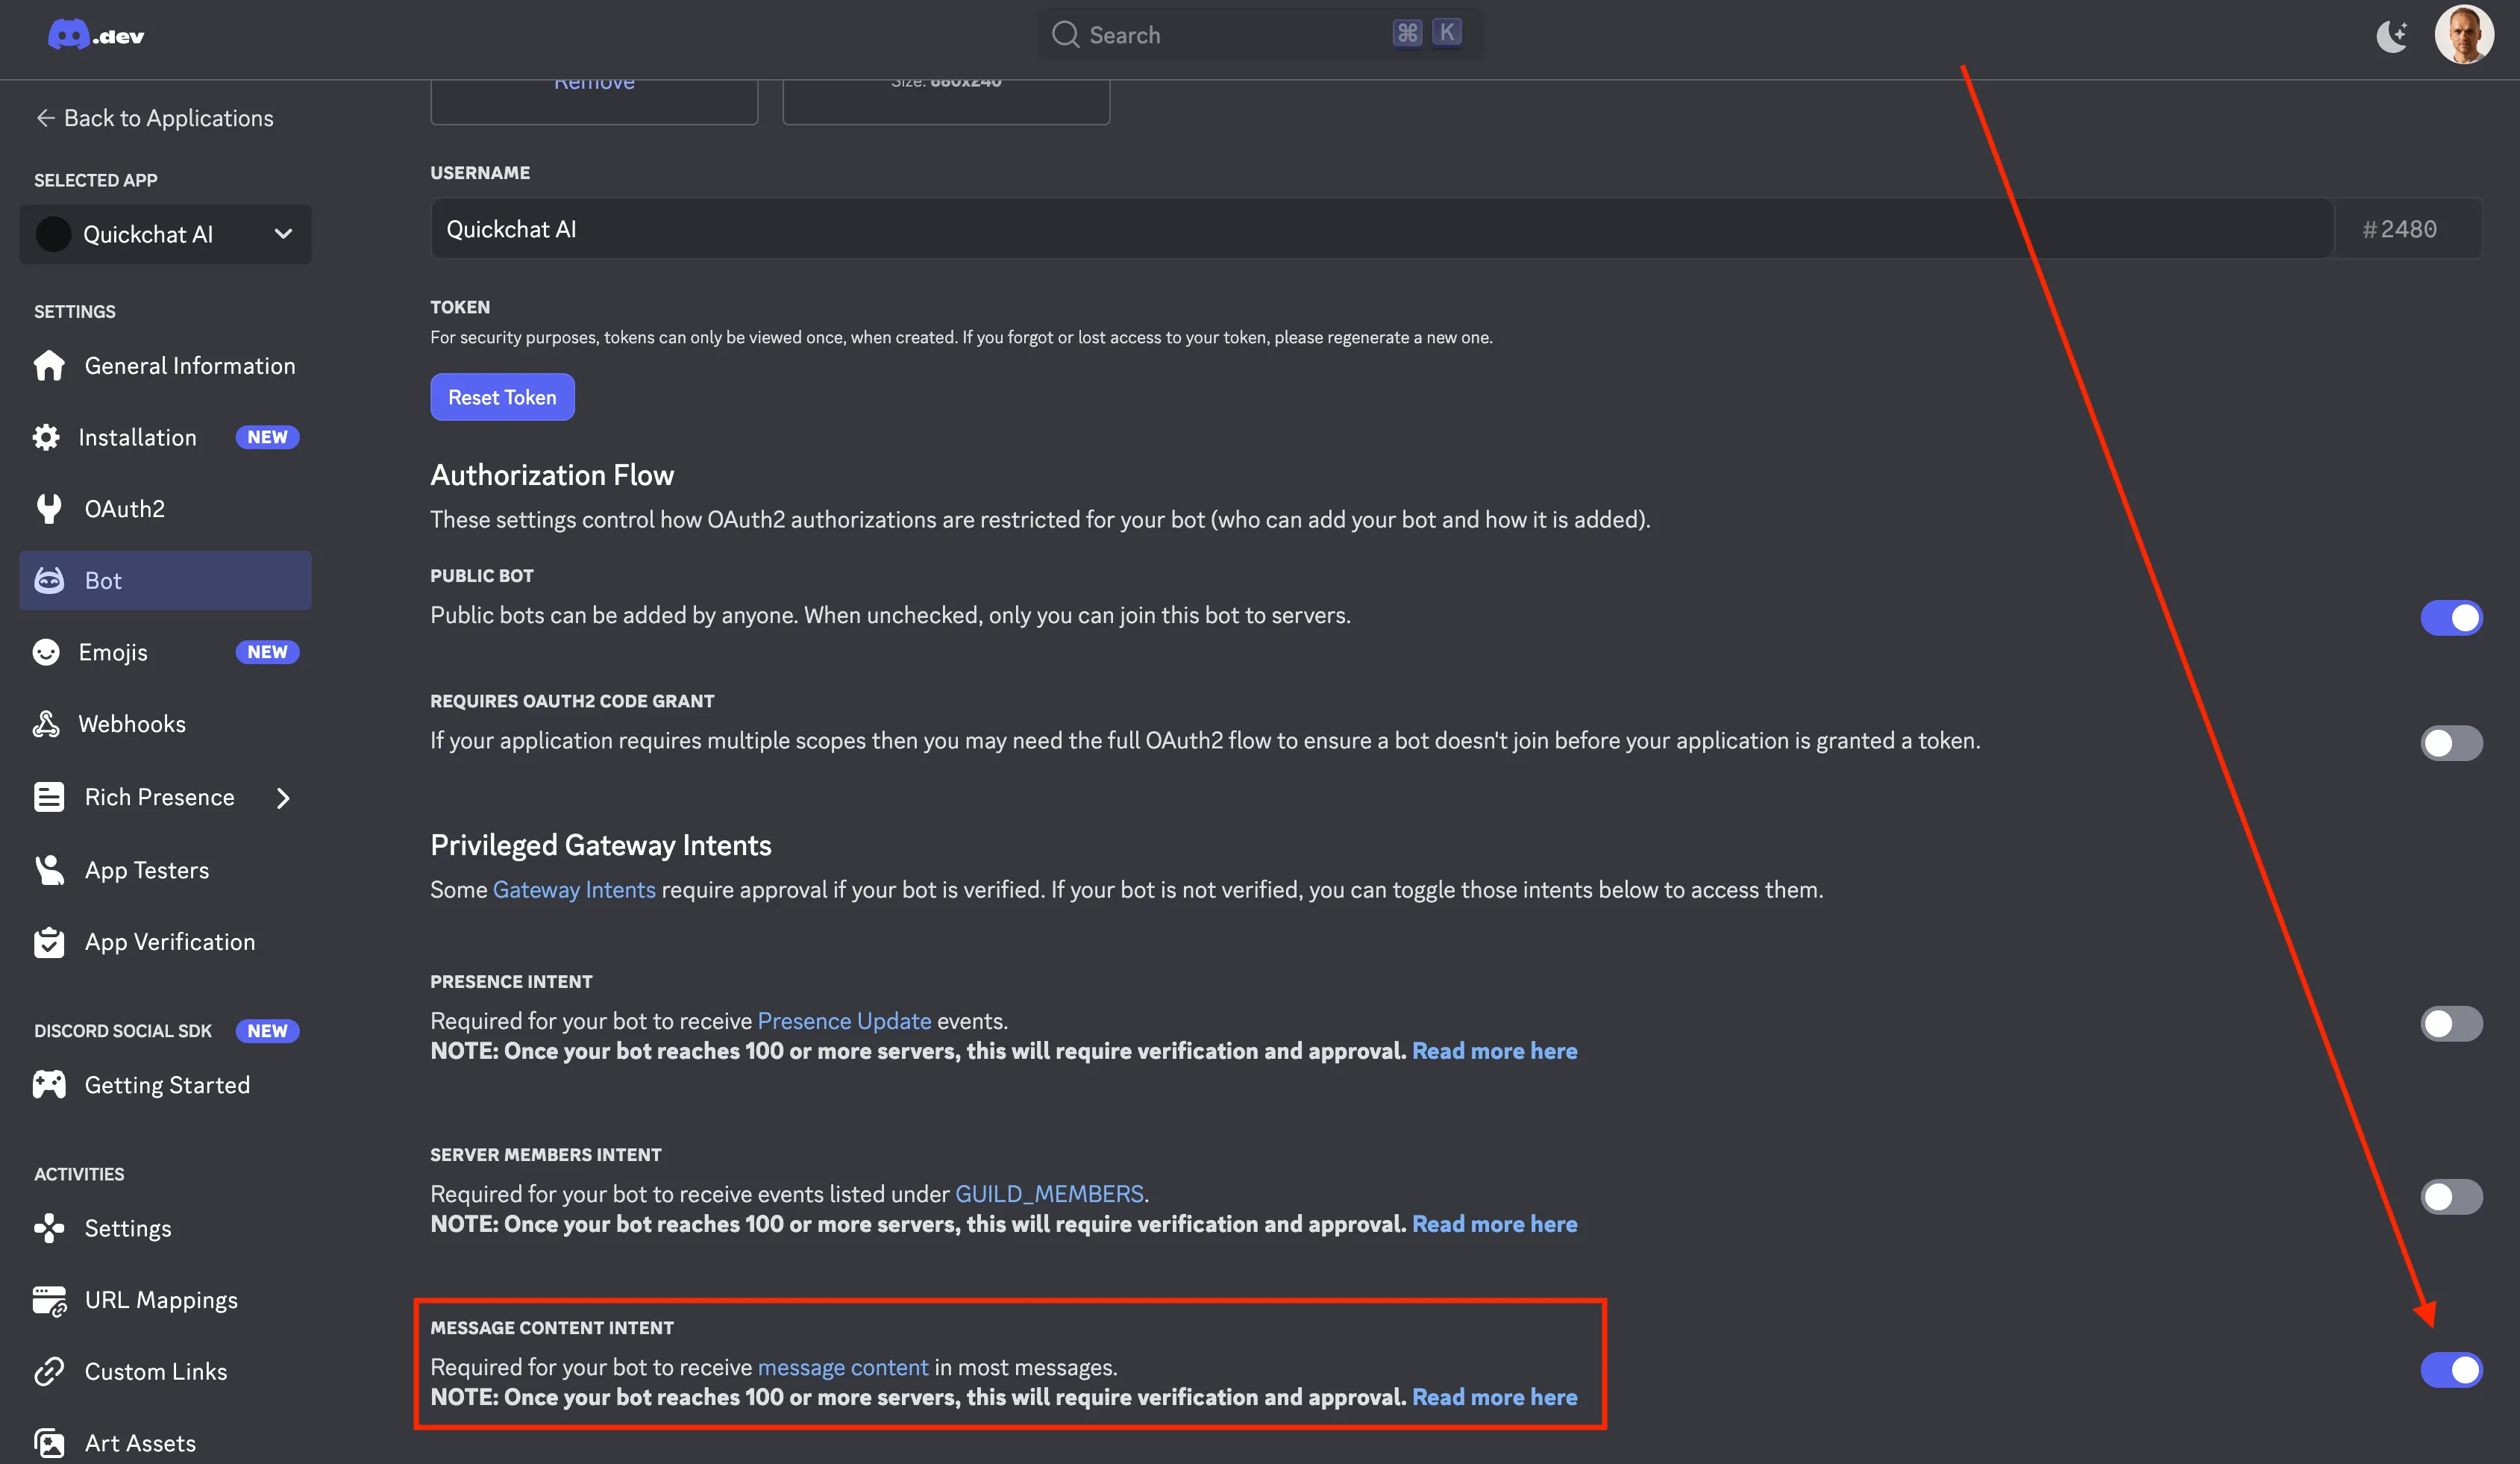
### Add the Bot to Your Discord Server
[Section titled “Add the Bot to Your Discord Server”](#add-the-bot-to-your-discord-server)
Now you need to add your bot to your server. The way to do it is to construct a Discord URL and paste it into your browser:
```plaintext
https://discord.com/api/oauth2/authorize?client_id=&permissions=309237712896&scope=bot
```
**Where does the permissions number come from?**
The permissions number (`309237712896`) comes from requesting the following permissions:
* `Send Messages`
* `Create Public Threads`
* `Send Messages in Threads`
* `Read Message History`
Those are the minimal set of permissions required for your bot to operate correctly. You can see it for yourself by going to [discord.com/developers/applications](https://discord.com/developers/applications), selecting your application, clicking on **Bot** on the left and scrolling down:
**Where to find YOUR CLIENT ID?**
The easiest way will be to look at the address bar in your browser and copy the long number which is part of the address:
```plaintext
https://discord.com/developers/applications//bot
```
In this case the client id is **1234567890123456789** which means that the full URL you need to go to to add the server will be:
```plaintext
https://discord.com/api/oauth2/authorize?client_id=1234567890123456789&permissions=309237712896&scope=bot
```
## Integrate Your Discord Bot with Quickchat AI
[Section titled “Integrate Your Discord Bot with Quickchat AI”](#integrate-your-discord-bot-with-quickchat-ai)
To connect your bot with **Quickchat AI**, retrieve your **Discord Bot Token** from the [Developer Portal](https://discord.com/developers/applications).
1. Go to **Bot Settings** → **Reset Token** → **Copy Token**
2. In the **Quickchat AI Dashboard**, head to **External Applications**, open the **Discord** integration, turn on **Enable Discord** and paste your token.
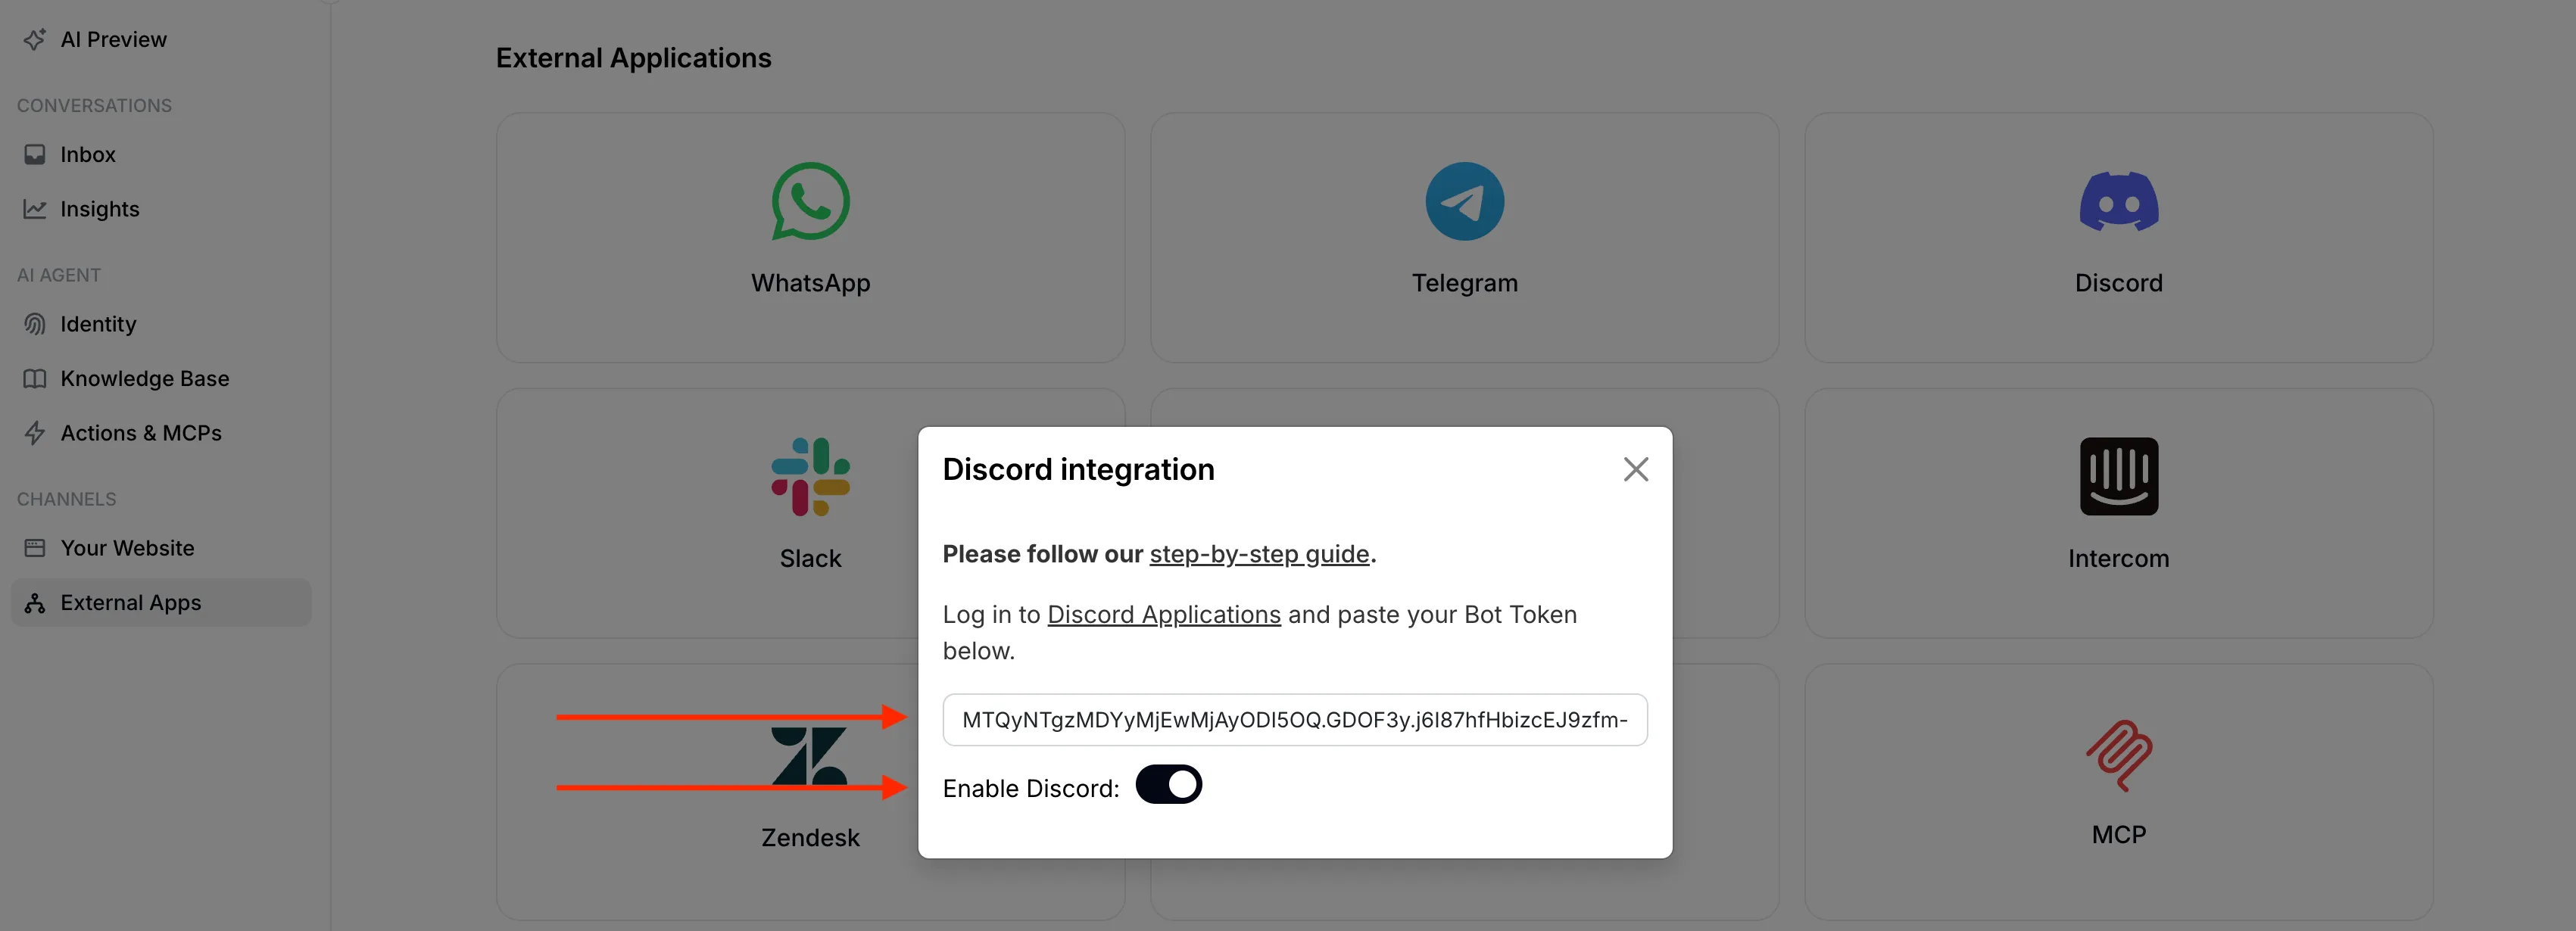
## 🎉 Your AI Bot is Live!
[Section titled “🎉 Your AI Bot is Live!”](#-your-ai-bot-is-live)
Head back to **Discord** - your bot should be **online** and ready to chat! Just **@mention** it to start a conversation. 🤖💬
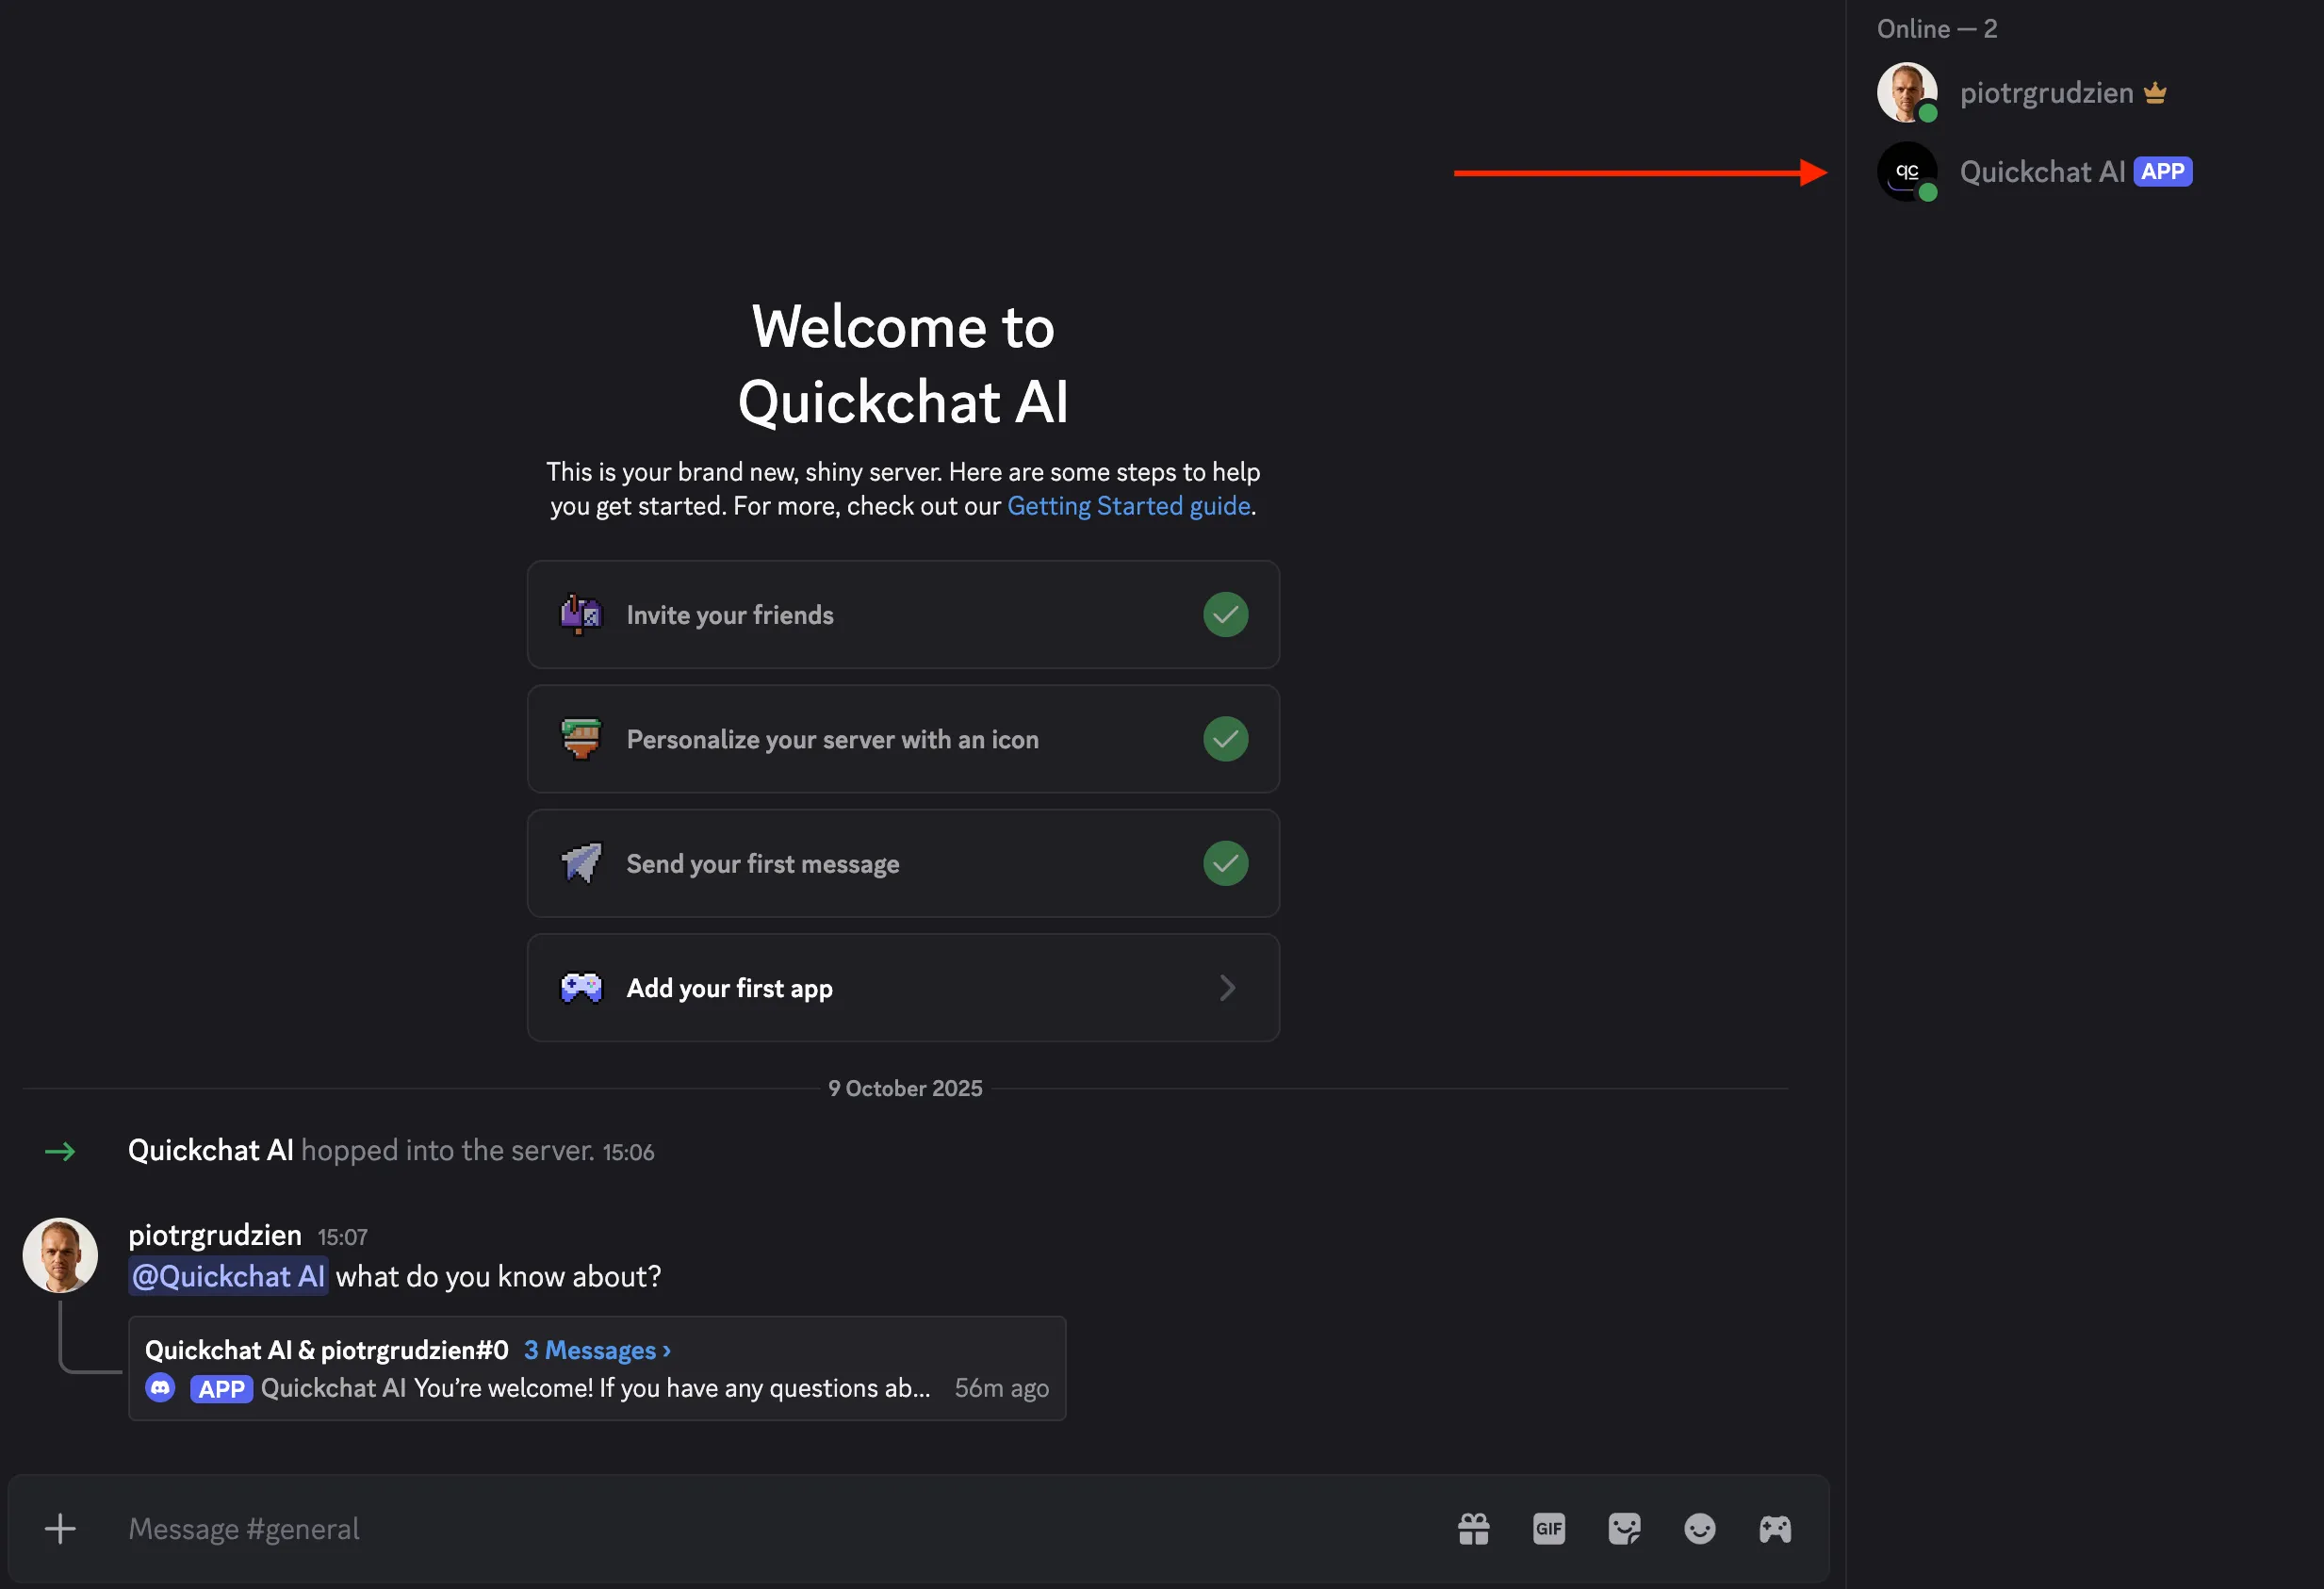
By default, when **@mentioned** the bot replies in the same channel. You can change this with the **Reply mode** setting in the integration: **Reply in channel** (the default) or **Reply in threads**. With **Reply in threads**, the bot answers inside a thread and users can continue the conversation there without mentioning it again.
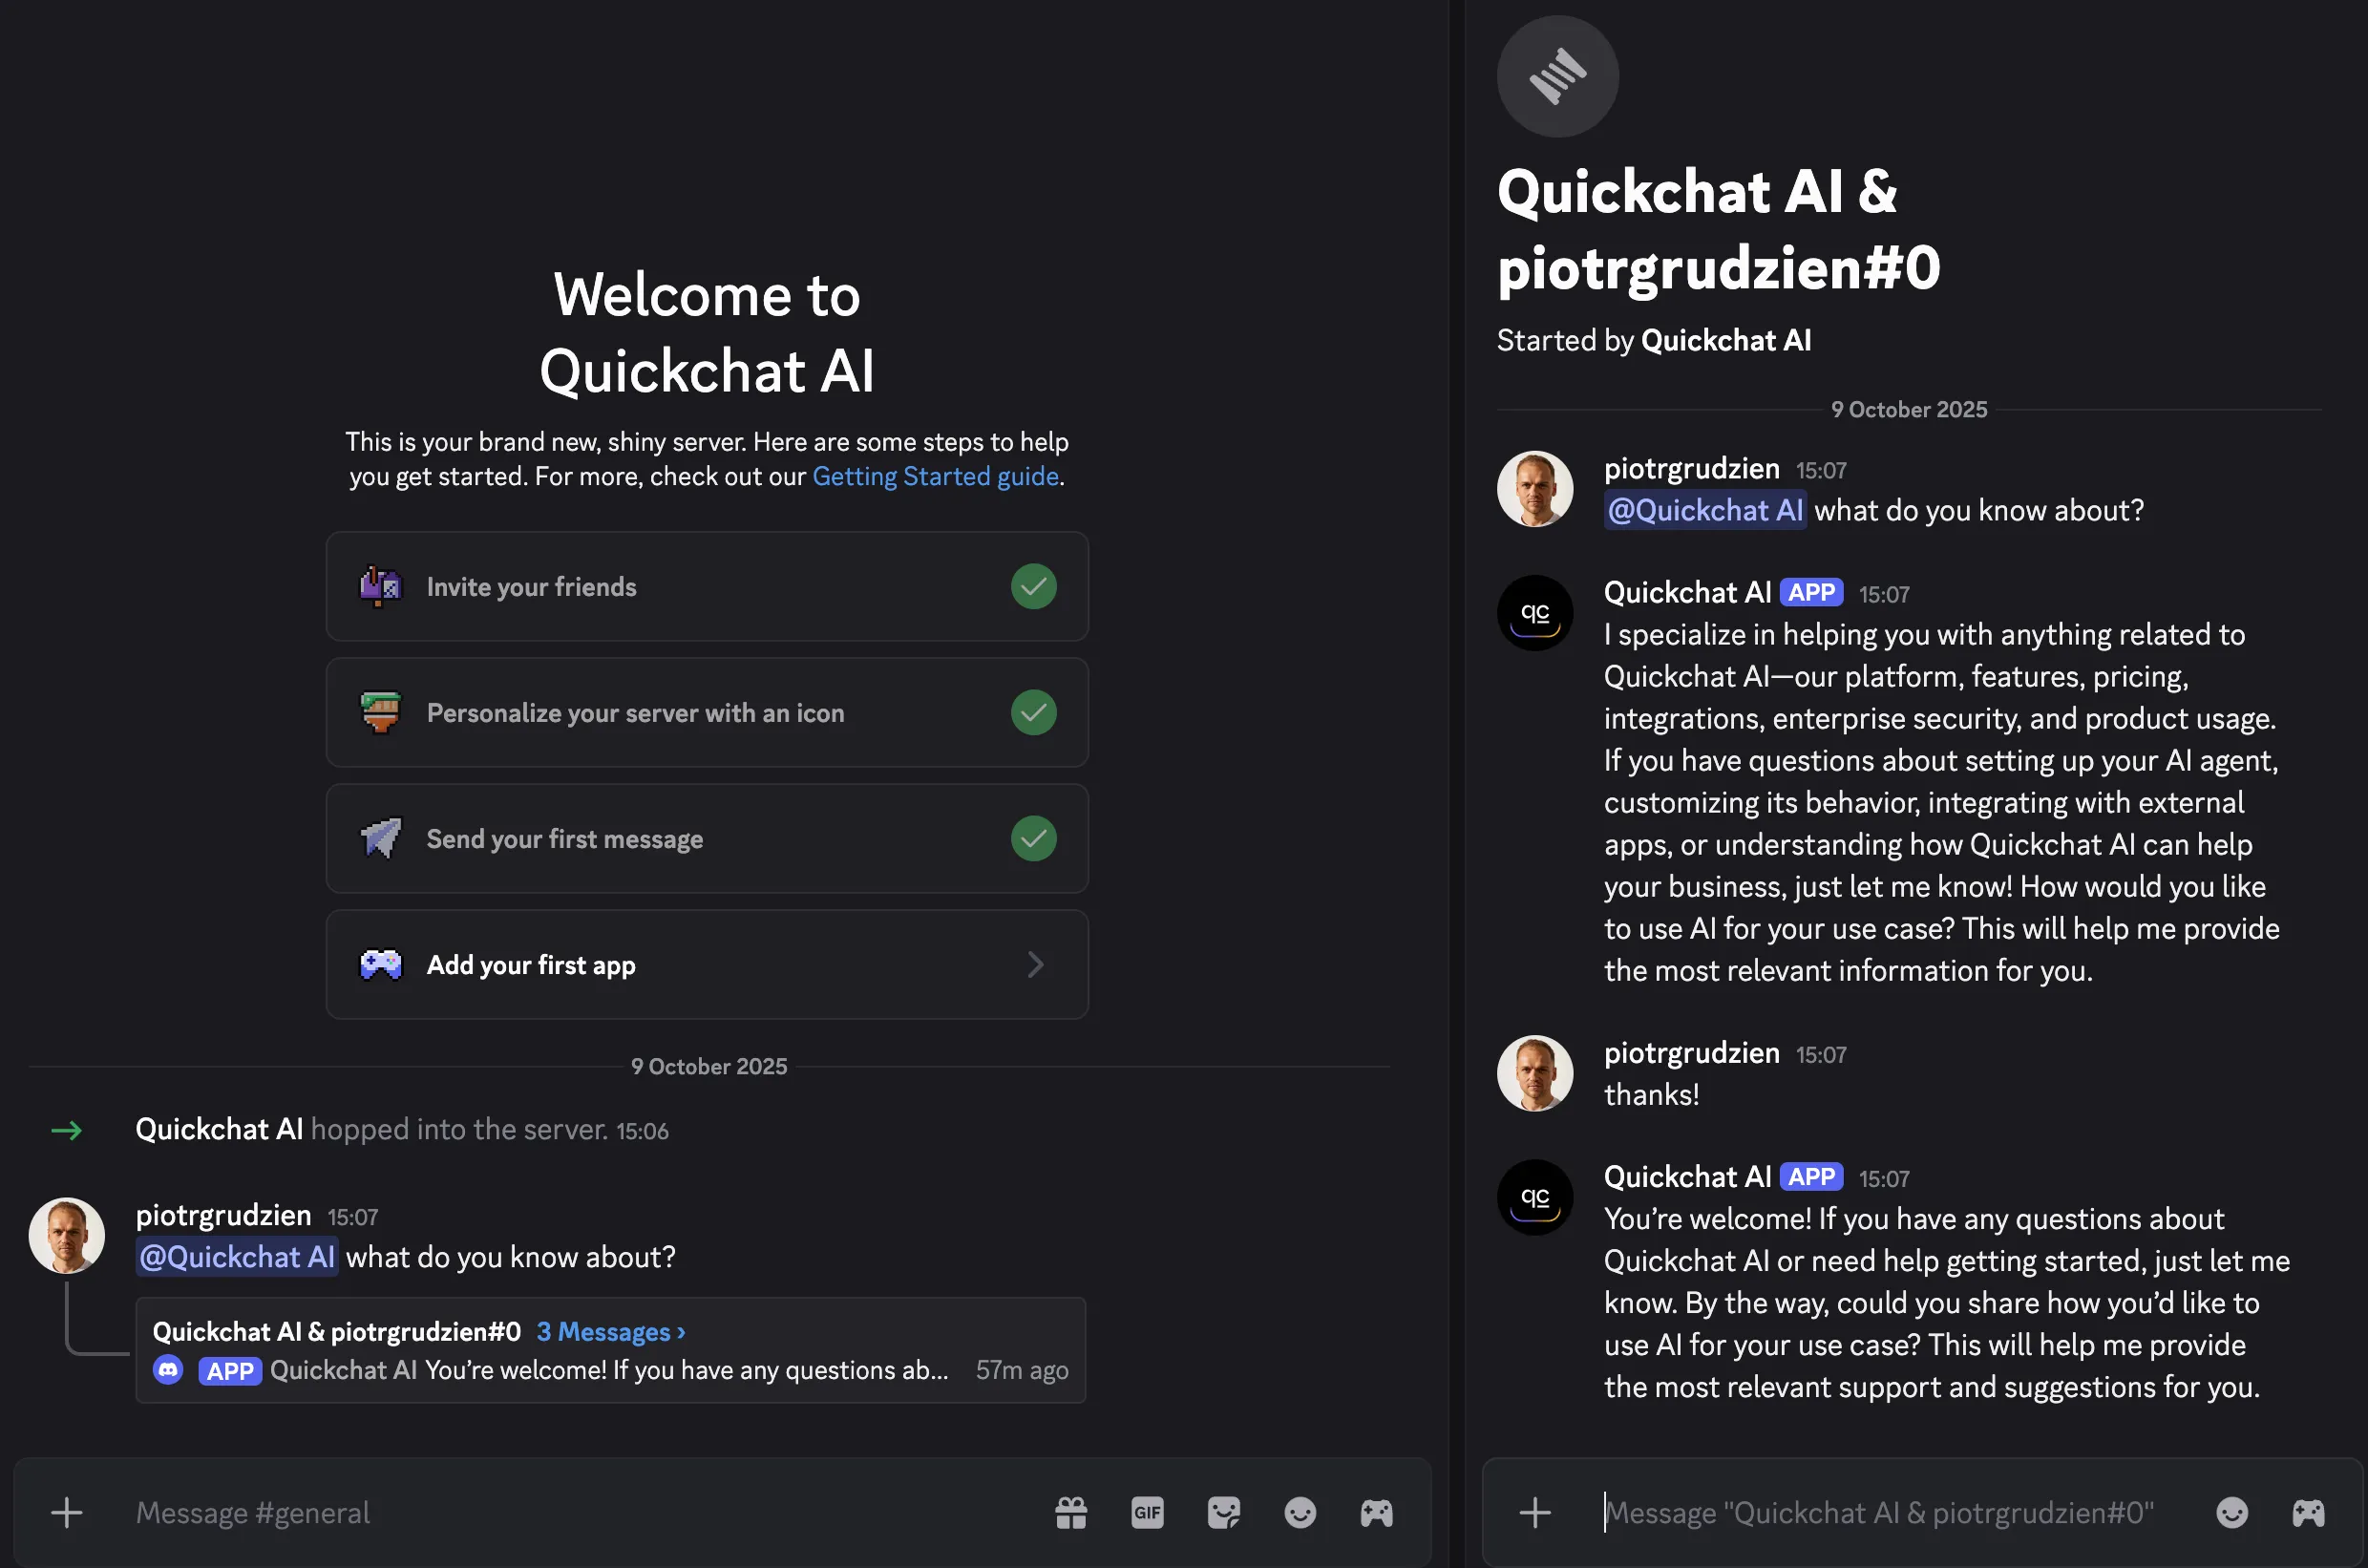
## Troubleshooting
[Section titled “Troubleshooting”](#troubleshooting)
### ”Integration requires code grant” when adding the bot
[Section titled “”Integration requires code grant” when adding the bot”](#integration-requires-code-grant-when-adding-the-bot)
Your application has **Require OAuth2 Code Grant** enabled, which blocks the simple bot invite flow. In the [Developer Portal](https://discord.com/developers/applications), open your application, go to **Bot**, turn **Require OAuth2 Code Grant** off, save, and open the invite URL again.
### The authorization page shows a cake or “baked” message
[Section titled “The authorization page shows a cake or “baked” message”](#the-authorization-page-shows-a-cake-or-baked-message)
That quirky screen is Discord’s success page: the bot was added. To confirm, open your server’s **Server Settings → Integrations → Bots and Apps** and look for your bot in the list.
### The bot is in the server but appears offline
[Section titled “The bot is in the server but appears offline”](#the-bot-is-in-the-server-but-appears-offline)
1. In the Quickchat AI dashboard, open **External Apps → Discord** and check the connection status. An invalid token or a missing intent is reported there with instructions.
2. Bot tokens are shown only once. If in doubt, click **Reset Token** in the Developer Portal, copy the new token, and paste it into Quickchat again.
3. Make sure **Message Content Intent** is enabled under **Bot → Privileged Gateway Intents**.
4. Give it up to a minute after saving: the bot restarts whenever its settings change.
### The bot is online but does not reply
[Section titled “The bot is online but does not reply”](#the-bot-is-online-but-does-not-reply)
@mention the bot in a channel it can access. Verify its role and channel permissions include **Send Messages**, **Create Public Threads**, **Send Messages in Threads**, and **Read Message History**. Whether it replies in the channel or in threads is configured in Quickchat under **External Apps → Discord**.
Tip
The Discord integration page in the Quickchat AI dashboard shows the connection status, the **Bot Token** field, a **Reply mode** selector (**Reply in channel** or **Reply in threads**), and a link to join our Discord community for help.
***
Join our Discord server to learn more about how to make the most of Quickchat AI 👉 [discord.gg/KqkHwvPRNH](https://discord.gg/KqkHwvPRNH)
# Drupal
> Integrate Quickchat AI with Drupal. Obtain API tokens, sync Knowledge Base items, and add the AI Agent chatbot to your Drupal site.
In this guide, we’ll go through how to integrate your AI Agent into your Drupal. Here’s an overview of what we’ll cover:
1. Obtaining a token for Drupal integration
2. Syncing Knowledge Base items
3. Adding the Quickchat AI Assitant to Drupal
## Obtain token for Drupal integration
[Section titled “Obtain token for Drupal integration”](#obtain-token-for-drupal-integration)
1. Activate Drupal integration within the **External Apps** tab of the Quickchat AI app.
2. Copy your scenario\_id and token.
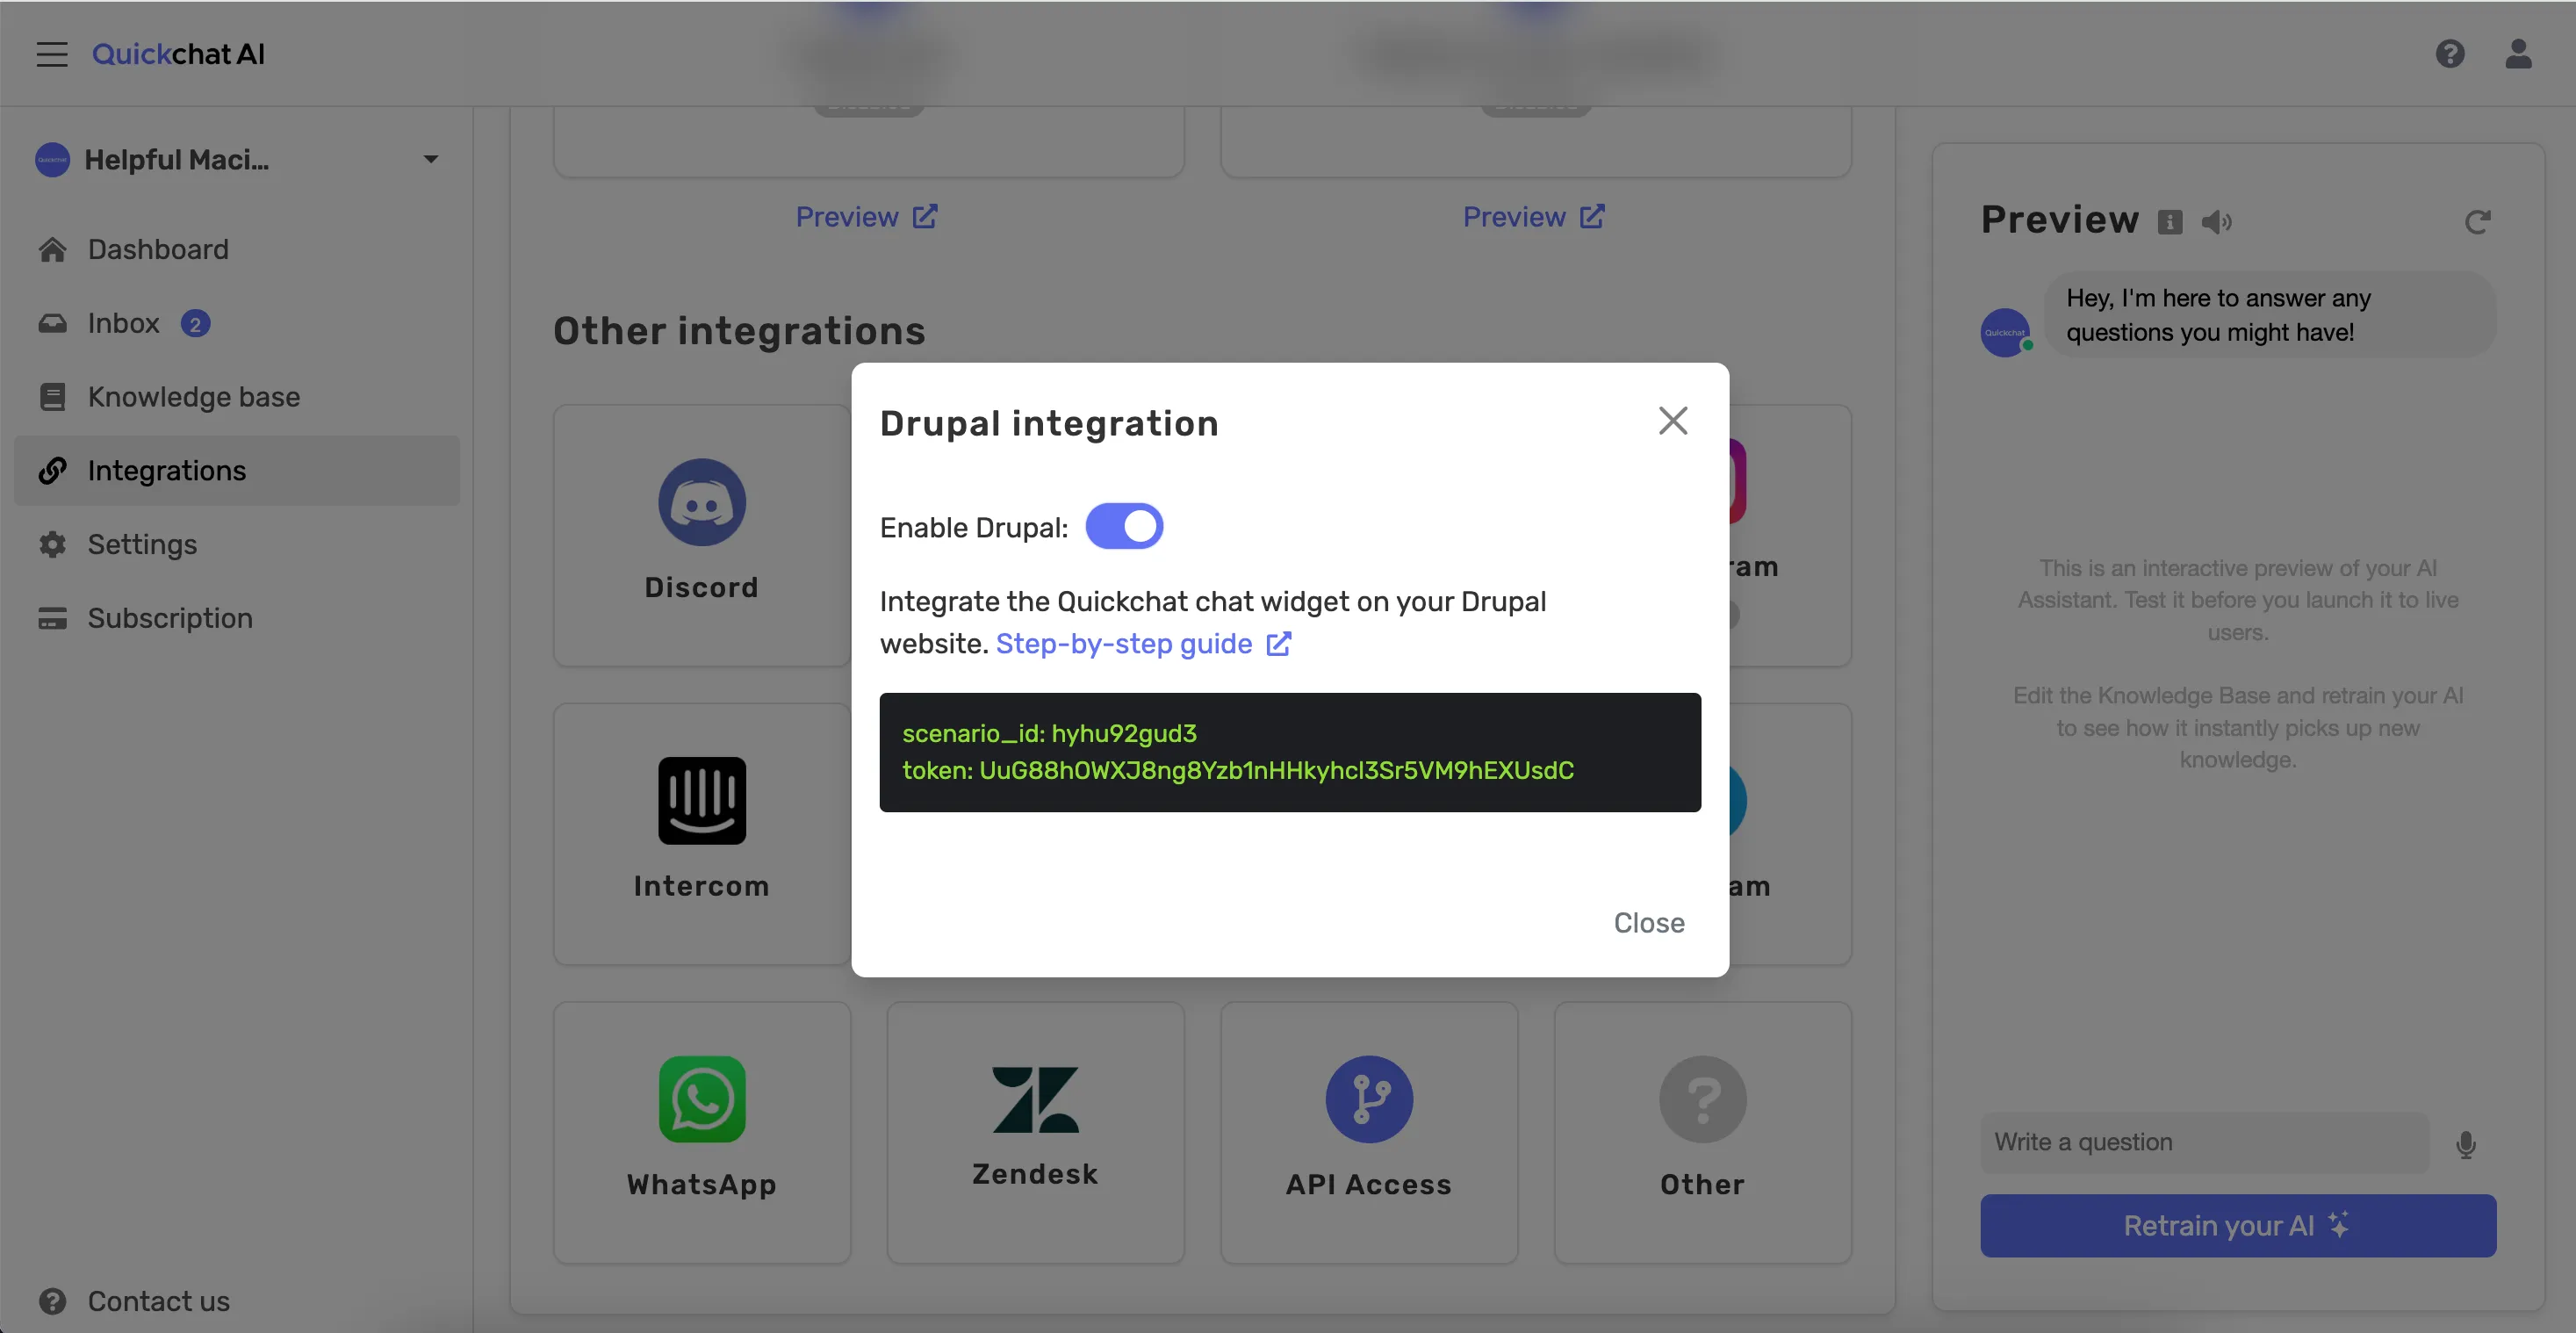
## Enable module
[Section titled “Enable module”](#enable-module)
Enable the Quickchat module to provide the API client used by the sub-modules. No configuration is needed at this point.

## Sync knowledge base items
[Section titled “Sync knowledge base items”](#sync-knowledge-base-items)
### Configuration
[Section titled “Configuration”](#configuration)
This module will add a new content type `quickchat_kb` (admin/structure/types/manage/quickchat\_kb) and a view `quickchat_kb` (/admin/structure/views/view/quickchat\_kb) so you can use them as a source to train your chatbot models.
You can configure the module from (/admin/config/services/quickchat-api/sync), defining:
* A model name
* A scenario\_id
* An API token
* A view name: the view to use as a source of knowledge base items (you can use the one provided by the module or a custom one).
* A view display: the display from the view name selected above.
*From that screen, you can add multiple models with a different pair of token and scenario\_id and view source.*
### View
[Section titled “View”](#view)
In case you want to use a different view as the source of knowledge base items, be aware that if you want to split the results into different knowledge base items, you need to use the \n separator. Otherwise, the view results will be considered as only one knowledge base item.
### Operation
[Section titled “Operation”](#operation)
Once you have configured the sync model mappings, the next step is to sync the knowledge base items for your chatbot models. You can do this by navigating to `/admin/content/kb`.
In this section, you will see a list of the configured models:
If you click in the title of the model to sync you will see a page similar to this one:
In the preview section you can see the knowledge base items that you are about to sync. The values displayed there are the results of the view and view display that you selected under the model configuration section.
The available actions are Update and Rebuild:

The **Update** action will push the knowledge base items to the selected model (scenario\_id), and the **Rebuild** action will retrain the chatbot with the updated knowledge base items.
## Add a Quickchat AI Agent
[Section titled “Add a Quickchat AI Agent”](#add-a-quickchat-ai-agent)
The `quickchat_chatbot` sub-module adds a new block type `chatbot_block` where you can set the `scenario_id`.
Also, you can add multiple chatbot blocks with a different scenario\_id for different type of pages, eg:
Once you enabled the block, visit the pages where the block should be available (visibility settings) so you can interact with the chatbot.
That’s it! 🎉 Your Drupal integration is now ready. If you have any questions or require a more complex solution with more functionality, please do not hesitate to get in touch.
# Facebook Messenger
> Connect your Quickchat AI Agent to Facebook Messenger. Link a Facebook Page and your AI Agent replies to Messenger conversations automatically.
This guide shows how to connect your **Quickchat AI Agent** to **Facebook Messenger**. Once a Facebook Page is linked, your AI Agent replies to people who message that Page on Messenger, and every conversation appears in your [Quickchat AI Inbox](https://app.quickchat.ai).
If you get stuck, jump to [Troubleshooting & FAQs](#troubleshooting--faqs) or [contact us](https://quickchat.ai/contact).
## Step 0 - Prerequisites
[Section titled “Step 0 - Prerequisites”](#step-0---prerequisites)
* A **Facebook Page** for your business. Messenger integrations connect to a Page, not to a personal profile.
* **Admin access** to that Page.
* A **Facebook account with Business permissions** for the Page, so you can authorize Quickchat AI.
Caution
A Facebook Page can be connected to **one AI Agent** at a time. If you manage several Agents, use a separate Page for each.
## Step 1 - Connect your Facebook Page
[Section titled “Step 1 - Connect your Facebook Page”](#step-1---connect-your-facebook-page)
1. Open the [Quickchat AI App](https://app.quickchat.ai) and go to **External Apps**.
2. Click **Messenger**, then click **Connect**.
3. A Facebook pop-up opens. Log in if prompted and **continue as yourself**.
4. **Select the Page** you want your AI Agent to reply for, and review the requested permissions.
5. Click **Continue / Confirm** to grant Quickchat AI access.
6. The pop-up closes and the panel shows your connected **Page name** and **Page ID**.
That’s it. **Your AI Agent is now live on Messenger!** 🎉
## Step 2 - Enable the bot
[Section titled “Step 2 - Enable the bot”](#step-2---enable-the-bot)
Use the **Enable** toggle to switch the integration on or off without disconnecting the Page. When it’s on, your AI Agent replies to incoming Messenger messages; when it’s off, the Page stays connected but the Agent stops replying.
## Try it out
[Section titled “Try it out”](#try-it-out)
Open your Page in Messenger (for example via `m.me/`) and send a message. Your AI Agent replies, and the conversation appears in your [Quickchat AI Inbox](https://app.quickchat.ai), where you can read the full transcript, see the visitor’s name, and take over from the AI at any time.
## Troubleshooting & FAQs
[Section titled “Troubleshooting & FAQs”](#troubleshooting--faqs)
**The pop-up doesn’t open.**
* Disable pop-up and tracker blockers in your browser, refresh the page and try again. If that doesn’t help, try a different browser.
**My AI Agent doesn’t reply.**
* Make sure the **Enable** toggle is on and the panel shows the Page as connected.
* Confirm you connected the intended **Page** and that the correct **AI Agent** is selected.
* One Page connects to one AI Agent. Don’t connect the same Page to multiple Agents.
**I connected the wrong Page.**
* Click **Switch Page** in the integration panel and repeat the connection flow with the correct Page.
**How do I change the welcome message?**
* The greeting is your AI Agent’s message, configured in the [Quickchat AI App](https://app.quickchat.ai). Update it there and it applies to every channel, including Messenger.
## Need Help?
[Section titled “Need Help?”](#need-help)
Still stuck? Reach out on [Discord](https://discord.gg/KqkHwvPRNH) or [contact us](https://quickchat.ai/contact) and we’ll help you get your Page connected.
# Hubspot
> Integrate Quickchat AI with HubSpot Conversations to automate customer support, streamline queries, and enhance your CRM workflows.
Integrating Quickchat AI Agent with HubSpot Conversations is a powerful customer service tool that enables businesses to interact with their customers by providing instant support, and build customer relationships, providing automated responses to customer queries and streamlining your customer support processes.
## Watch the Video
[Section titled “Watch the Video”](#watch-the-video)
[Play](https://youtube.com/watch?v=Suc4_rxHMN0)
## Quickchat prerequisites:
[Section titled “Quickchat prerequisites:”](#quickchat-prerequisites)
* Create a Quickchat AI [account](https://app.quickchat.ai/)
## Step-by-step tutorial:
[Section titled “Step-by-step tutorial:”](#step-by-step-tutorial)
1. Create a new user — this seat be assigned to the AI Agent
2. Select the **Super Admin** permission set
3. Ensure the *Service Enterprise* seat is enabled — hover over your newly created user and click *Edit permissions*.
4. Check if the user status is set to available — hover over your newly created user and click *Actions*, then *Edit user*.
5. Once your Quickchat AI is ready, navigate to the Quickchat AI [dashboard](https://app.quickchat.ai/) and go to the **External Apps** tab.
6. On the list of available platforms, click **HubSpot**.
7. Provide the exact same email address you used to create the new HubSpot user. It will be responding to messages **on behalf of** that account.
8. Click on *Authenticate with HubSpot* and follow the on-screen prompts by choosing the appropriate HubSpot workspace. Please keep in mind that you **need** to have HubSpot [*Super Admin*](https://knowledge.hubspot.com/settings/hubspot-user-permissions-guide#super-admin) permissions in order to authenticate your account.
9. Go back to HubSpot. Create a new [*Chatflow*](https://knowledge.hubspot.com/chatflows/create-a-live-chat) on your HubSpot account. Go to the *Service* tab from the left sidebar and then click *Chatflows*.
10. Create a new *Chatflow* or edit an existing one.
11. Choose *Website* and then *Live chat*.
12. Select an *Inbox* and *Language*. (remember to set the same language in Quickchat AI settings)
13. Disable *Knowledge base search*. AI Agent’s Knowledge Base is handled in the Quickchat AI Platform.
14. Select *Automatically assign conversations* , select *Specific users* and select your Quickchat AI user (associated with the *email address* you provided earlier).
15. (Optional) Customize your *Welcome message*.
16. (Optional) Disable *Email capture*.
17. Click *Preview* and send a message. If the AI responds, everything’s set!
18. Save your *Chatflow*.
Caution
Ensure your Quickchat AI user is assigned as the “Owner” of a conversation; otherwise, the Quickchat AI Agent won’t respond. Additionally, check other HubSpot features you use, like “Automations,” as they may affect the assignment automatically.
The below video guide summarises these steps.
**Your integration is now complete!**
If you prefer not to use the HubSpot widget, use Quickchat! Go to *Website* > *Install*, and follow the instructions on the screen to add it to your website.
Tip
As a final verification of your integration, you can test the widget in the Preview section of the HubSpot Chatflow editor. You should get a reply from your AI Agent and the conversation should appear in the Inbox in the [Quickchat AI App](https://app.quickchat.ai). You can now share the HubSpot widget on your website and have Quickchat AI reply automatically!
# Intercom
> Integrate Quickchat AI with Intercom. Set up a dedicated user, authenticate, and assign conversations to your AI Agent.
In this guide, we’ll go through how to integrate your AI Agent into Intercom. Here’s an overview of what we’ll cover:
1. Preparing the Intercom Account for integration
2. Integrating Quickchat AI with Intercom
3. Adding the Quickchat AI Agent to Intercom
## Prepare your Intercom Account
[Section titled “Prepare your Intercom Account”](#prepare-your-intercom-account)
### Create an Intercom User dedicated to your AI
[Section titled “Create an Intercom User dedicated to your AI”](#create-an-intercom-user-dedicated-to-your-ai)
To initiate the integration process, you’ll need to designate an Intercom user who will be serving as the *persona* for **AI Agent**. Our AI will be replying as this user to all conversations that are assigned to it.
To ensure a seamless experience, we recommend creating a separate user named ‘Quickchat AI’ to handle automatic replies. This approach provides flexibility of choosing when the AI Agent is active and lets your team take over the conversation by assigning it to a different team member. Here’s how to do that:
1. **Create the Quickchat AI User:** Log in to your Intercom account and create a new user with the name ‘Quickchat AI.’
2. **Define Permissions/Access:** Configure specific permissions and access rights for the ‘Quickchat AI’ user to ensure it functions correctly.
Once you’ve completed this setup, you’re ready to move on to the next step.
Caution
Ensure that you are logged in as dedicated User while proceeding with the next steps of integration.
## Integrate Quickchat with Intercom
[Section titled “Integrate Quickchat with Intercom”](#integrate-quickchat-with-intercom)
### Navigation
[Section titled “Navigation”](#navigation)
Go to the **External Apps** tab, locate and click on the “Intercom” tile:
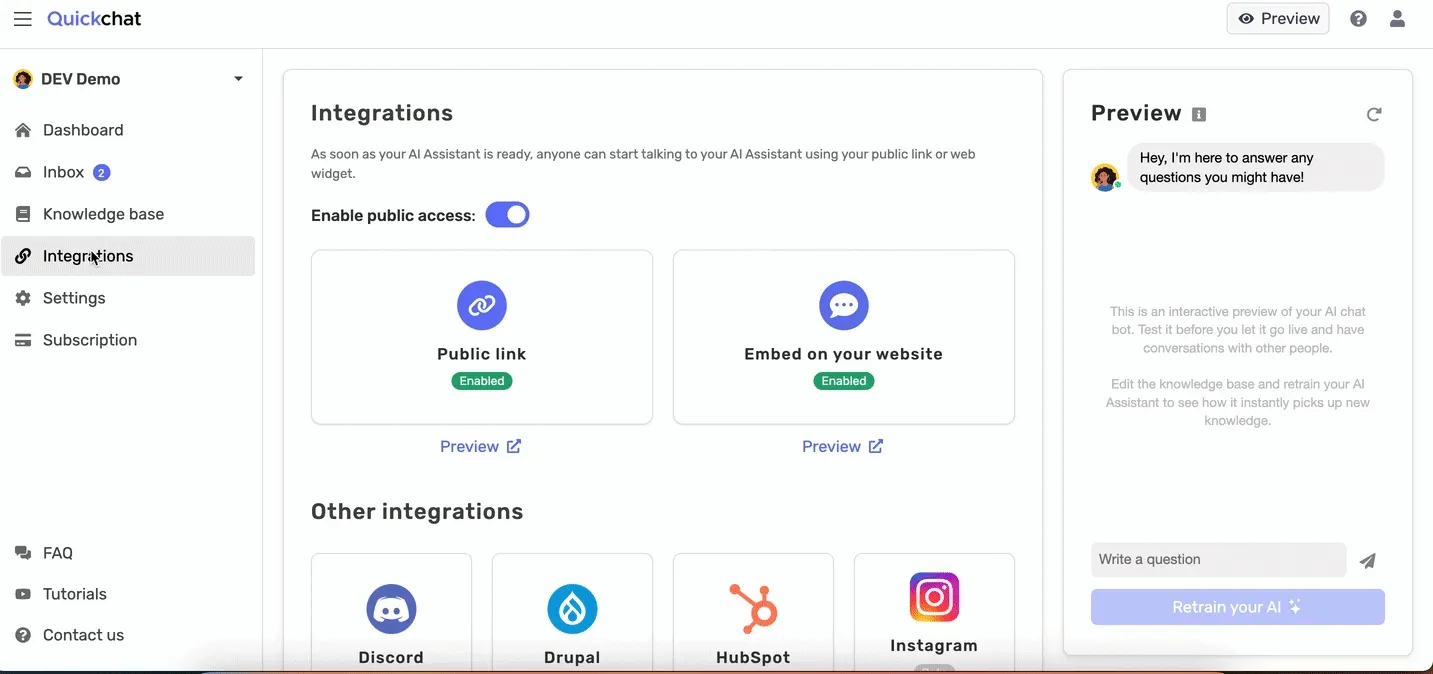
### Authentication
[Section titled “Authentication”](#authentication)
When Intercom is not yet connected, the panel shows a single **Authenticate with Intercom** button. Click it to start the OAuth flow. A popup window opens where you authorize the AI Agent to access your Intercom workspace. When you approve, the popup closes automatically and the connection is detected, so there is no separate “enable” step to do first.
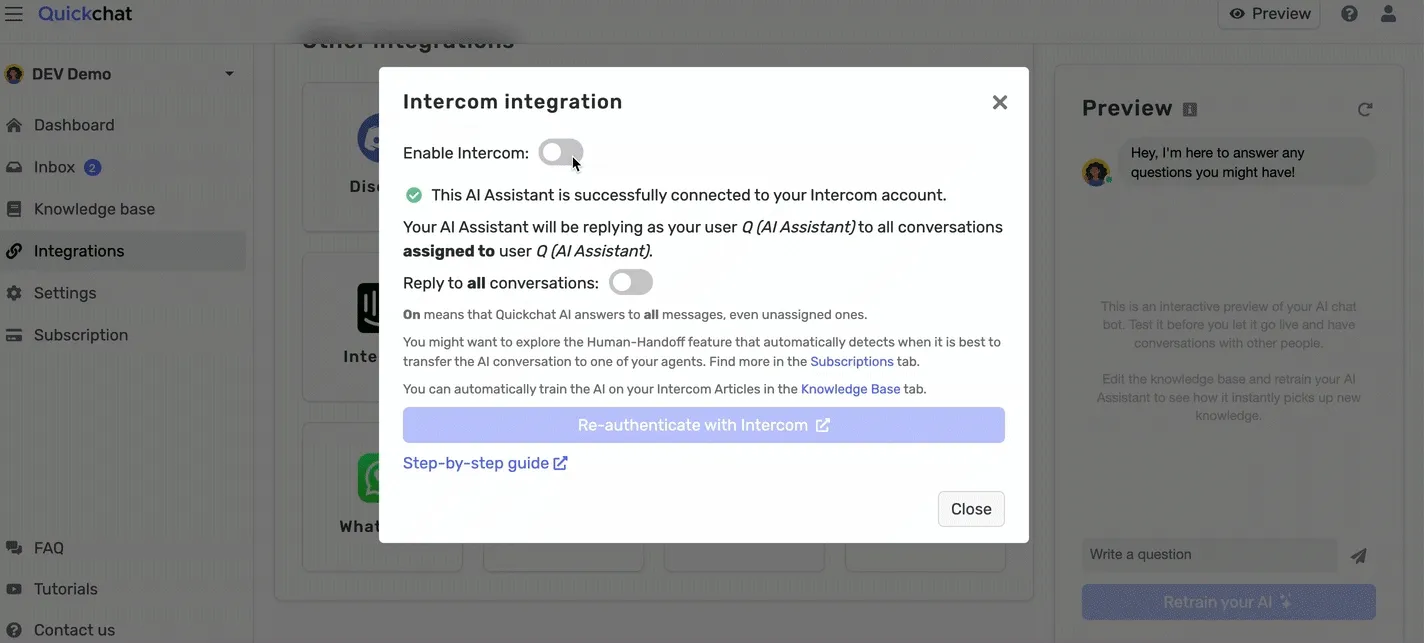
### Confirmation
[Section titled “Confirmation”](#confirmation)
Once connected, the panel shows a connection card with **Connected as {name}**, your **App ID**, and your **Admin ID**, along with **Re-authenticate**, **Test connection**, and **Remove** buttons. Click **Test connection** to verify the integration is working.
If the test succeeds, you did it! Congratulations! Your integration is now live, and you can proceed to the next step to assign conversations in Intercom to your AI Agent.
### Integration settings
[Section titled “Integration settings”](#integration-settings)
After connecting, the panel exposes a few settings. Use the **Enable Intercom** toggle to switch the integration on or off without removing it.
* **Reply to all conversations:** When enabled, the AI Agent replies to every conversation in your Intercom inbox, and the Workflow Automation assignment step below is not required. By default this is off (assigned-only mode), so the AI Agent only replies to conversations assigned to its admin user. In that default mode, complete both the Workload Management and Workflow Automation steps below.
* **Offer human handoff to Intercom admins:** Off by default. When enabled, the AI Agent can transfer a conversation to a human admin in Intercom when escalation is needed.
* **Automatically close inactive conversations:** Choose how long to wait before closing a conversation with no activity. Options are Never, 5 minutes, 10 minutes, or 30 minutes.
## Assign conversations in Intercom to Quickchat AI Agent
[Section titled “Assign conversations in Intercom to Quickchat AI Agent”](#assign-conversations-in-intercom-to-quickchat-ai-agent)
In the default assigned-only mode, there are two steps to assigning Intercom conversations to your Quickchat AI Agent for handling. (If you enabled **Reply to all conversations** above, you can skip the Workflow Automation step.)
### Workload Management
[Section titled “Workload Management”](#workload-management)
Navigate to Settings tab then to Inbox settings and add the Quickchat AI Agent to the Workload Management. 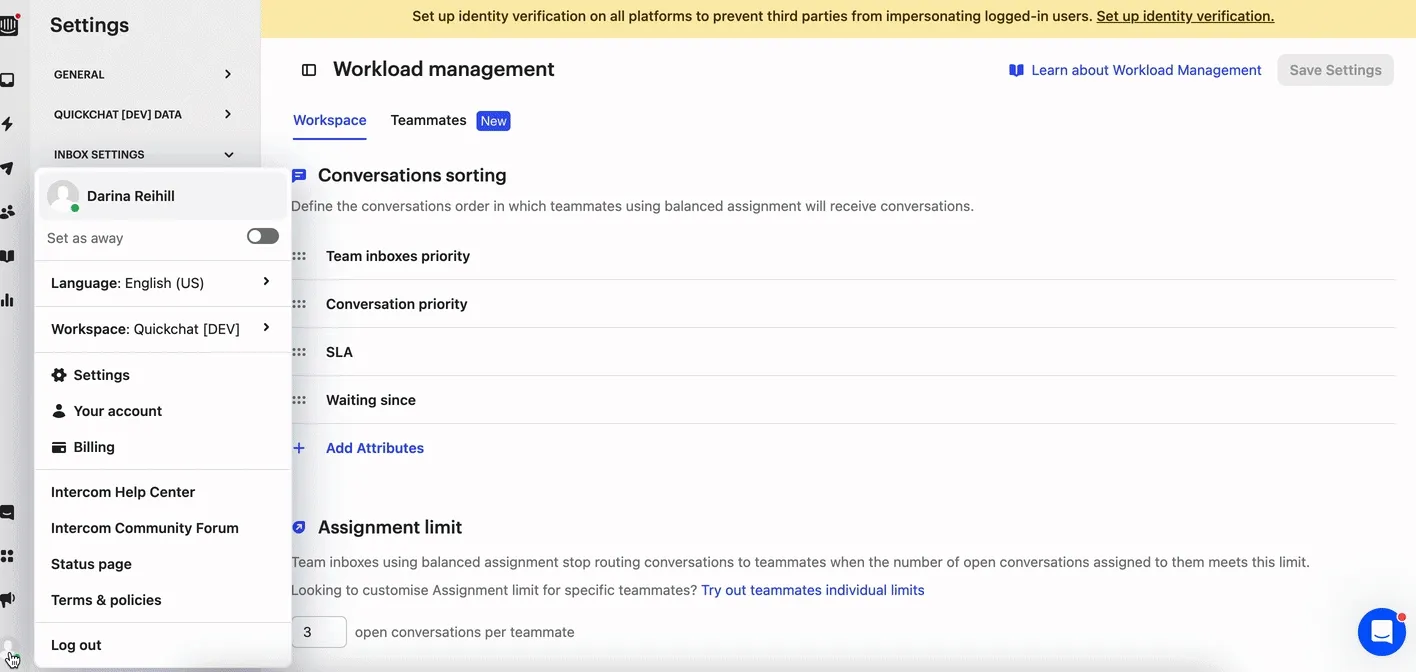
### Workflow Automation
[Section titled “Workflow Automation”](#workflow-automation)
Navigate to the Automation tab, and click on **Create new workflow** (“Customer starts a new message”).
Once you’re at workflow, we set up a workflow automation. We assign it to the Intercom user you’ve created for Quickchat Assistant.
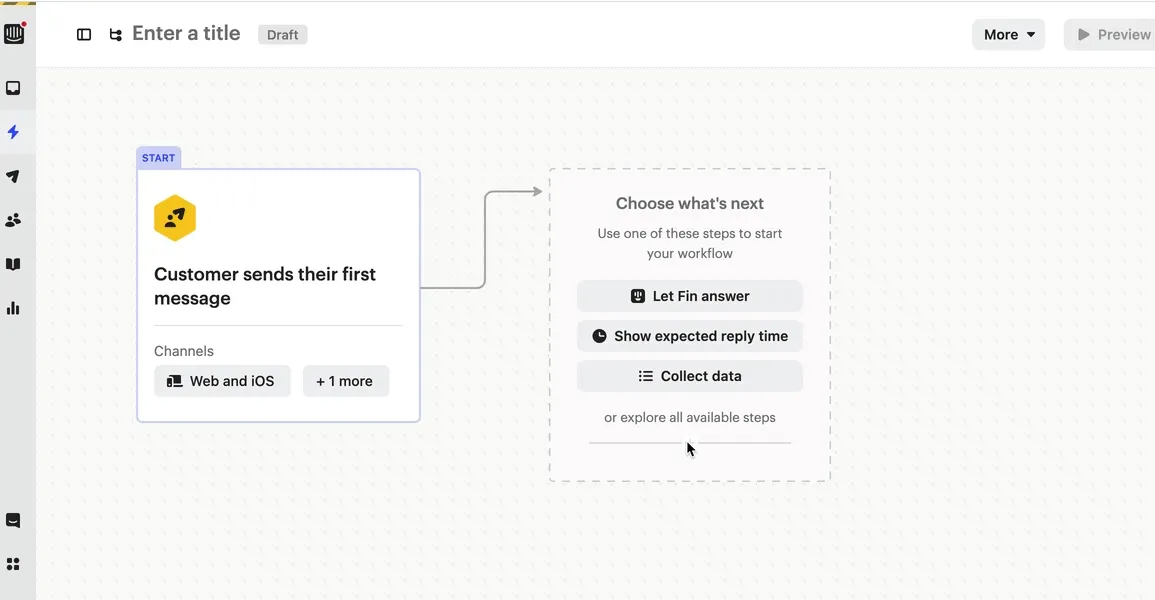
That’s it! 🎉 *Your integration is now complete!*
Tip
As a final verification of your integration, send a message to your Intercom chat window. You should get a reply from your AI Agent and the conversation should appear in the Inbox in the [Quickchat AI App](https://app.quickchat.ai).
# Jira
> Connect your Quickchat AI Agent to Jira. Enable AI-powered search and Q&A over your Jira tickets using Custom API Actions.
In this post, I will show you how to connect your AI Agent to Jira. We will be using:
* a Jira account (**free**)
* a Quickchat’s AI Agent ([sign up here and use for **free**](https://app.quickchat.ai/register))
It will enable your Quickchat AI Agent to:
* be able to search through your Jira tickets, and
* be **smart** about answering questions based on them
We will use Quickchat’s **AI Actions** (custom HTTP actions) to let your Agent call the [Enhanced search for issues](https://developer.atlassian.com/cloud/jira/platform/rest/v3/api-group-issue-search/#api-rest-api-3-search-jql-get) endpoint of the Jira (Atlassian) API.
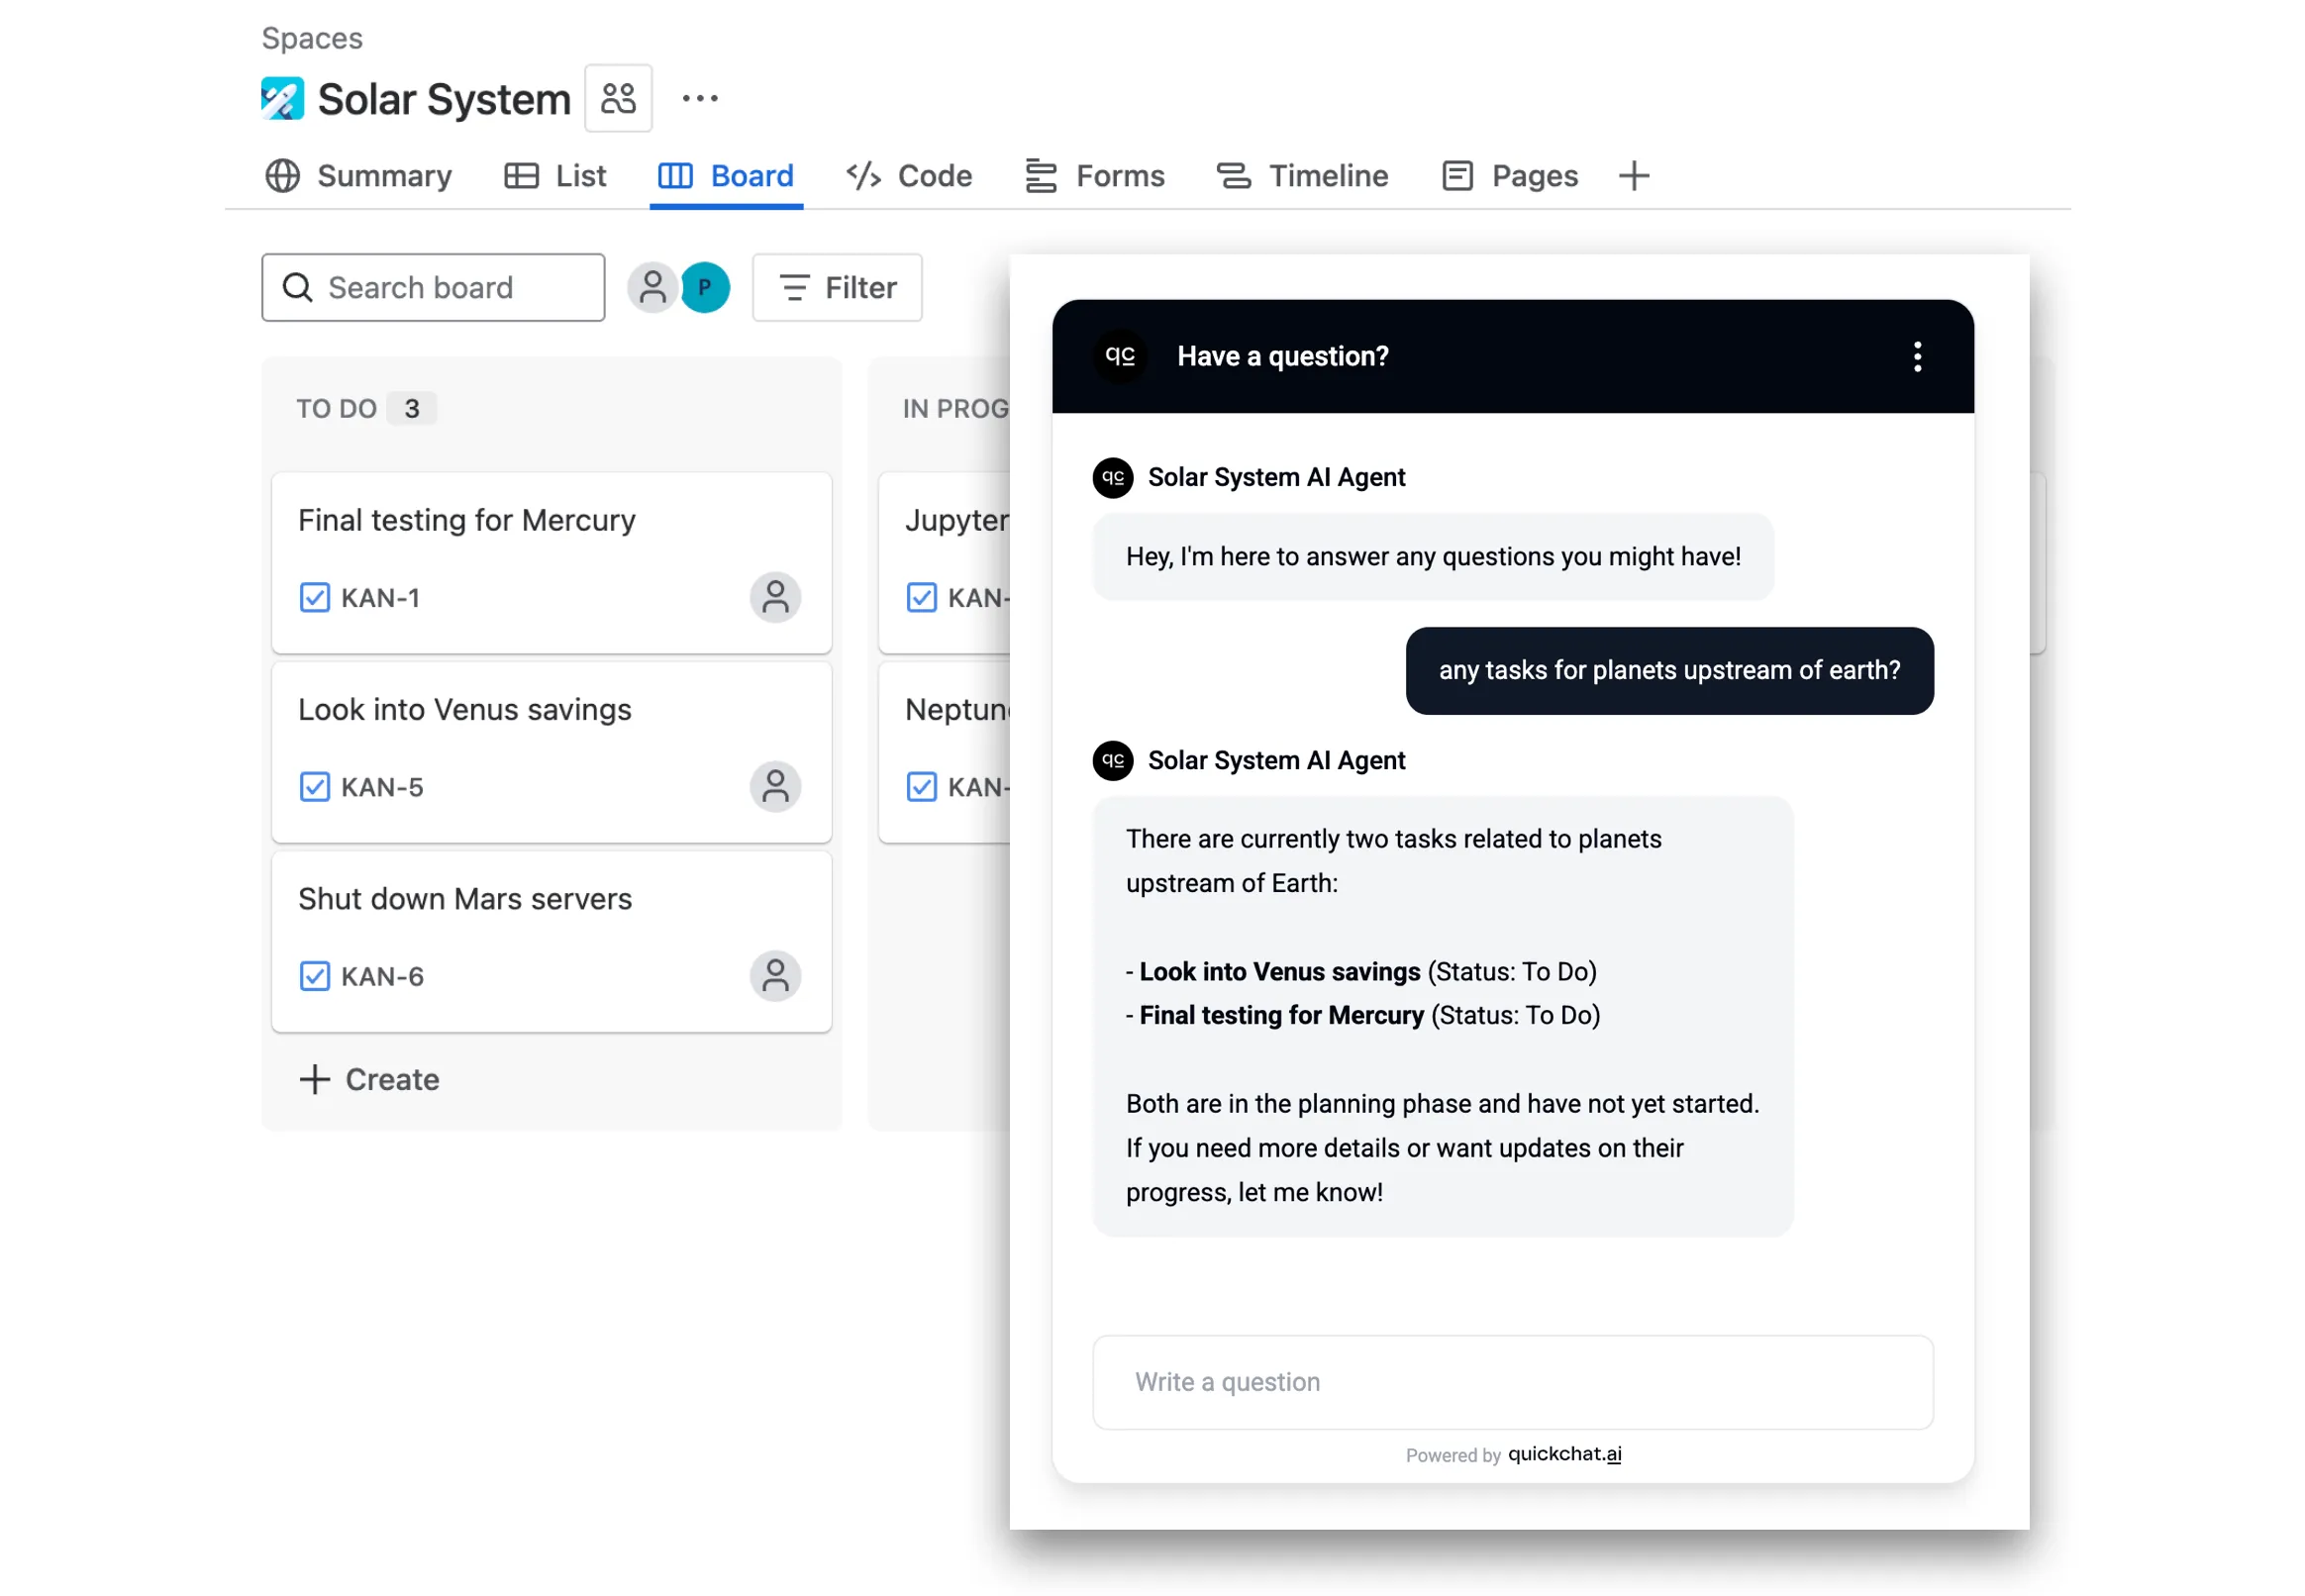 *Craft an AI Agent creative about interpreting user inputs*
## Watch the Video
[Section titled “Watch the Video”](#watch-the-video)
[Play](https://youtube.com/watch?v=D4NPTXQw-Qk)
## How it works
[Section titled “How it works”](#how-it-works)
Here is how your AI Agent will operate during conversations:
1. User asks a question like *“what’s up with issues to do with mercury?”*
2. AI Agent fetches relevant information from the **Jira API** using a query like *“mercury”*
3. AI Agent replies to the user based on the information **fetched from the API**
Please follow the steps below. The whole setup shouldn’t take longer than **10 minutes**!
## Step 0 - create a Jira account and project
[Section titled “Step 0 - create a Jira account and project”](#step-0---create-a-jira-account-and-project)
1. Go to [id.atlassian.com/signup](https://id.atlassian.com/signup), create and verify your account.
2. Add Jira to your Atlassian apps (the free plan will be enough to start).
3. Set up your first project and create tickets like in the example below.
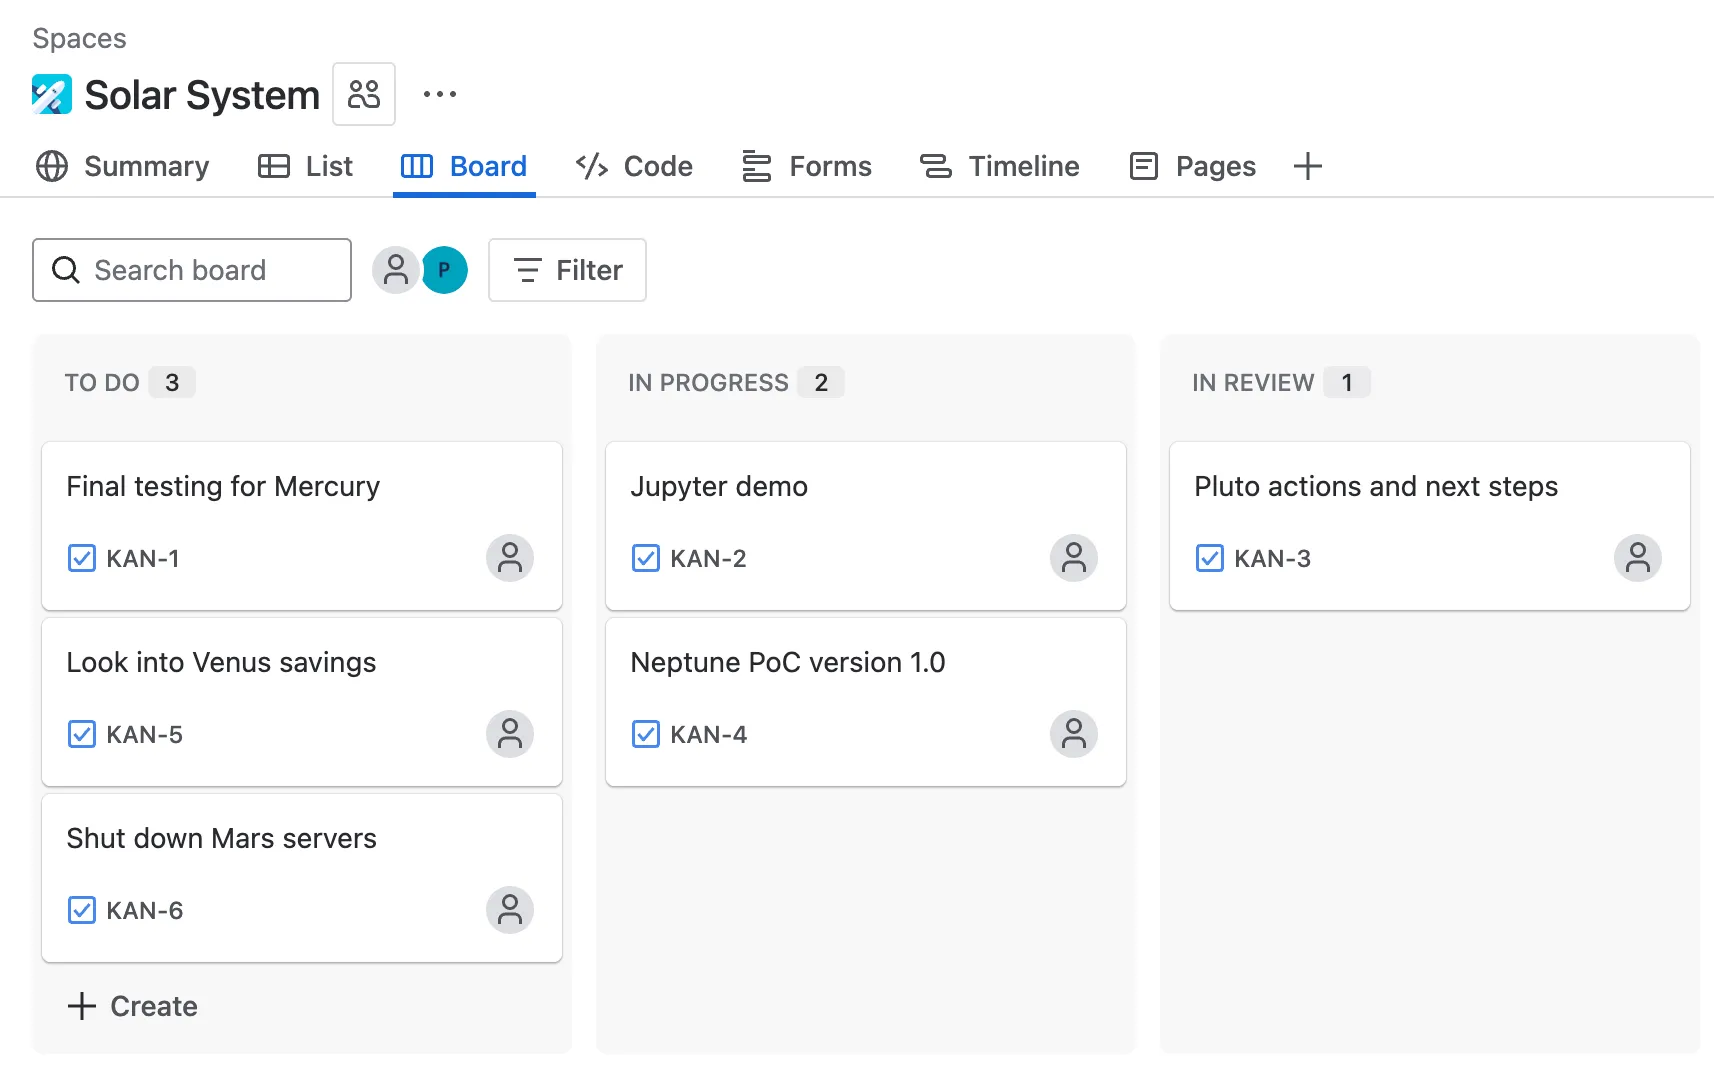 *Example board with Jira issues*
## Step 1 - Jira API authentication token
[Section titled “Step 1 - Jira API authentication token”](#step-1---jira-api-authentication-token)
Go to [id.atlassian.com/manage-profile/security/api-tokens](https://id.atlassian.com/manage-profile/security/api-tokens) and create your **API token** which will look something like this:
```plaintext
ATATT3xFfGF01sKUl0HEW2-_-u9umfLSz7jeblmeLzEHZ1DLcdLbKeVF137iTHGkKhPuNMSKX8mkbwLpHXT4-qXEn-xNEnfiK8_XDVW6XXvGd_SBV3HD4kJInGNjfg2_yEoJFN6uwy4NRqeuhV2tjmyzxozLBRn35OhXkDA6QGfLFvf2_PKuNtA=8DA704E4
```
In order to be able to use your Atlassian API token in Quickchat AI Actions, **you need to base64-encode it** along with your email address:
```plaintext
your_email@example.com:ATATT3xFfGF01sKUl0HEW2-_-u9umfLSz7jeblmeLzEHZ1DLcdLbKeVF137iTHGkKhPuNMSKX8mkbwLpHXT4-qXEn-xNEnfiK8_XDVW6XXvGd_SBV3HD4kJInGNjfg2_yEoJFN6uwy4NRqeuhV2tjmyzxozLBRn35OhXkDA6QGfLFvf2_PKuNtA=8DA704E4
```
> Make sure to include the exact **email address** you used to set up your Atlassian account
You can use a simple online tool like [base64encode.org](https://www.base64encode.org/).
> Make sure to use the **Live mode** which guarantees the encoding happens entirely in your browser.
 *You can use a free online tool to encode your API token*
Alternatively, here is how to do it on your machine in a simple **python script**:
```python
import base64
email = "your_email@example.com"
api_token = "ATATT3xFfGF01sKUl0HEW2-_-u9umfLSz7jeblmeLzEHZ1DLcdLbKeVF137iTHGkKhPuNMSKX8mkbwLpHXT4-qXEn-xNEnfiK8_XDVW6XXvGd_SBV3HD4kJInGNjfg2_yEoJFN6uwy4NRqeuhV2tjmyzxozLBRn35OhXkDA6QGfLFvf2_PKuNtA=8DA704E4"
credentials = f"{email}:{api_token}"
b64_credentials = base64.b64encode(credentials.encode("utf-8")).decode("utf-8")
print(f"Basic {b64_credentials}")
```
The above script will give you a **ready-to-use header** with the encoded token which looks something like this:
```plaintext
Basic eW91cl9lbWFpbEBleGFtcGxlLmNvbTpBVEFUVDN4RmZHRjAxc0tVbDBIRVcyLV8tdTl1bWZMU3o3amVibG1lTHpFSFoxRExjZExiS2VWRjEzN2lUSEdrS2hQdU5NU0tYOG1rYndMcEhYVDQtcVhFbi14TkVuZmlLOF9YRFZXNlhYdkdkX1NCVjNIRDRrSkluR05qZmcyX3lFb0pGTjZ1d3k0TlJxZXVoVjJ0am15enhvekxCUm4zNU9oWGtEQTZRR2ZMRnZmMl9QS3VOdEE9OERBNzA0RTQ=
```
## Step 2 - create a Quickchat AI Action
[Section titled “Step 2 - create a Quickchat AI Action”](#step-2---create-a-quickchat-ai-action)
In the [Quickchat AI app](https://app.quickchat.ai), go to **Actions & MCPs** and add an action:
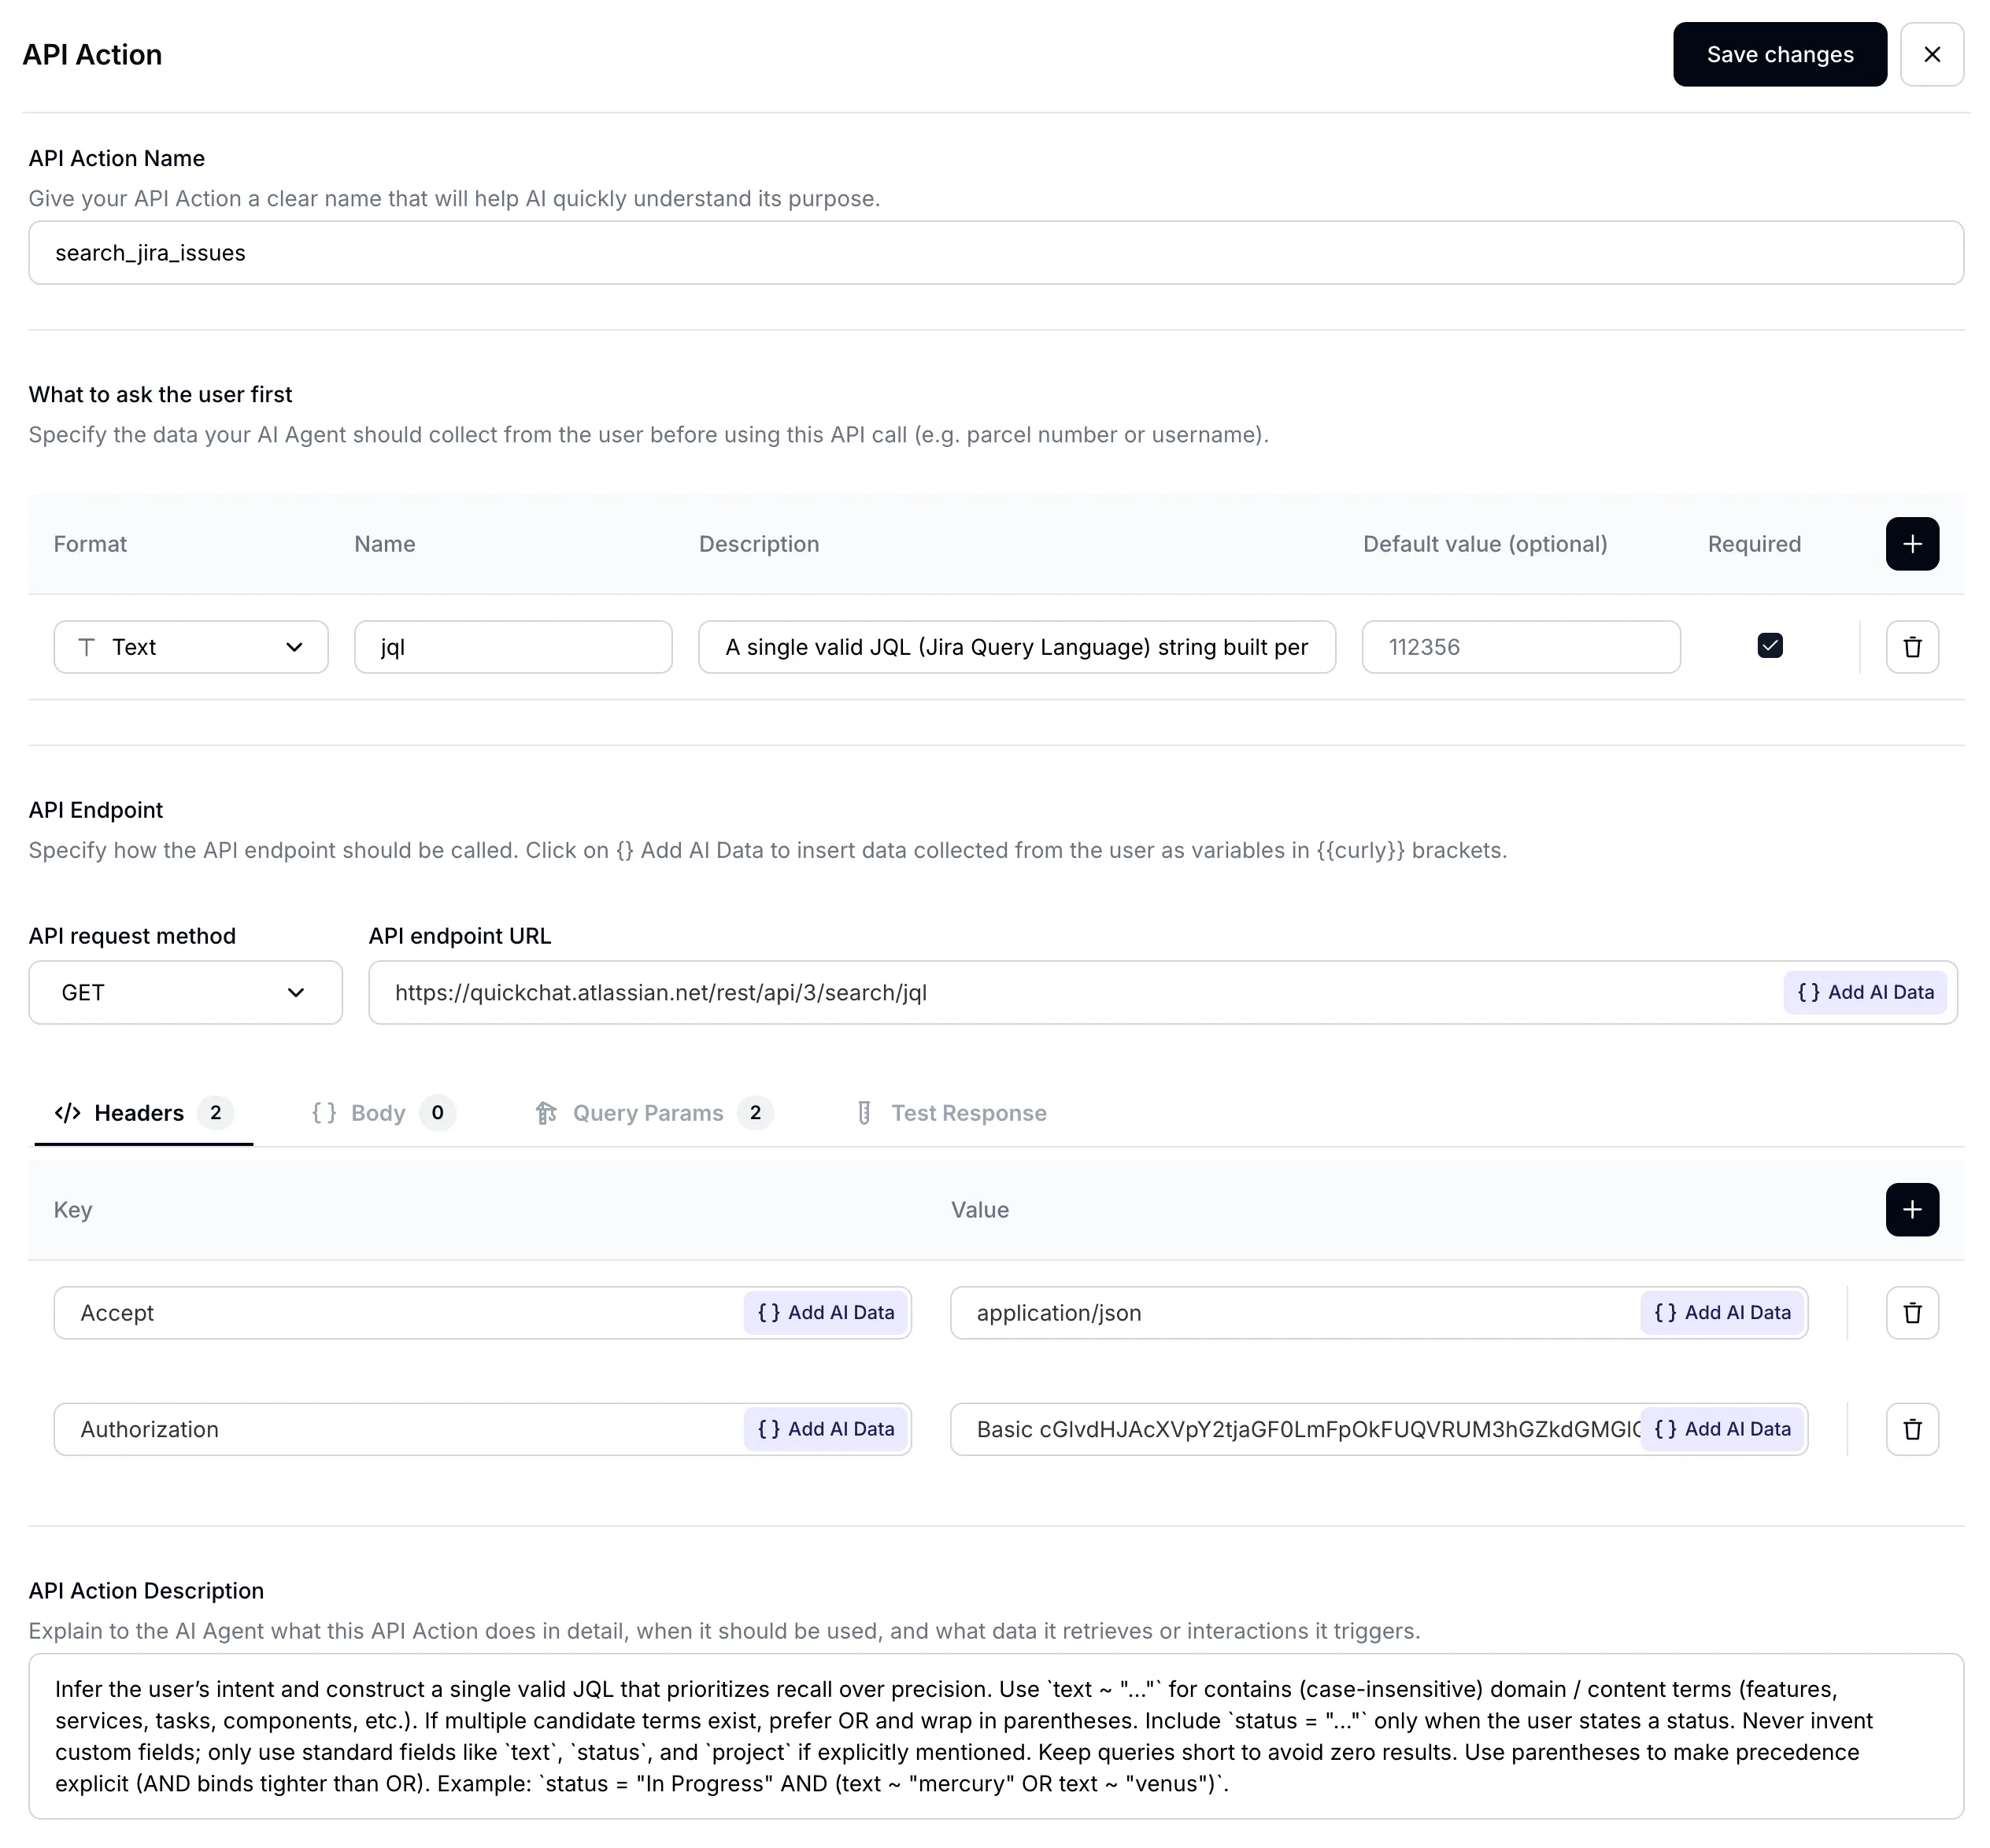 *AI Action page*
Give your AI Action an appropriate name:
**Name**: `Search Jira issues`
 *Insert AI Action name*
## Step 3 - set input parameters
[Section titled “Step 3 - set input parameters”](#step-3---set-input-parameters)
Your AI Agent’s main task will be to translate what the user is asking about into an exact query to use to search through Jira issues. When it comes to searching for issues Jira recently fully migrated to [JQL (Jira Query Language)](https://support.atlassian.com/jira-software-cloud/docs/what-is-advanced-search-in-jira-cloud/) to allow for performing more complicated search. This allows your AI Agent to be much more powerful. Set up your input parameters as follows:
| Format | Name | Description | Default value | Required |
| :----- | :---- | :---------- | :------------ | :------- |
| `Text` | `jql` | (see below) | - | ✅ |
In order to achieve great performance with your AI Agent, a **well-crafted description** is hugely important:
**Description:**
```plaintext
A single valid JQL (Jira Query Language) string built per the description. Favor recall: prefer `(text ~ "term1" OR text ~ "term2")` over chaining with AND, and use parentheses for grouping. For "not started / in progress / done" questions, filter on `statusCategory` ("To Do", "In Progress", "Done"), which is stable across projects; use `status = "..."` only when the user names a specific status that exists on the board. Avoid custom fields. Examples: `statusCategory = "In Progress" AND (text ~ "mercury" OR text ~ "venus")`, `(text ~ "planet*" OR text ~ "integration")`, `project = "Solar System" AND statusCategory = "To Do"`.
```
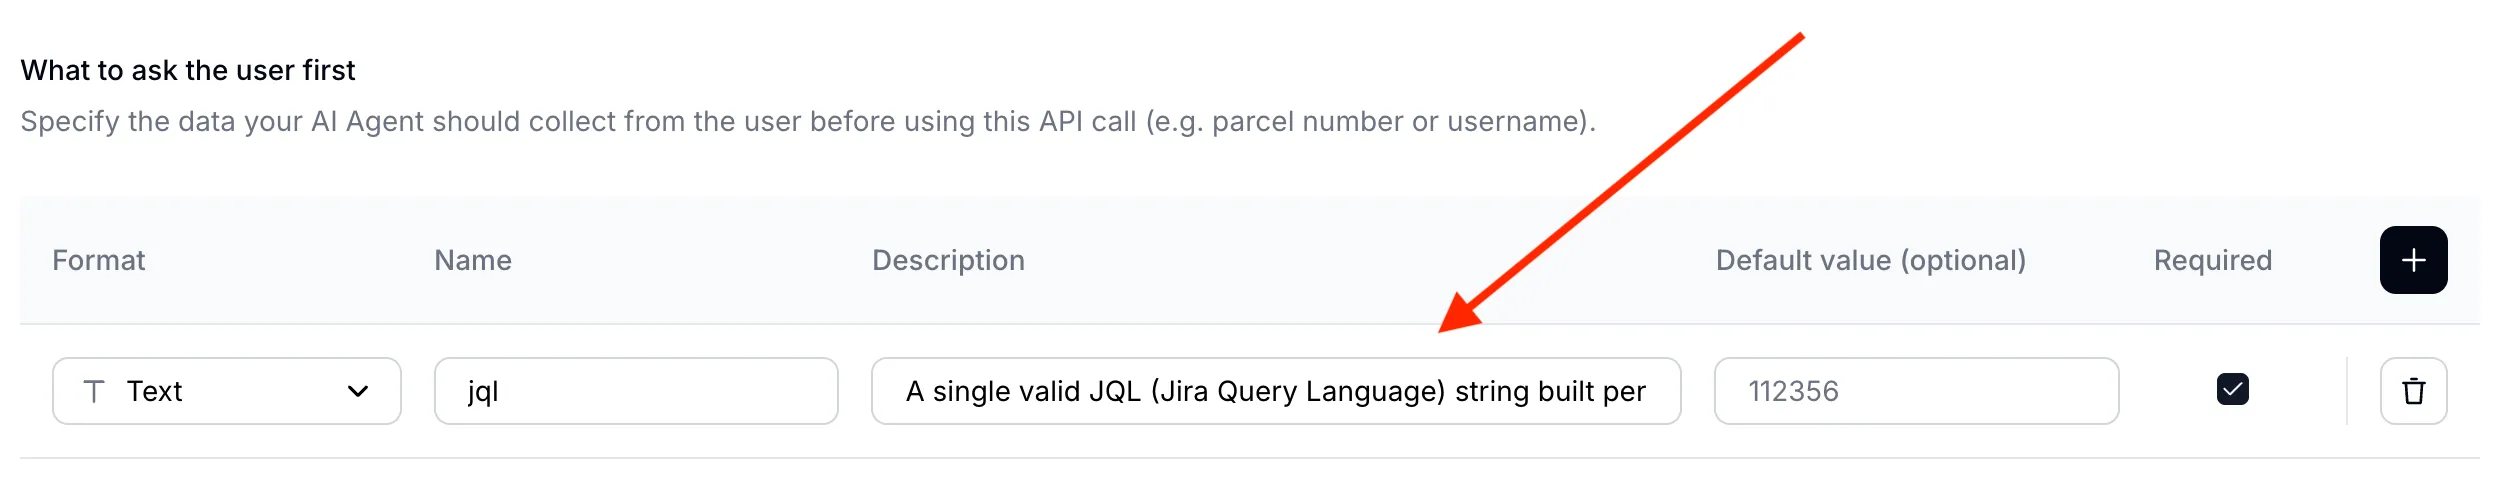 *A well-crafted parameter description is key for AI Agent performance*
### A note on Jira statuses
[Section titled “A note on Jira statuses”](#a-note-on-jira-statuses)
Jira separates a status **name** from its **category**, and JQL treats them differently:
* The **status name** is whatever the board shows. One project uses `To Do` / `In Progress` / `Done`, another uses `Open` / `In Review` / `Closed`.
* The **status category** is one of three fixed buckets every status maps to: `To Do`, `In Progress`, `Done`.
`status = "To Do"` filters by name, so it returns nothing on a board whose first column is named `Open`. This is a common reason an agent confidently reports “no tickets to do” while the board is full of them. For “what has not started”, “what is in progress” and “what is done” questions, filter on the category instead:
```plaintext
statusCategory = "To Do"
statusCategory = "In Progress"
statusCategory = "Done"
```
Keep `status = "..."` for when the user names a specific status you know exists on the board. You can also list your board’s real status names in the Action description (Step 7) so the agent maps a request like “ready for QA” to the right one.
## Step 4 - set API endpoint URL
[Section titled “Step 4 - set API endpoint URL”](#step-4---set-api-endpoint-url)
1. Select **GET** as the API request method
2. Set the endpoint URL to the Jira [/rest/api/3/search/jql](https://developer.atlassian.com/cloud/jira/platform/rest/v3/api-group-issue-search/#api-rest-api-3-search-jql-get) endpoint
 *Set your API endpoint URL*
> Make sure to use **your Atlassian domain name**. You will find it in your Jira board URL.
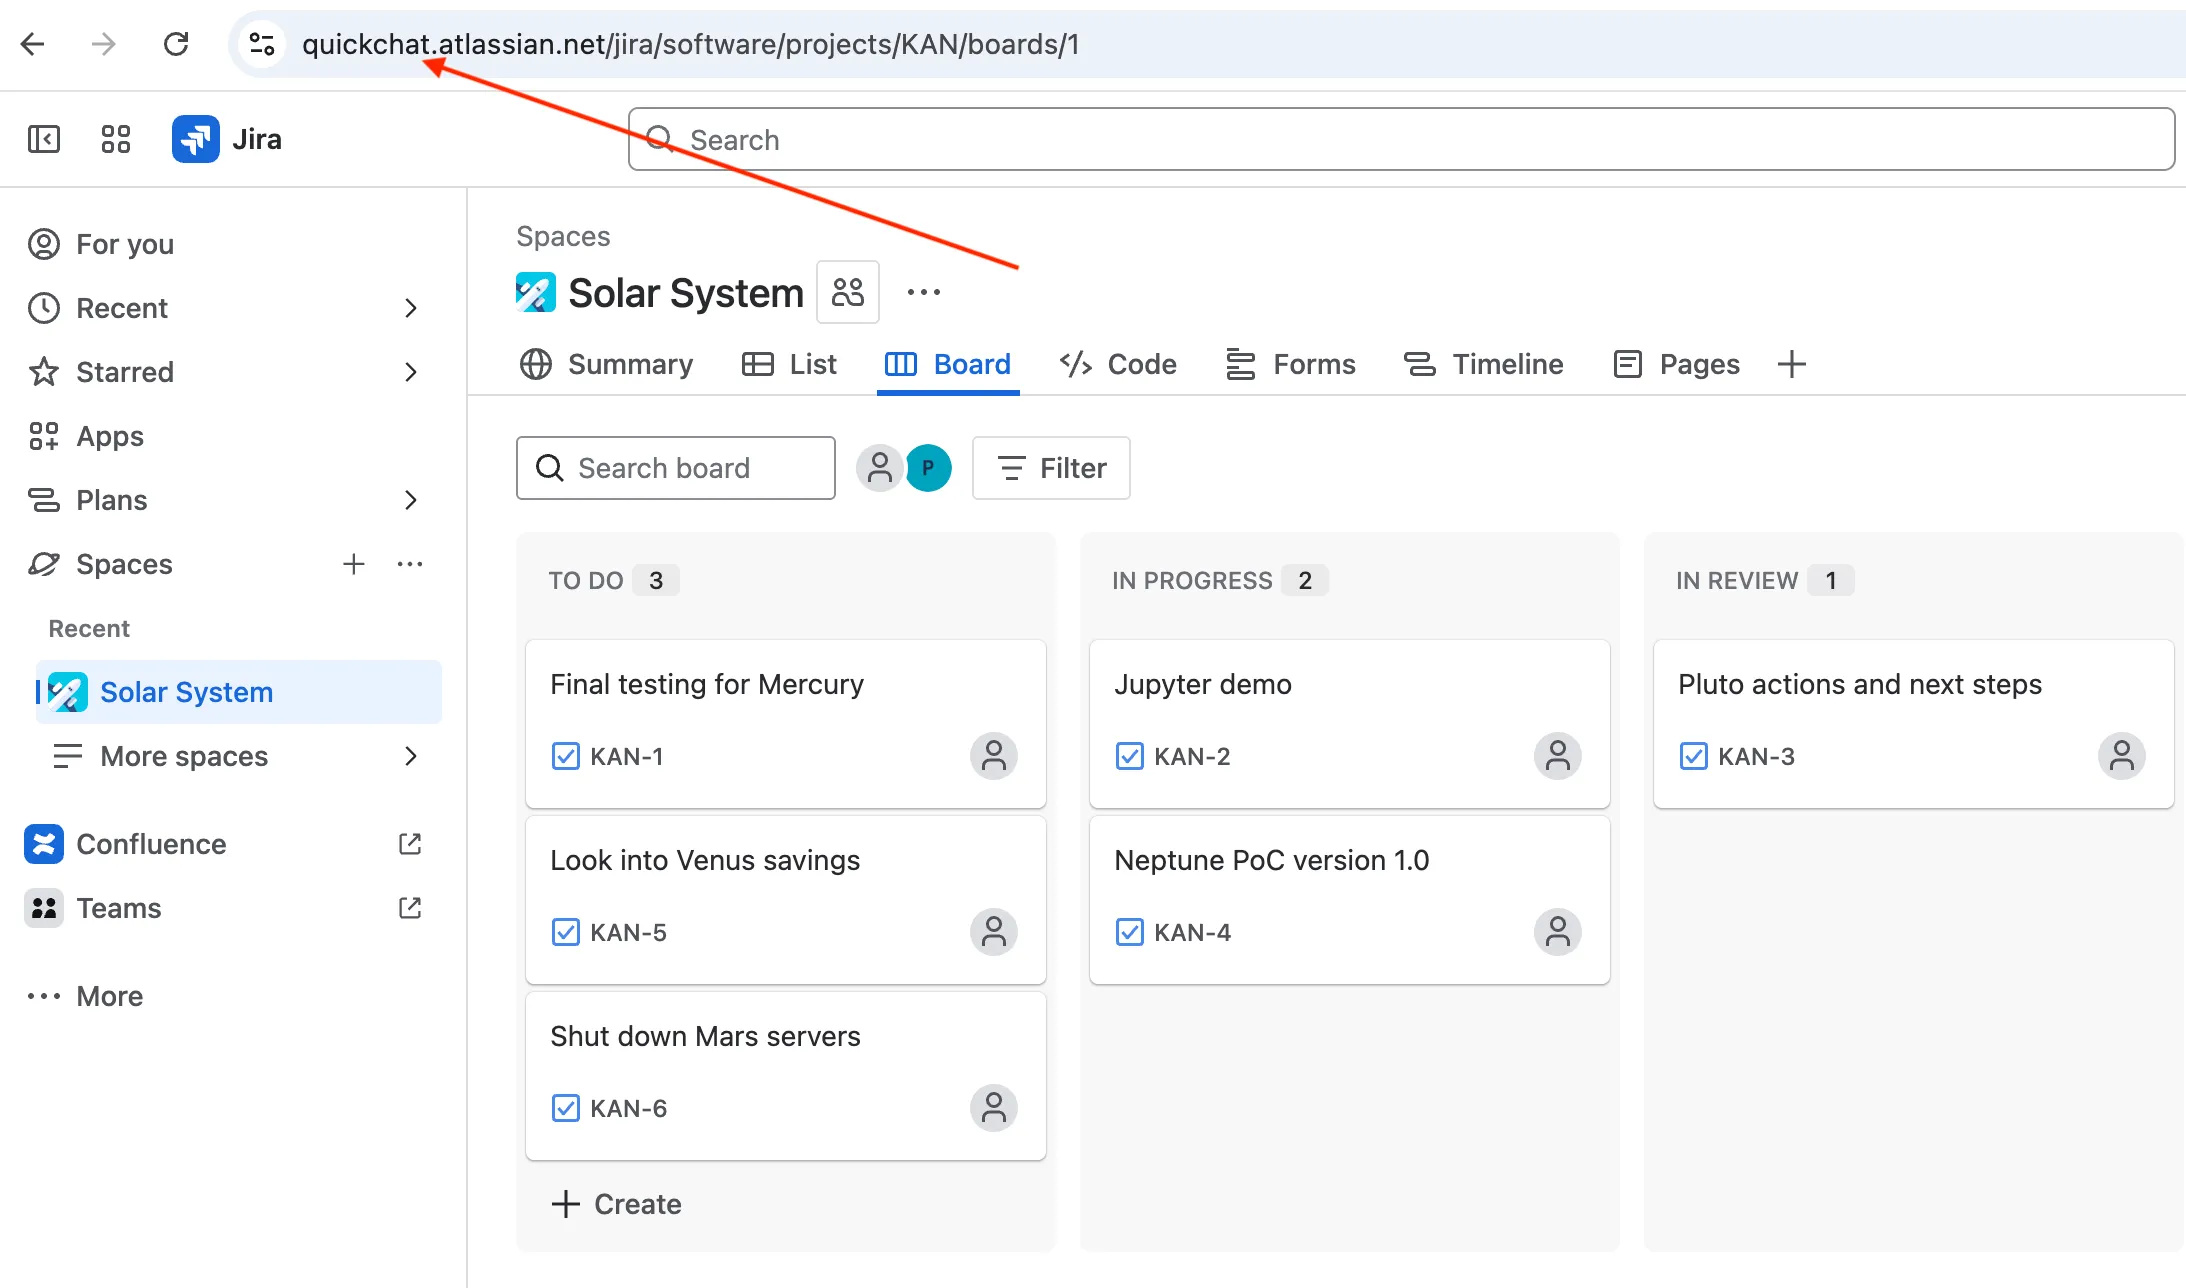 *Your Atlassian domain name*
## Step 5 - set API request headers
[Section titled “Step 5 - set API request headers”](#step-5---set-api-request-headers)
Define your API request **headers** as follows:
| Accept | Autorization |
| :----------------- | :--------------------------------------------------------------------------------------------------------------------------------------------------------------------------------------------------------------------------------------------------------------------------------------------------- |
| `application/json` | `Basic cGlvdHJAcXVpY2tjaGF0LmFpOkFUQVRUM3hGZkdGMGlQOVNacEhVZ1o5YUJfWGhmQjZJWjJId3MyaHlsMzEtTlNpYW90Z2tZVzRxQXEwQ3R4UVY1OXFTZkpWWVZNcXlxem42MWRkR0VobmJWNzdzaWtrb19ZWkhtLUgwazFOZGh4WlpQMnltYmZ1SzhBRmlFMnJEUmdqd182N1hkSFFUelFQY2I2U1lrNUFPRlRuVnZvaGxkZUd3djVpM2VrcEFyMVJ4QnJWRncyYz04MEZGQTcyMA==` |
> Pay special attention to correctly formatting your Authorization header: Basic ``
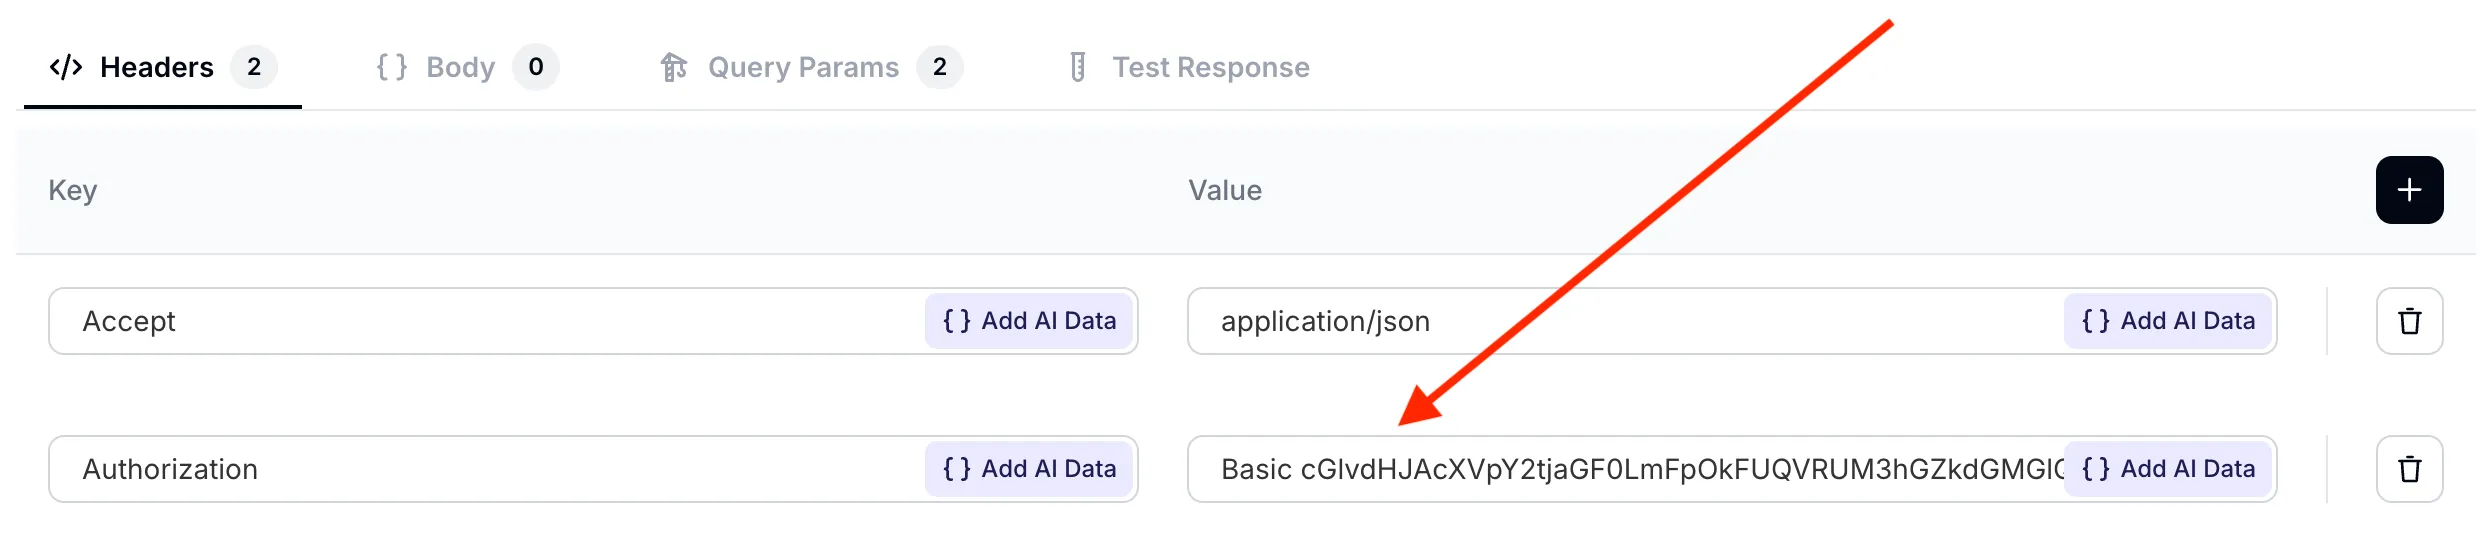 *Set your API request headers*
## Step 6 - set API request query parameters
[Section titled “Step 6 - set API request query parameters”](#step-6---set-api-request-query-parameters)
Set two query parameters for your AI request:
* `jql` is taking a dynamic value defined earlier in the *What to ask the user first* section. It is the AI Agent’s job to fill out the value of this parameter **based on what the user has said** in the conversation.
* `fields` is taking a fixed value. For each Jira issues, we are only interested in its *summary*, *description* and *status*.
| jql | fields |
| :-------- | :--------------------------- |
| `{{jql}}` | `summary,description,status` |
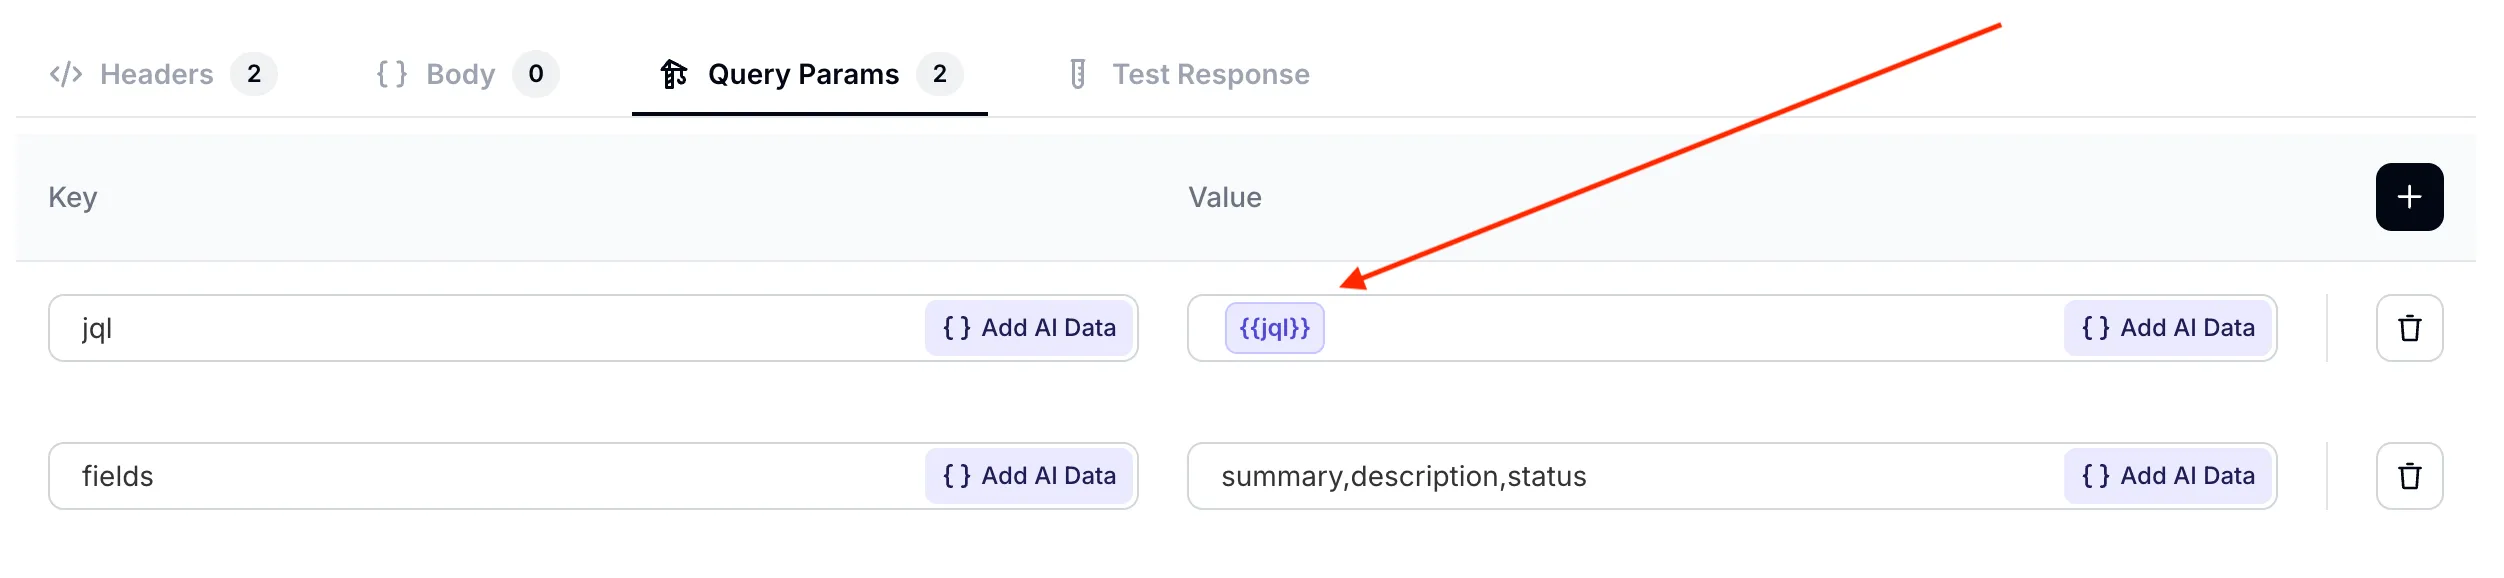 *Set your API request query parameters*
> Make sure the `jql` parameter correctly points to the value defined earlier. You can select it from the Add AI Data dropdown menu.
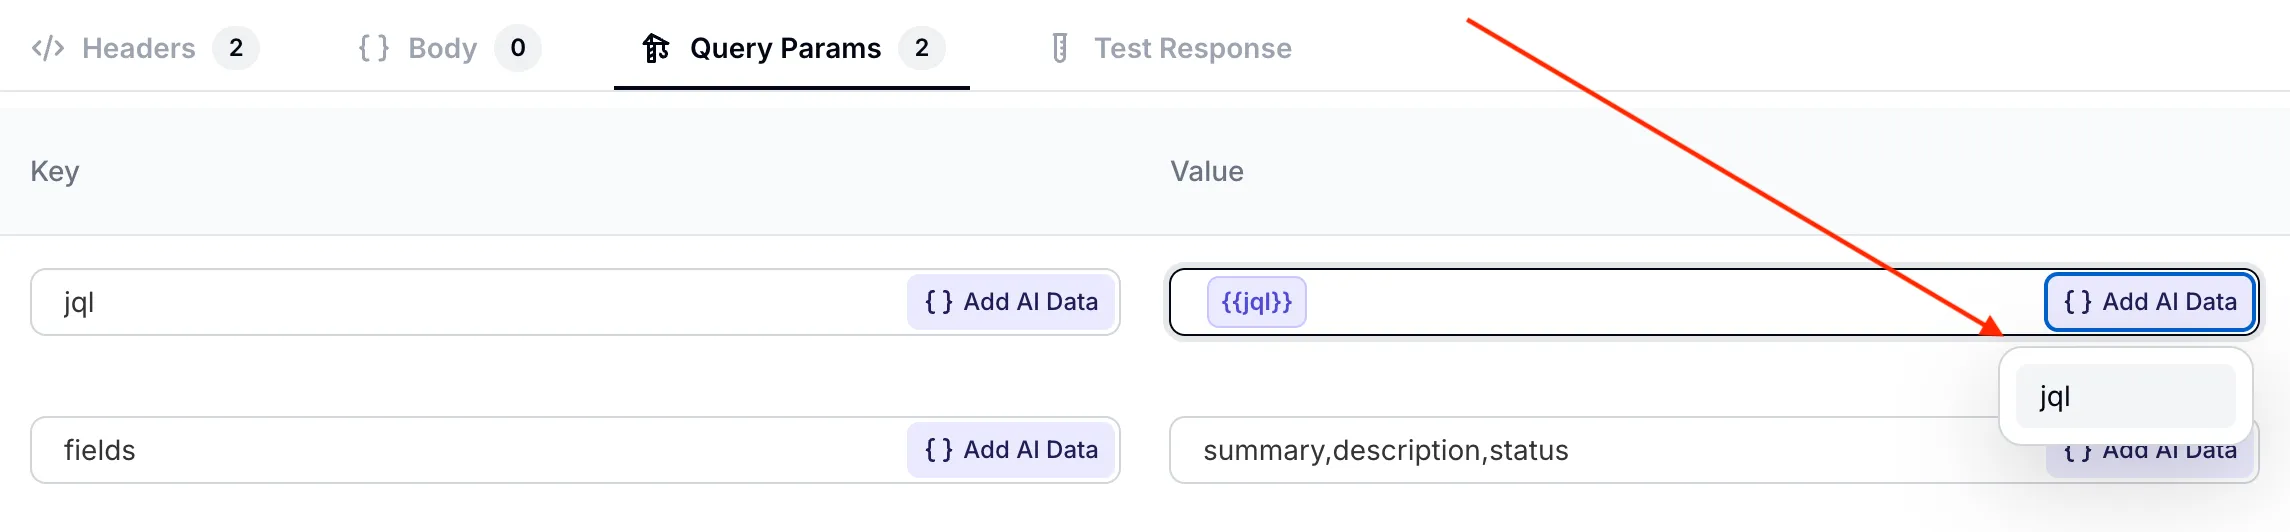 *Select the dynamic `jql` parameter from the dropdown menu*
## Step 7 - set API Action description
[Section titled “Step 7 - set API Action description”](#step-7---set-api-action-description)
The final crucial ingredient of a well set-up AI Action is its description. While the AI Agent has a good understanding of your API endpoint just from its URL and parameters, it is key to optimize its behaviour **for your use case**.
The three most important aspects included in the prompt are:
* **when** to invoke the action — listing every phrasing the user might pick (find / search / look for, as well as explain / tell me about / describe / what is / how is the status of) so the agent does not skip the call when the user does not say “search”
* suggestions on how to use the [advanced JQL syntax](https://support.atlassian.com/jira-software-cloud/docs/what-is-advanced-search-in-jira-cloud/) when searching for Jira issues
* how to handle empty results — the agent must say so explicitly rather than refuse access
Here is the resultant **API Action Description**:
```plaintext
Use this action whenever the user asks anything that could be answered by data in their Jira — projects, issues, statuses, sprints, test cycles, descriptions, owners, comments — regardless of how they phrase the request (find / search / look for / explain / tell me about / describe / what is / how is the status of, etc.). Do not refuse access; query Jira first.
Construct a JQL that prioritises recall over precision: prefer `(text ~ "term1" OR text ~ "term2")` over chaining with AND, and use parentheses for grouping. For lifecycle questions (not started, in progress, done) filter on `statusCategory` ("To Do" / "In Progress" / "Done") rather than `status`, because status names vary by board; use `status = "..."` only when the user names a specific status. Avoid custom fields.
If Jira returns no matches, say so explicitly to the user and suggest a refined query.
```
## Step 8 - test the API Action
[Section titled “Step 8 - test the API Action”](#step-8---test-the-api-action)
Before we test the AI Action in conversation, we can test how the API itself is being called in the **Test Response** tab. Let’s do a first test with the following query which should return all issues in the project: `project = "Solar System"`
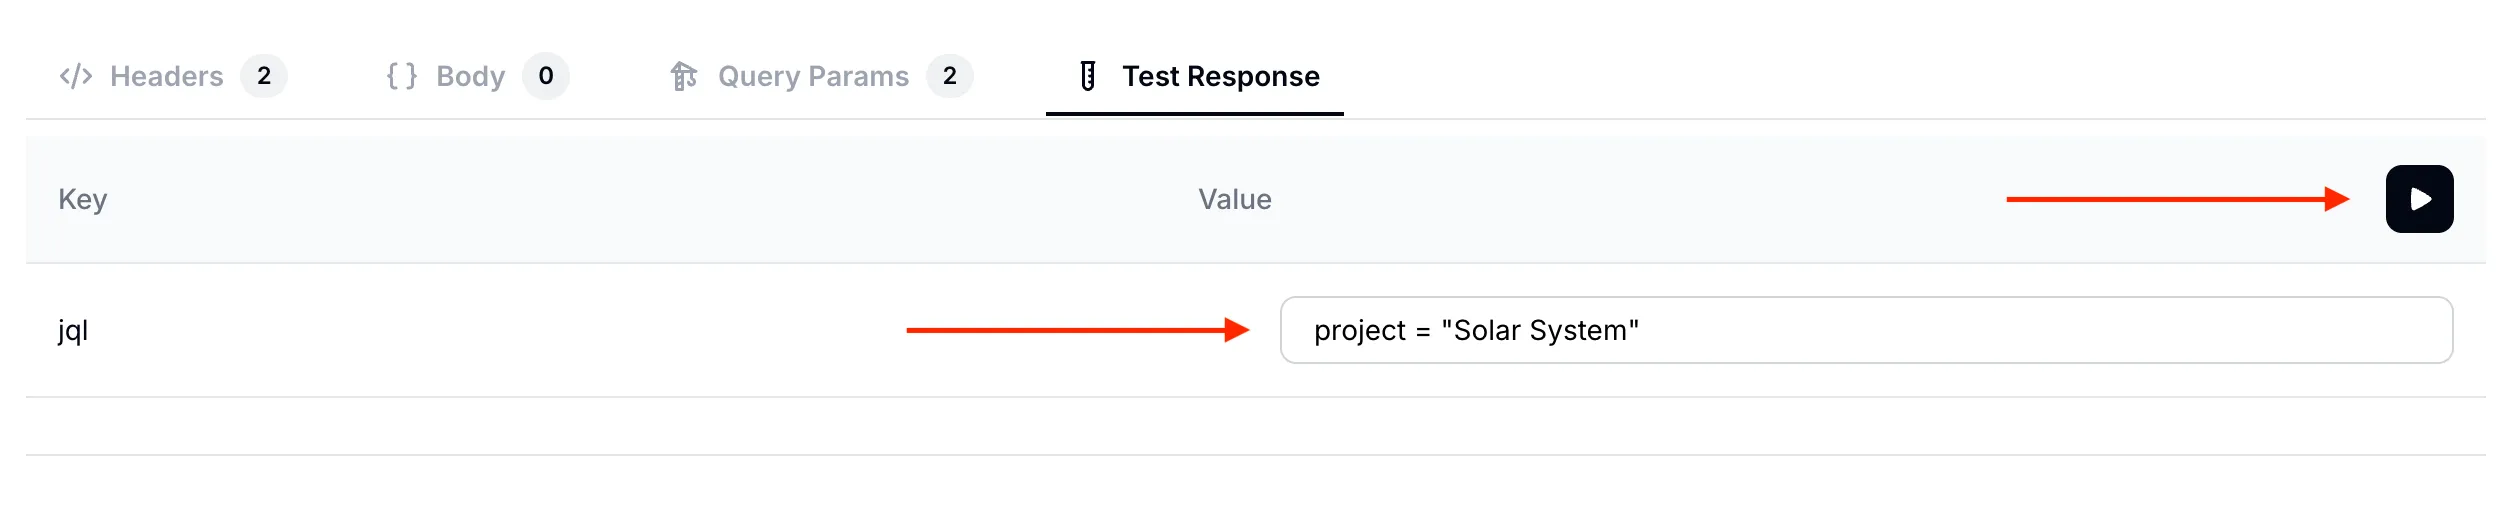 *Searching for all issues in the `Solar System` project*
Below is the test response we get. As expected, it lists the summary, description and status fields for all the 6 issues on our Jira board.
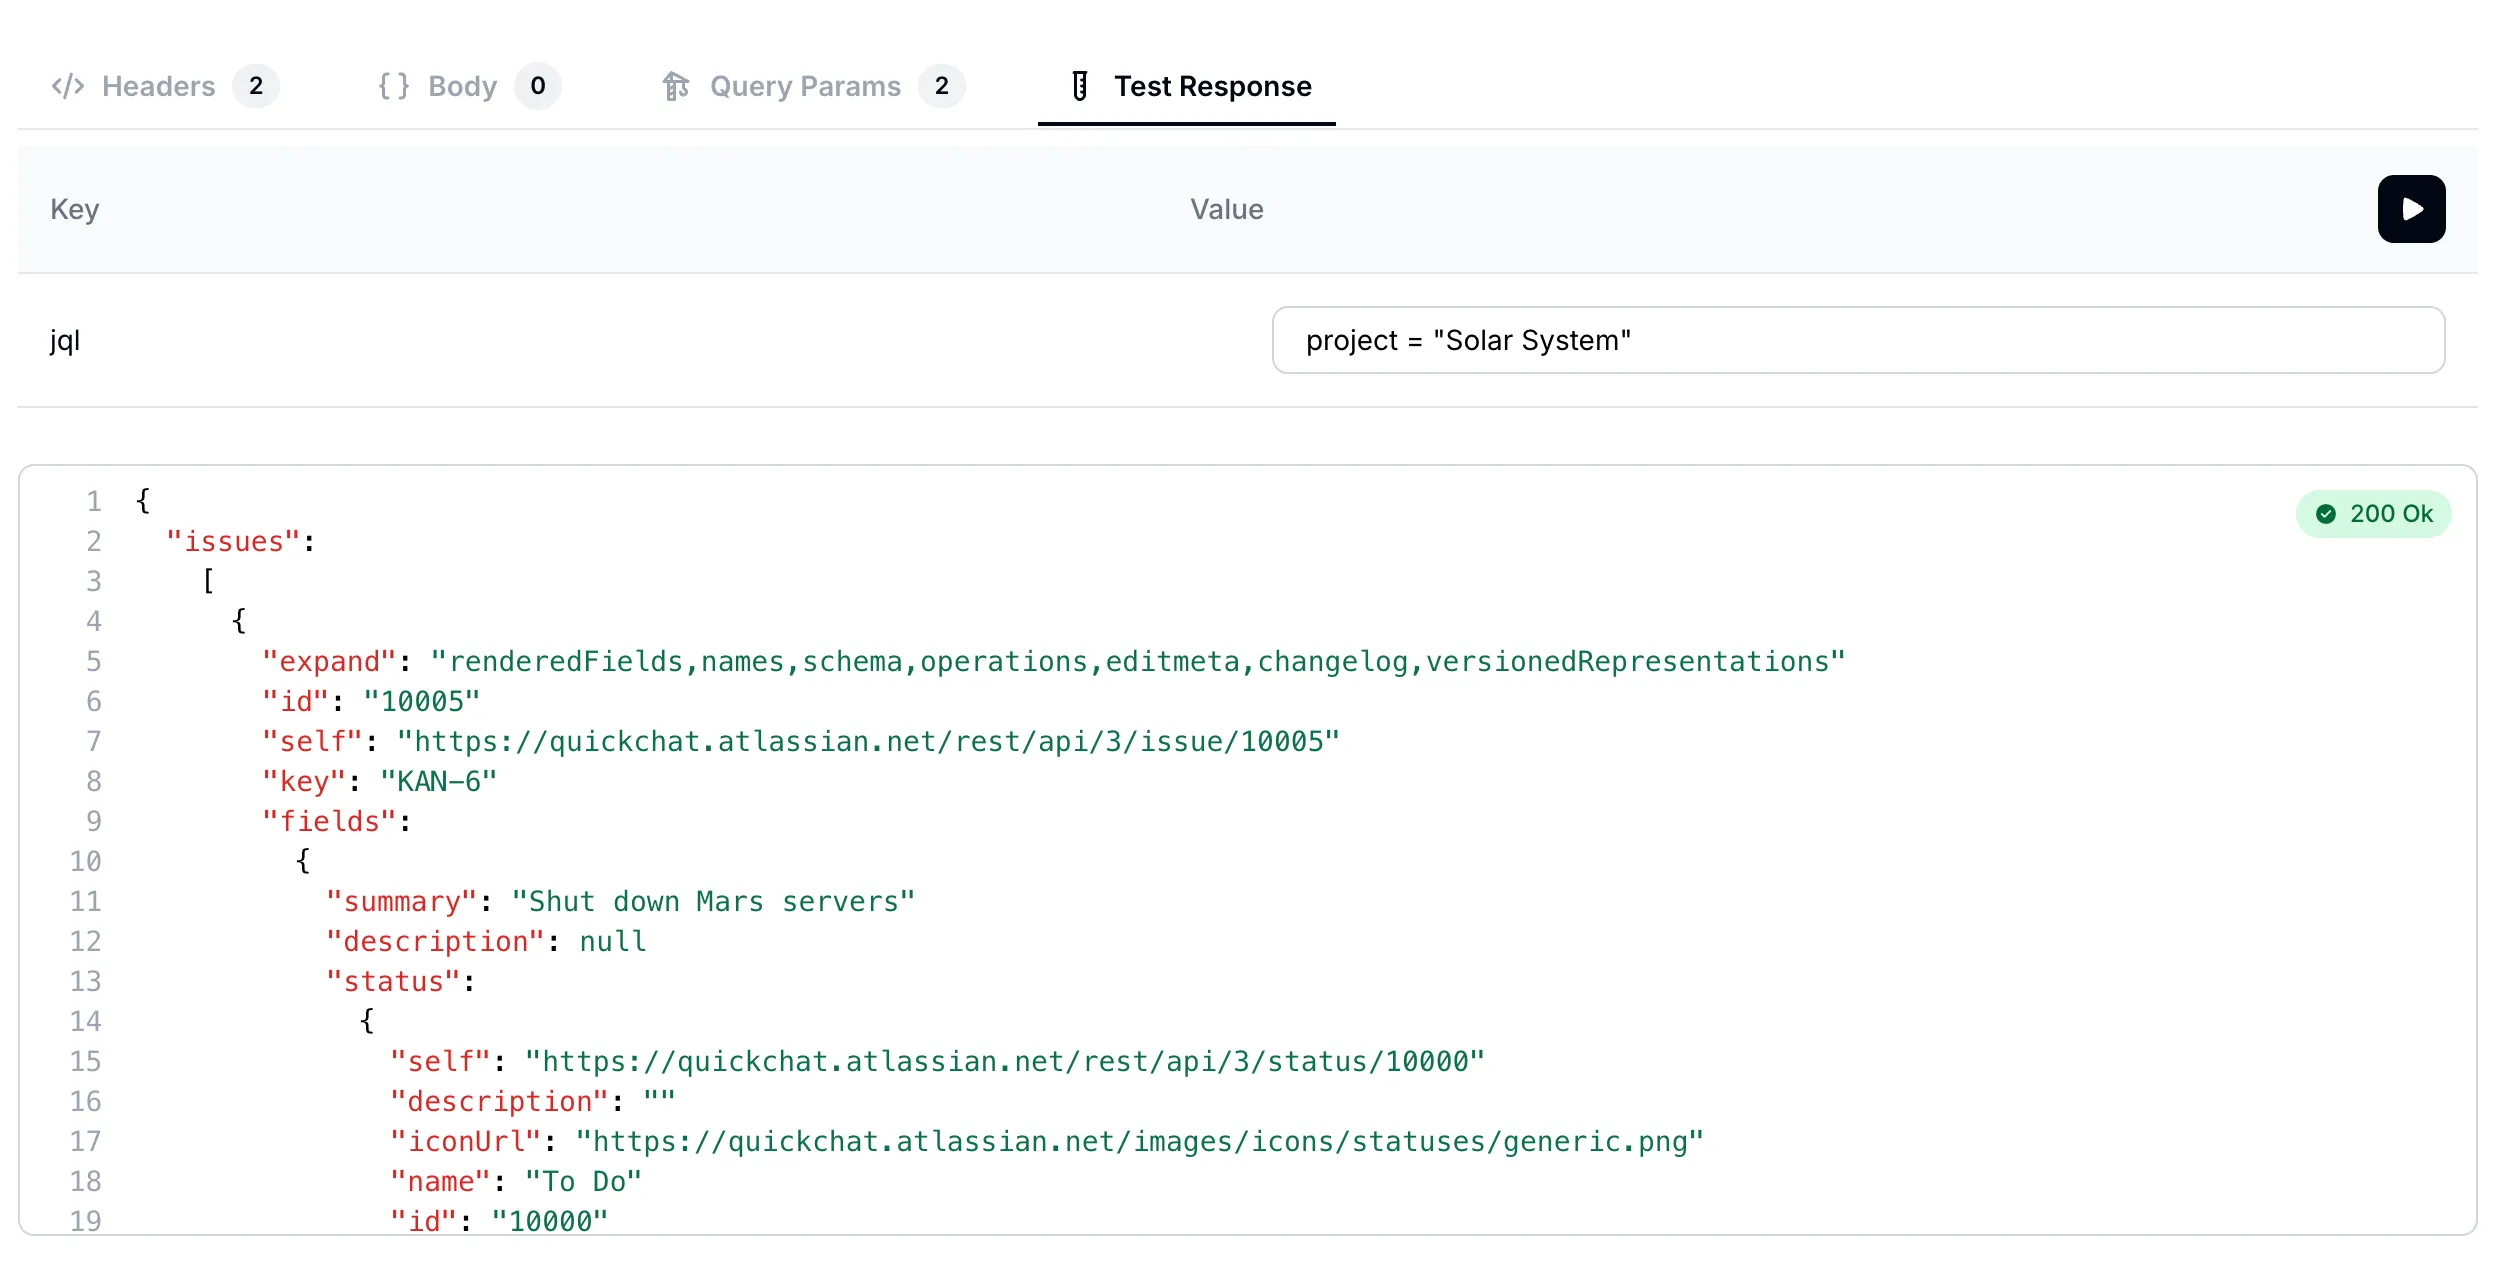 *Response lists all issues in the `Solar System` project*
Let’s try one more query. This time let’s search for all the issues which mention “mercury”: `text ~ "mercury"`
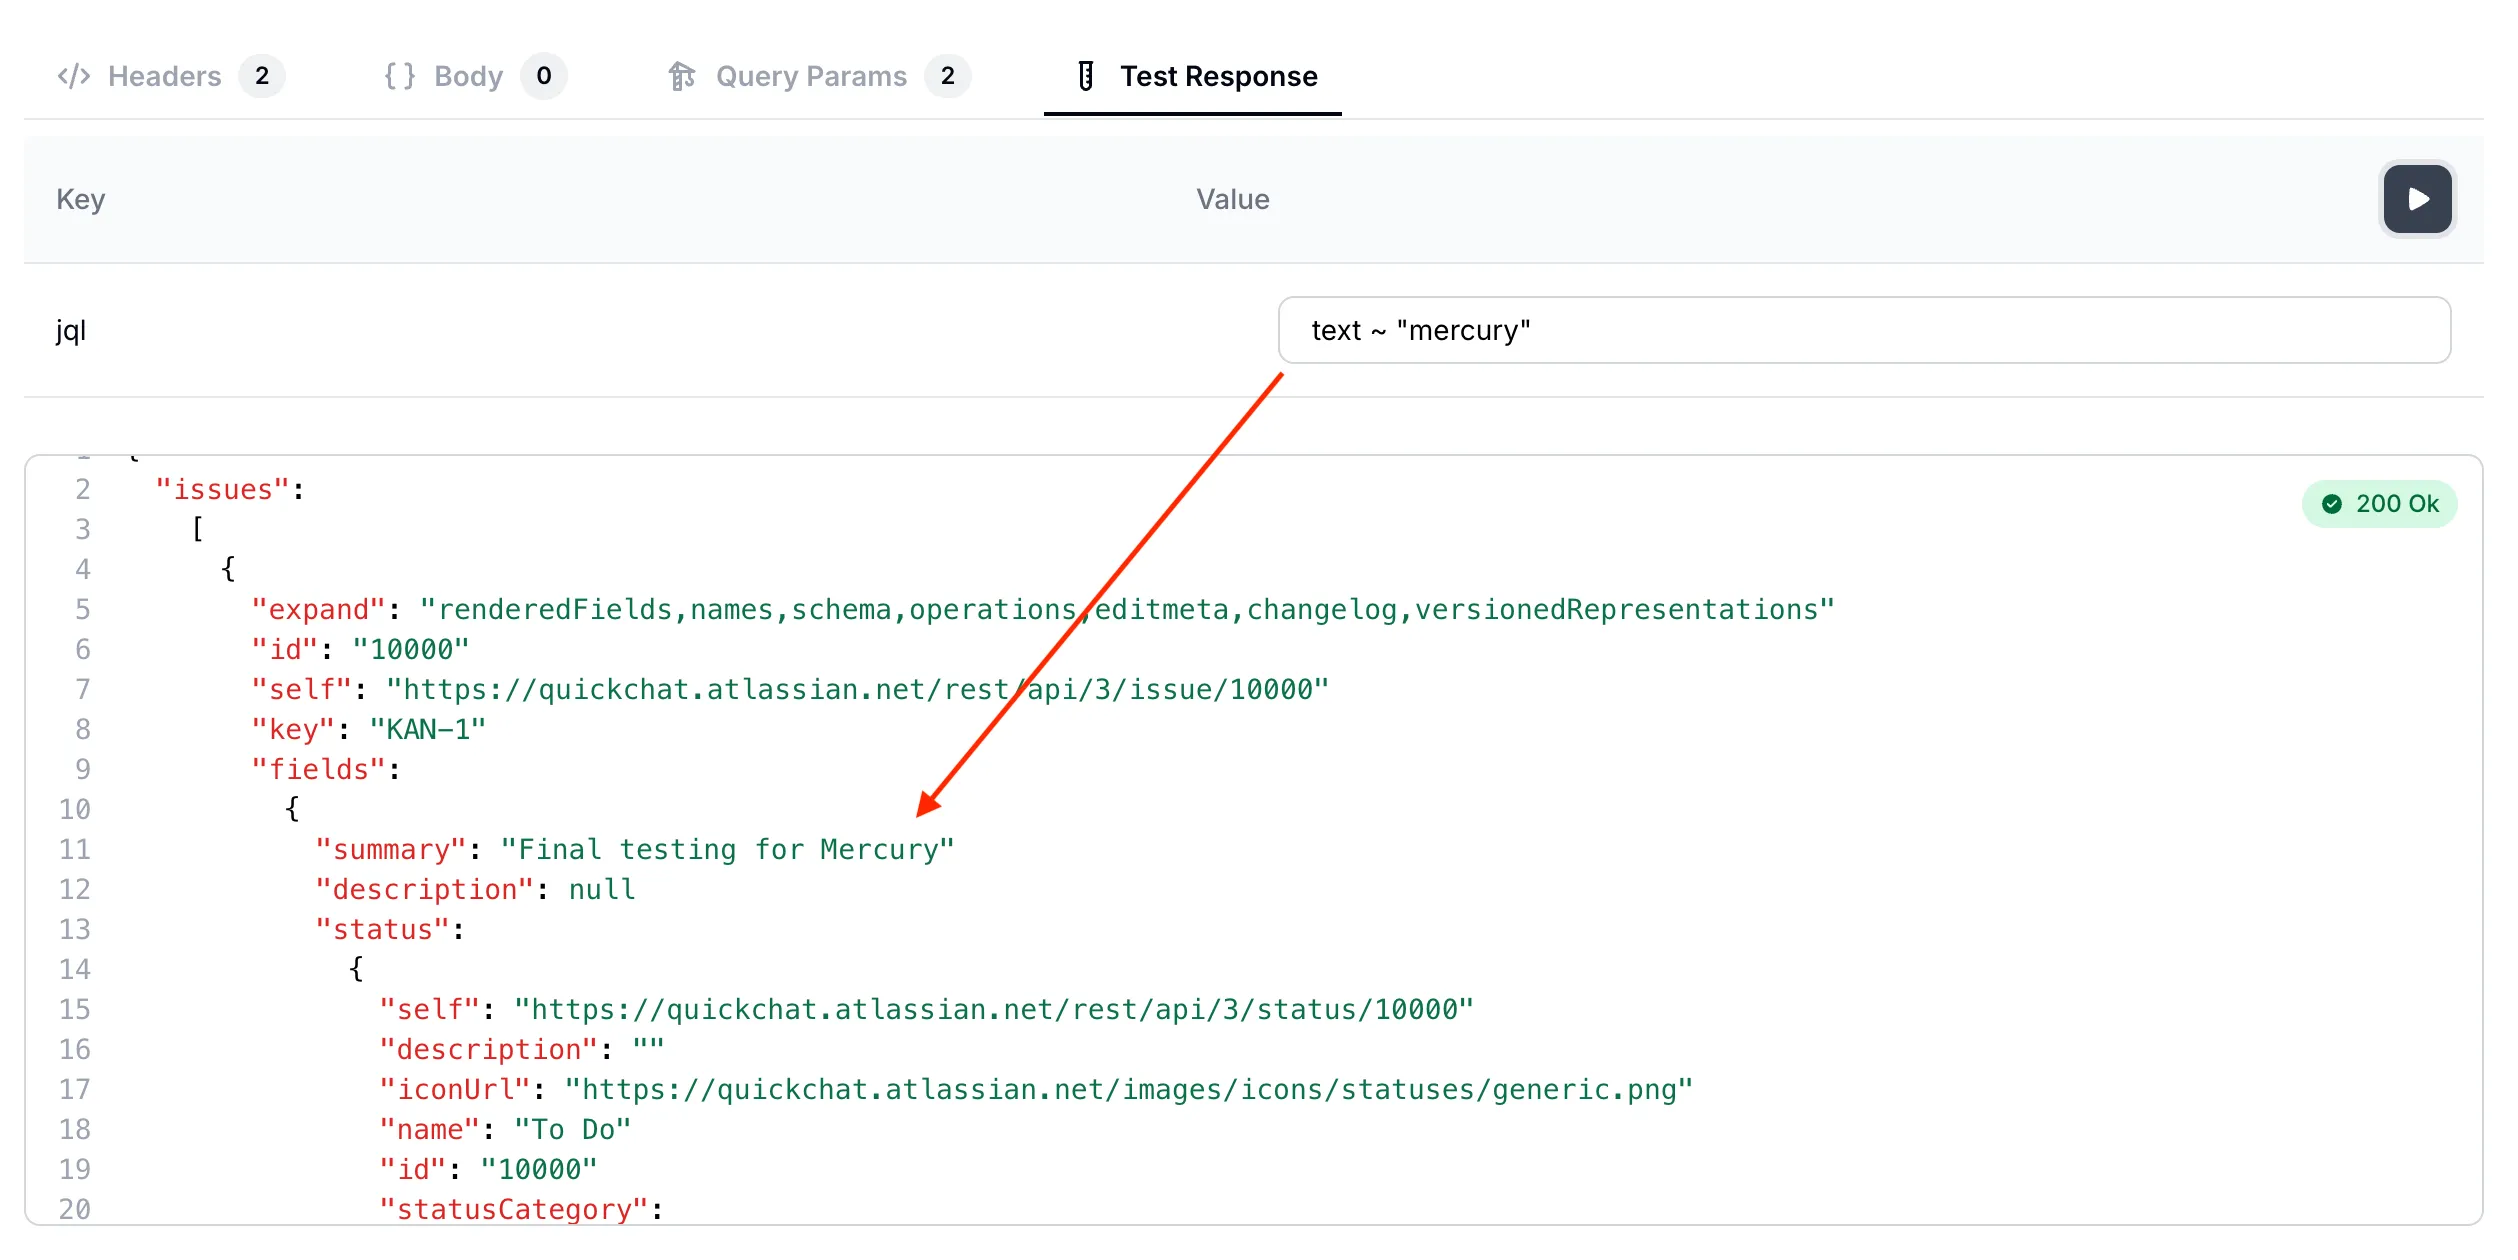 *Searching for issues which mention `mercury`*
We have now validated that the AI Action correctly calls our API endpoint. We can now move on to testing full conversations with the AI Agent!
## Step 9 - test the AI Agent in conversations
[Section titled “Step 9 - test the AI Agent in conversations”](#step-9---test-the-ai-agent-in-conversations)
Head back to the [Quickchat AI app](https://app.quickchat.ai) and test your AI Agent in conversation preview.
### Conversation #1
[Section titled “Conversation #1”](#conversation-1)
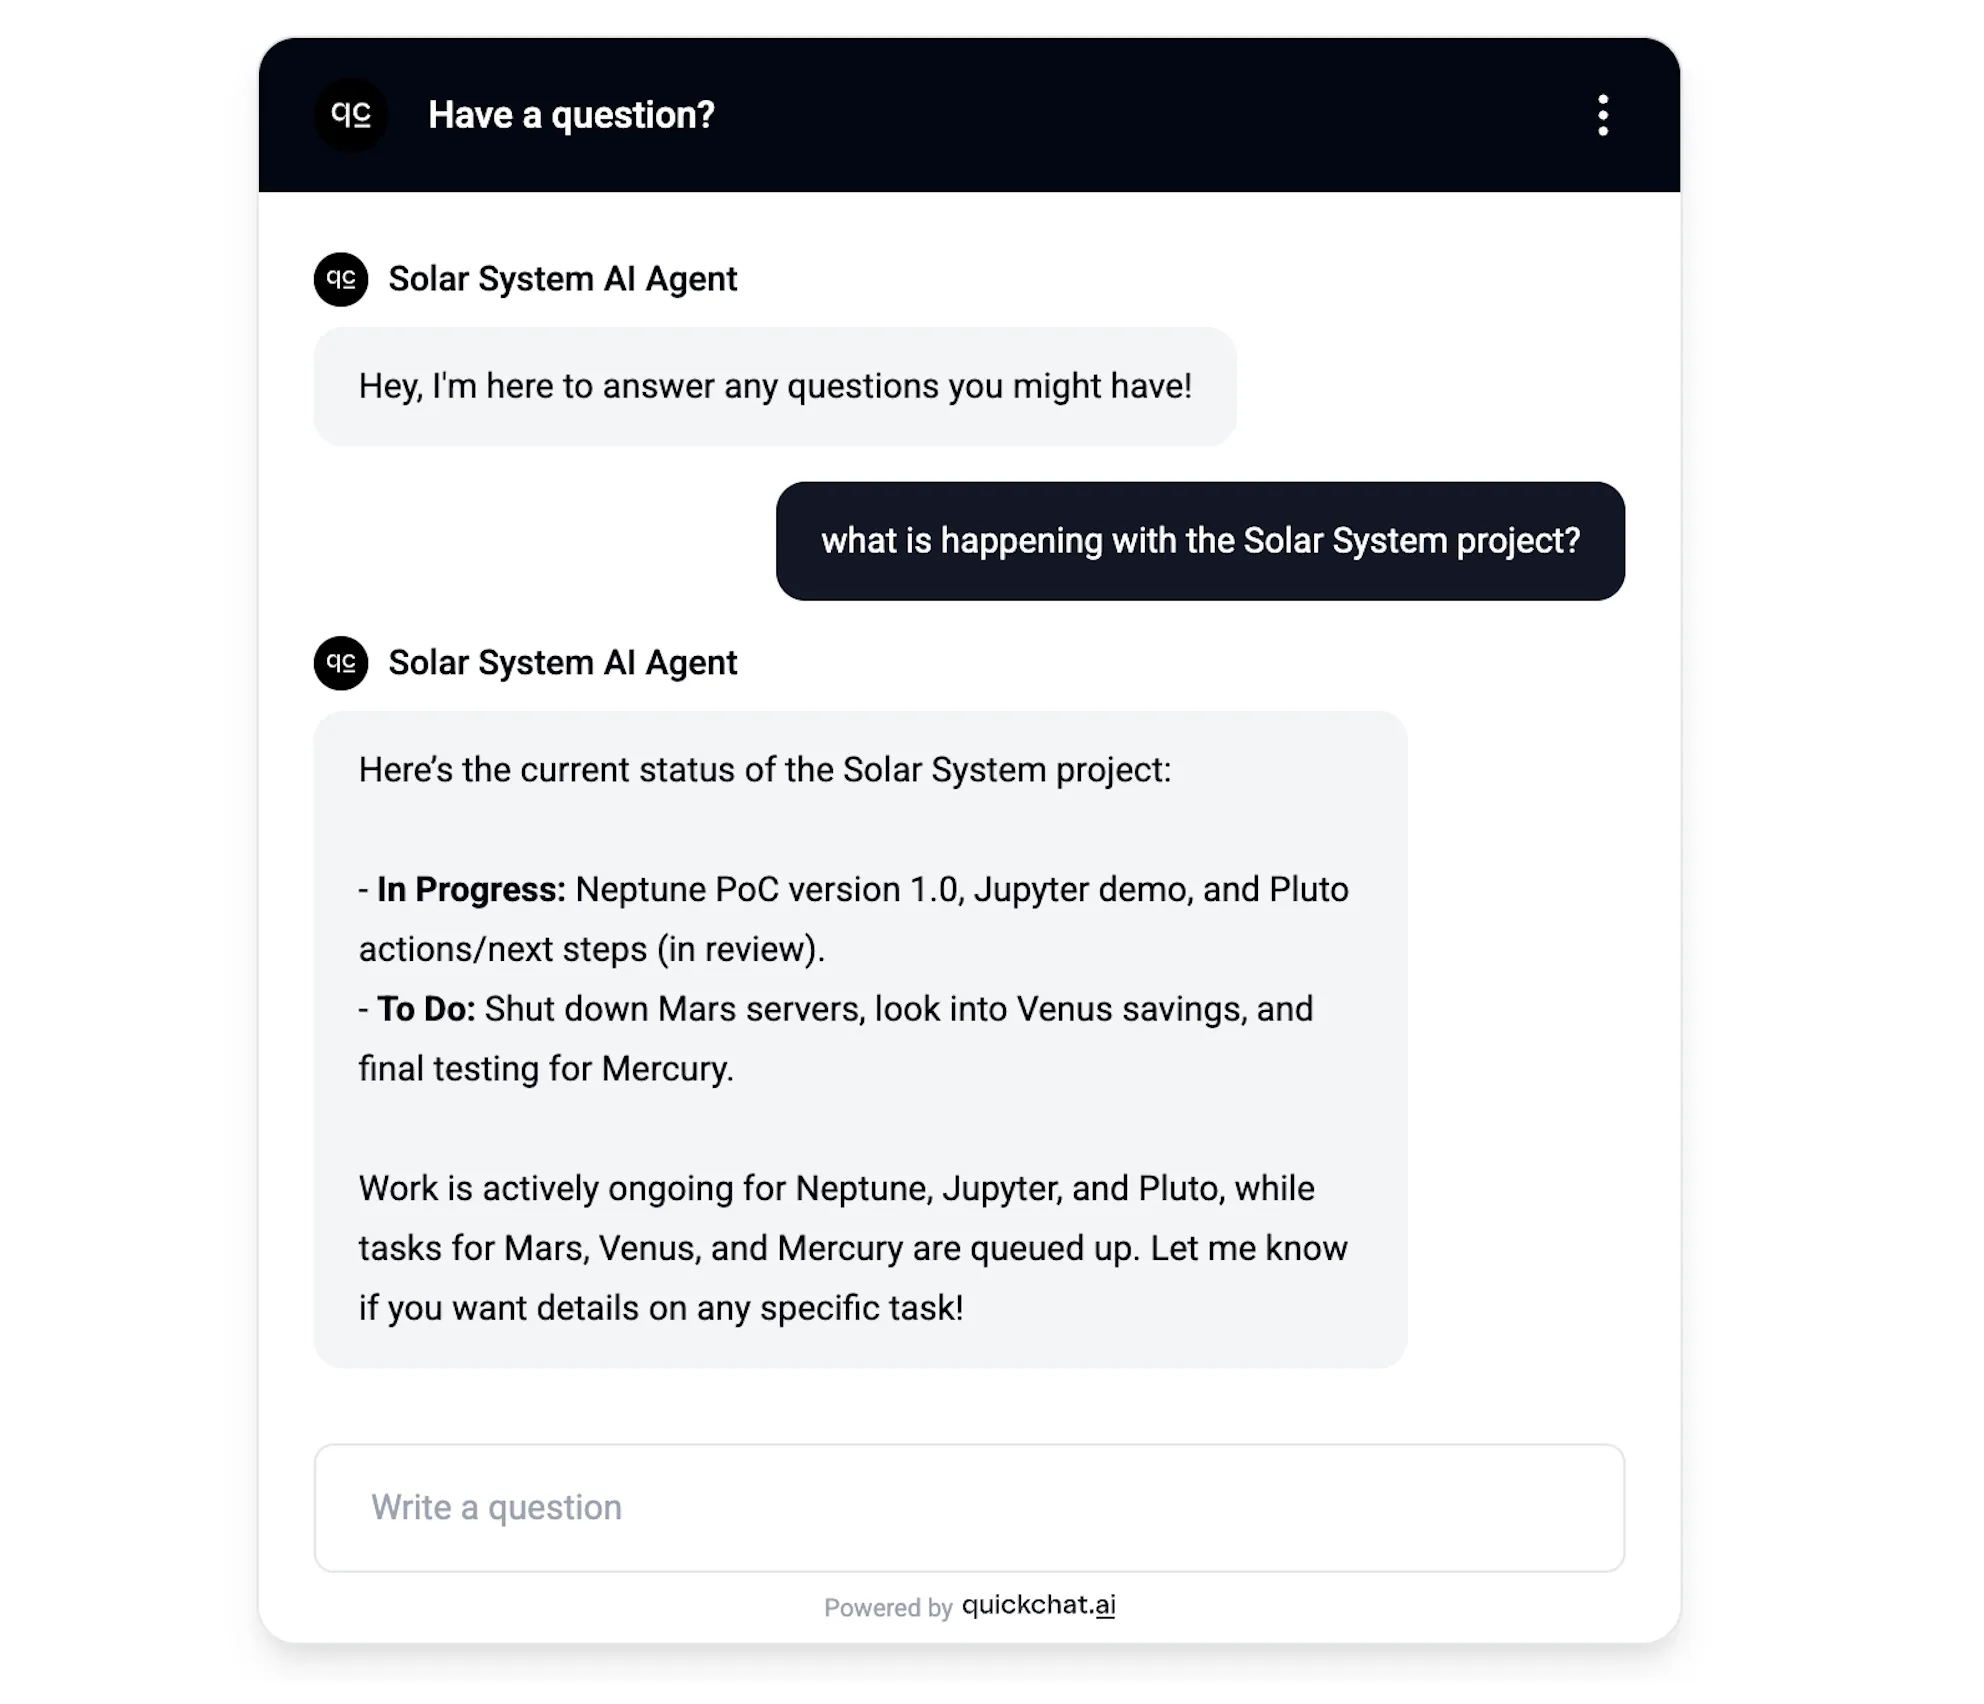 *AI Agent gives a summary of all issues within the project*
In this simple conversation the AI Agent gives an overview of all the issues within the project. A look behind the scenes tell us that the exact query it ran against the API endpoint was: `project = "Solar System"`
### Conversation #2
[Section titled “Conversation #2”](#conversation-2)
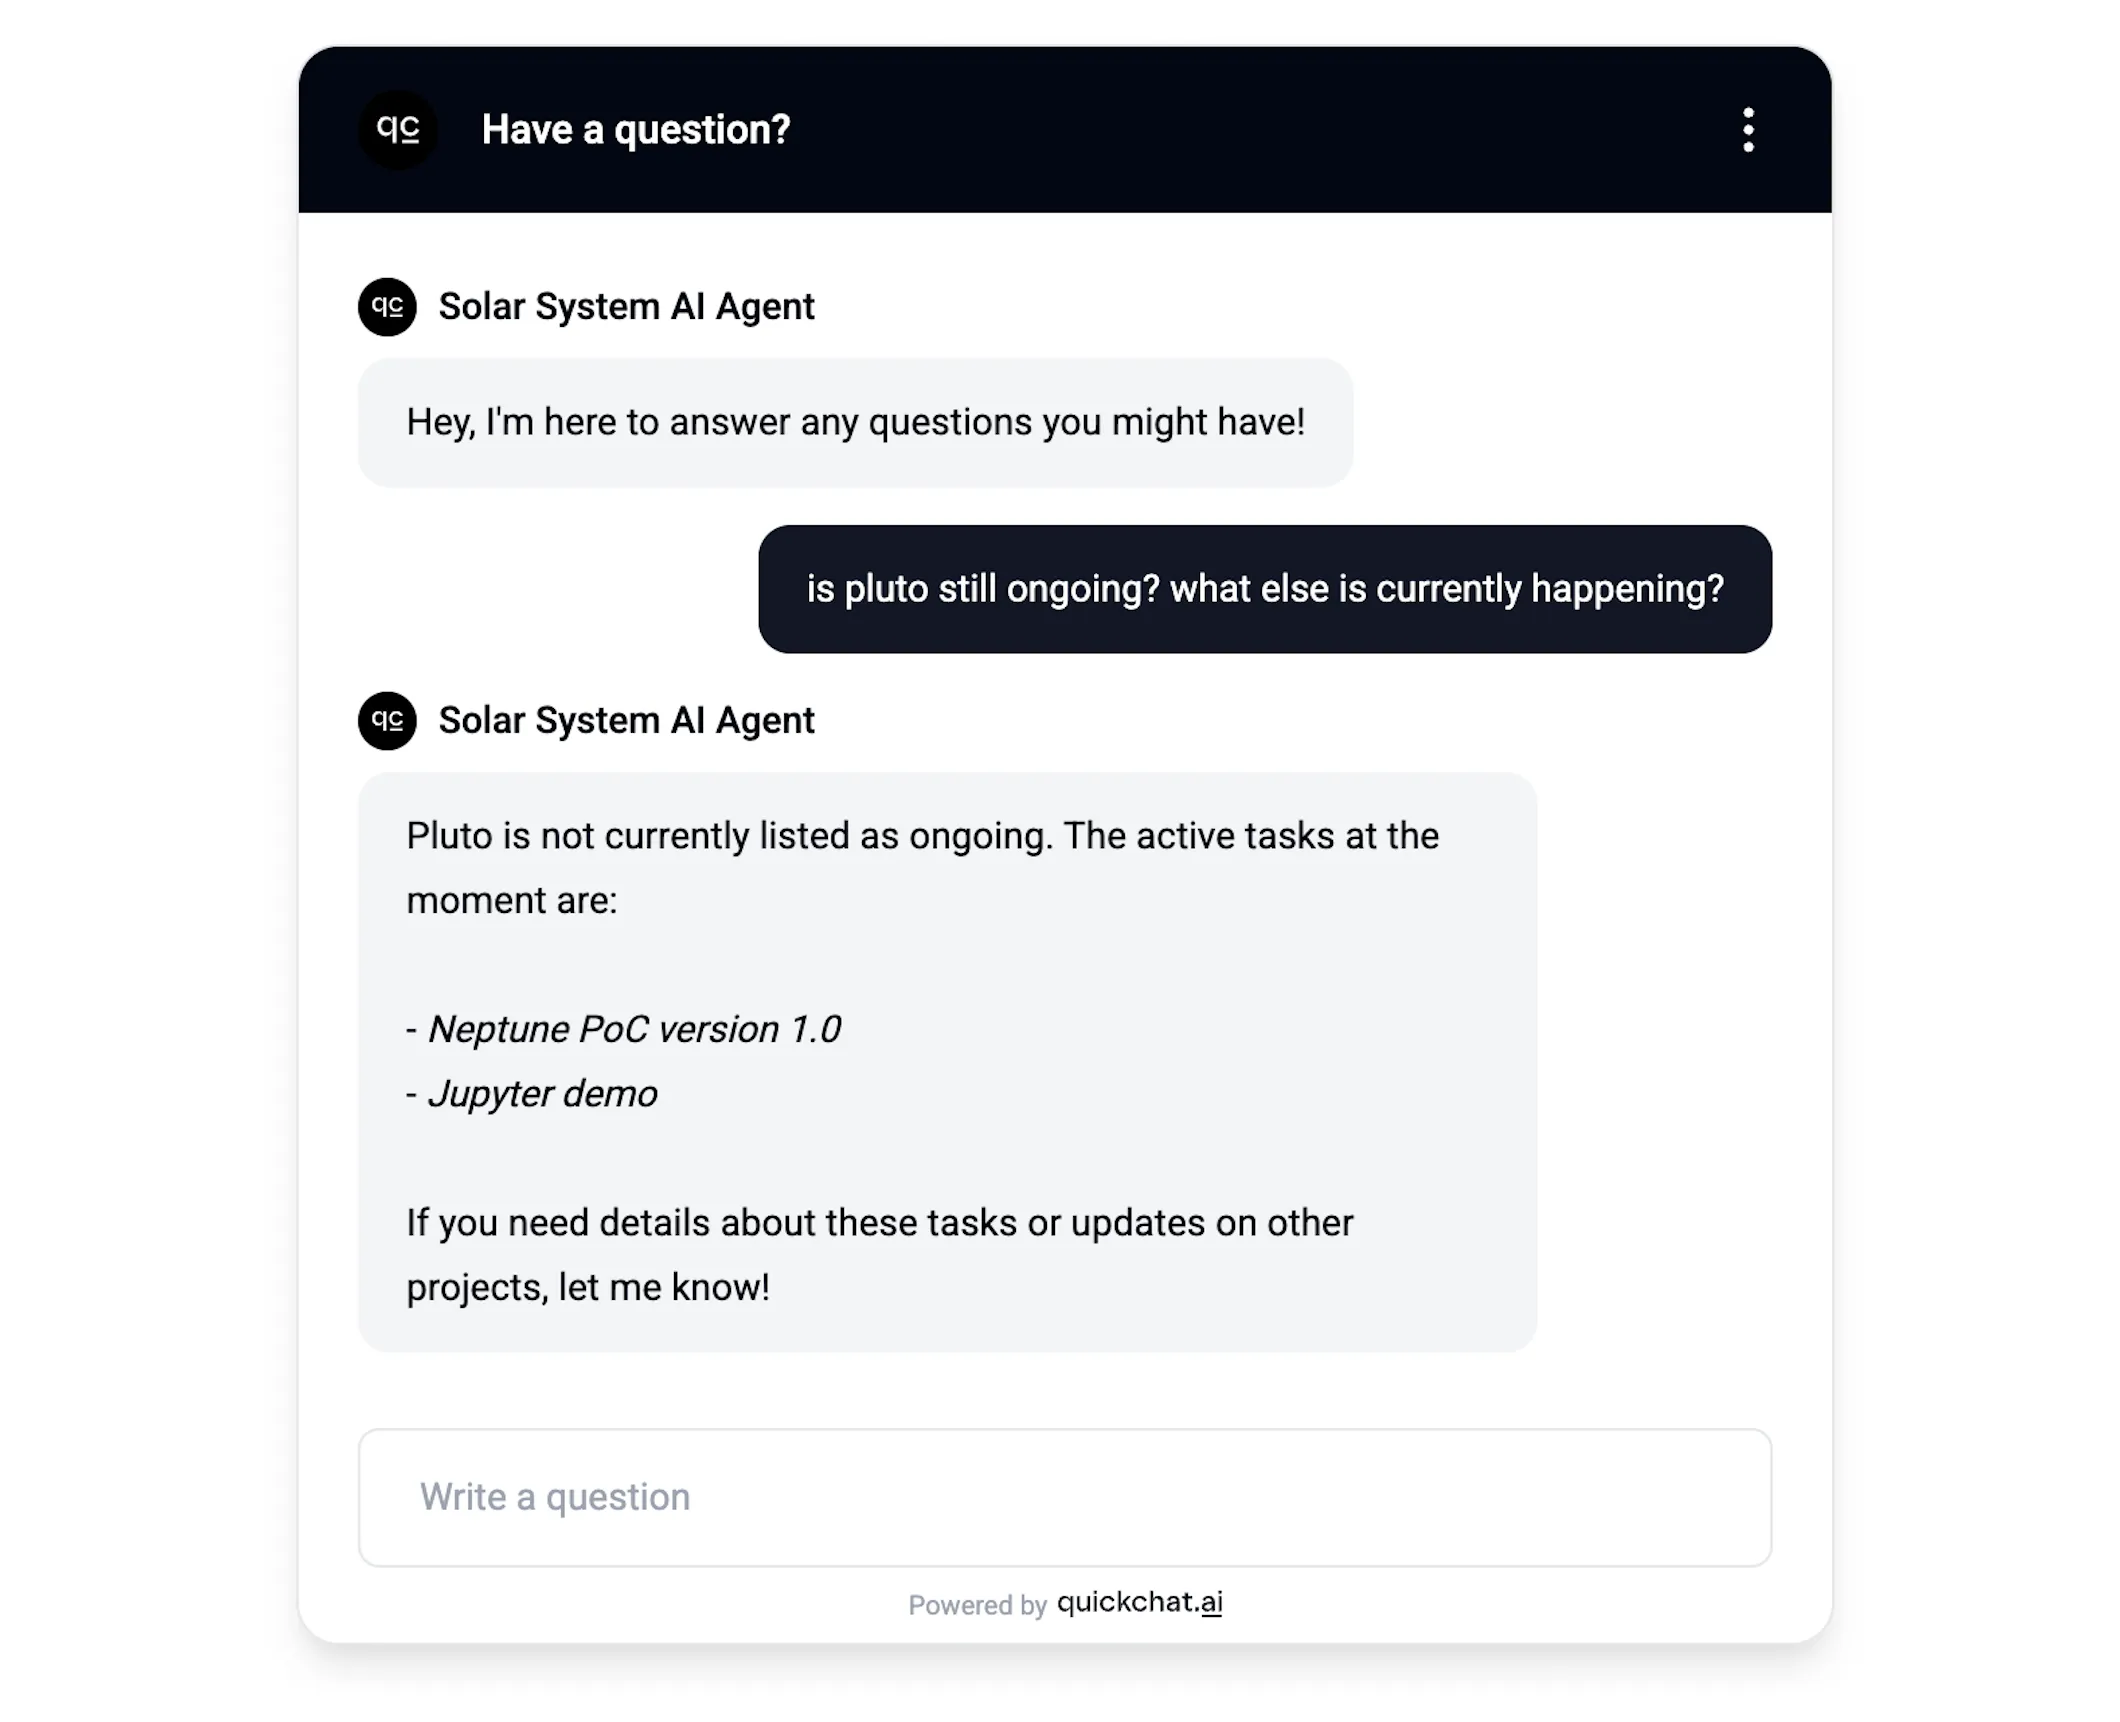 *AI Agent responds to questions about specific issues and statuses*
In this case, the AI Agent was asked about two separate aspects: a specific issue and issues ongoing in general. A look behind the scenes tells us that it decided to use the Jira API in a two-step process:
1. Check if `pluto` is ongoing:
```plaintext
status = "In Progress" AND (text ~ "pluto" OR text ~ "ongoing" OR text ~ "current" OR text ~ "active" OR text ~ "progress")
```
2. Check what else is ongoing:
```plaintext
status = "In Progress"
```
### Conversation #3
[Section titled “Conversation #3”](#conversation-3)
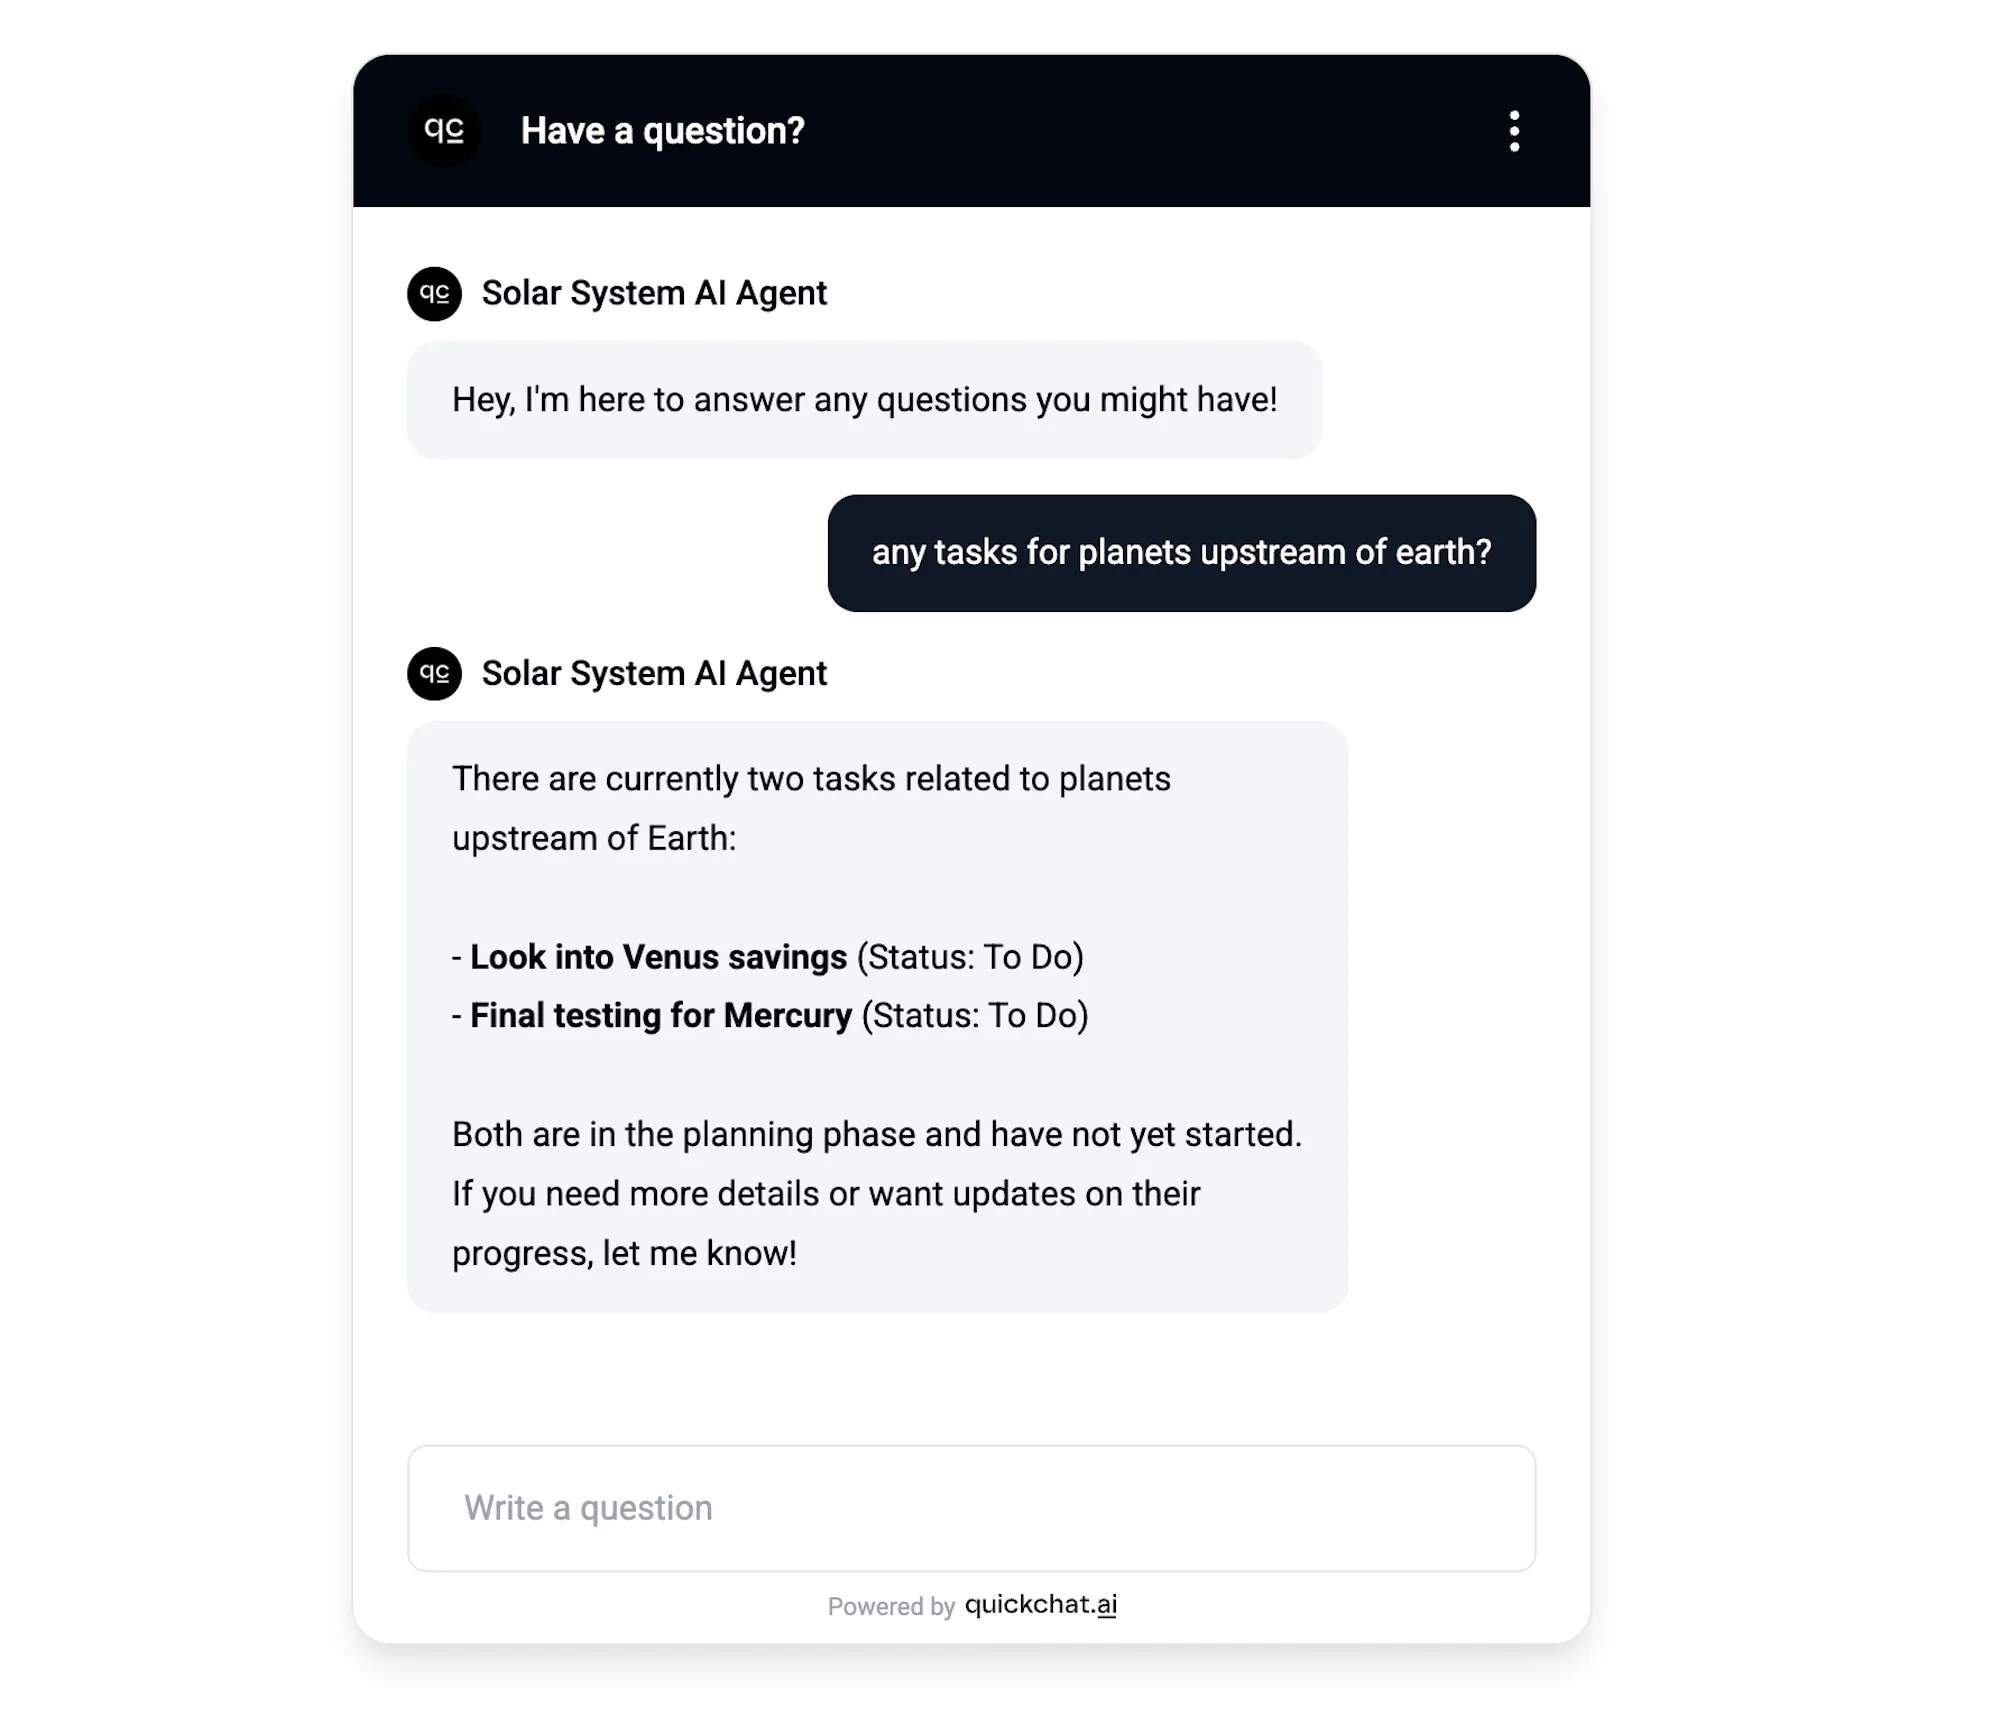 *AI Agent responds to a creative query 😉*
In this case I wanted to throw a curveball at the AI Agent and asked it a question that takes some creativity to interpret correctly. Here is how it got translated into a JQL query:
```plaintext
(text ~ "planet" OR text ~ "upstream" OR text ~ "mercury" OR text ~ "venus")
```
### Try these phrasings
[Section titled “Try these phrasings”](#try-these-phrasings)
To be confident the AI Action fires no matter how your end users phrase their request, run each of the prompts below against your test scenario. The agent should query Jira on every one of them, not just the search-style ones:
* *“find all open issues about live scores”*
* *“search for issues with `mercury`”*
* *“explain the Solar System project”*
* *“tell me about the open issues in this sprint”*
* *“describe what’s currently in progress”*
* *“what is the status of pluto?”*
If any of these phrasings does not invoke the AI Action, double-check that your API Action description (Step 7) lists those verbs explicitly.
What to expect when Jira has no matching issues
When Jira returns zero results, your AI Agent should say so explicitly — for example, *“I checked Jira and found no matching issues for your query — try a broader phrasing or remove the status filter.”*
If instead you see the agent reply with *“I don’t have direct access to your Jira”*, the AI Action did not fire at all. Re-check the description from Step 7 and confirm that it explicitly lists non-search verbs (`explain`, `tell me about`, `describe`, `what is`).
## Summary
[Section titled “Summary”](#summary)
In this post, we showed how an AI Agent can be set up to use a specific API endpoint in a creative way in conversations. The correct setup doesn’t come out of the box - it requires providing detailed extra information of the specific use case we have in mind. Please feel free to reuse the prompts and descriptions shown in this post for creating your own similar AI Agents!
> Prefer a long-form, narrated walkthrough? The same setup is also covered as a [blog post on quickchat.ai](https://quickchat.ai/post/search-jira-tickets-in-ai-conversation). This docs page is the canonical, continuously-updated reference.
## Going further
[Section titled “Going further”](#going-further)
A Jira action does not have to be a single fixed request. You can inject [built-in conversation variables and saved metadata](/ai-agent/variables/) (such as the visitor’s language or values captured earlier in the conversation) into any field, and you can add several actions so the agent picks the right one per question. See the [Actions reference](/ai-agent/actions/) for the full set of options.
## 🎁 BONUS
[Section titled “🎁 BONUS”](#bonus)
The above post was written by a *human* (yours truly) but could have just as well been written by AI. For example, by pasting a prompt like this one into ChatGPT:
```plaintext
I need an API endpoint that allows me to search through my Jira tickets.
Guide me through the process step by step so that it is accessible to a moderately technical person:
- Provide links to documentation describing the endpoint
- Any necessary account creation and initial setup
- If any paid account is needed, indicate that clearly
- If any authentication such as API tokens is needed, guide me through the process of creating them and show me exactly every step needed to be able to use them as an HTTP request header. For example, if base64 encoding is needed, show a script or another way of achieving that.
- Show to me exactly what header keys and values I need for the HTTP request (show me header keys and values in a table)
- Show to me exactly what payload parameters I need for the HTTP request (show me payload parameter name and example values in a table)
```
In the future, perhaps rather than search through Jira tickets you would like to:
* *send messages to a Slack channel?*
* *fetch information from a Notion page?*
* *perform an action via Zapier?*
Say that in the first sentence and run the prompt again! You will obtain perfectly good instructions to add the exact AI Action you need!
# MCP
> Launch your own MCP server with Quickchat AI. Let Claude, ChatGPT, Cursor, and other AI apps connect to your Agent via the Model Context Protocol.
When iPhones took off, every company needed an app in the App Store.
Now, as AI chat apps gain traction (and MCP becomes the standard) every company will need an MCP that lets others plug into their AI.
Starting today, **every Quickchat AI user can launch their own MCP with a single click.**
Most people describe MCPs as the USB-C of AI — the universal connector for AI apps, a simple, standardized way to add any tool to platforms like Claude or ChatGPT.
But here’s how we see it: MCP lets your favorite AI app message another AI on your behalf and let you know what it said. With Quickchat AI MCP, anyone can plug your AI Agent into Claude, (soon) ChatGPT, Cursor, or any other AI app that supports the protocol.
If you need a refresher on what MCP is, check out our [detailed, step-by-step guide](https://www.quickchat.ai/post/mcp-explained).
## Watch the Video
[Section titled “Watch the Video”](#watch-the-video)
[Play](https://youtube.com/watch?v=JE3dNiyZO8w)
## What is Quickchat AI MCP server?
[Section titled “What is Quickchat AI MCP server?”](#what-is-quickchat-ai-mcp-server)
The [Quickchat AI](https://quickchat.ai/) MCP ([Model Context Protocol](https://modelcontextprotocol.io/)) server allows you to let anyone plug in your Quickchat AI Agent into their favourite AI app such as Claude Desktop, Cursor, VS Code, Windsurf and [more](https://modelcontextprotocol.io/clients#feature-support-matrix).
## Quickstart
[Section titled “Quickstart”](#quickstart)
1. Create a [Quickchat AI account](https://app.quickchat.ai/). The Free plan lets you get started right away.
2. Set up your AI’s Knowledge Base, capabilities, and settings.
3. Go to the MCP page to activate your MCP. Give it **Name**, **Description** and (optional) **Command**. They are important — AI apps need to understand when to contact your AI, what its capabilities and knowledge are.
4. That’s it! Now you’re ready to test your Quickchat AI via any AI app and show it to the world!
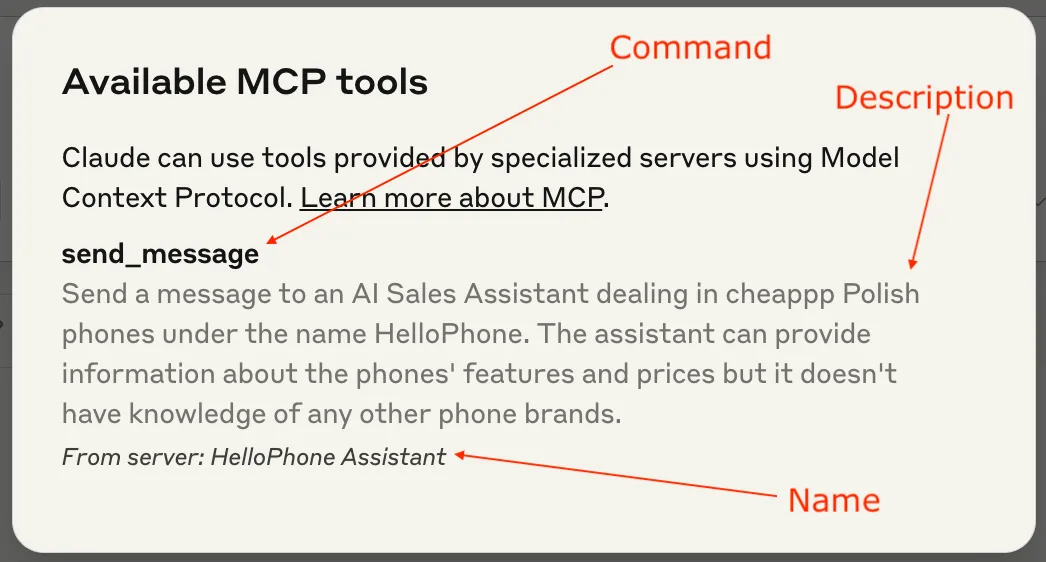 *Claude tool anatomy*
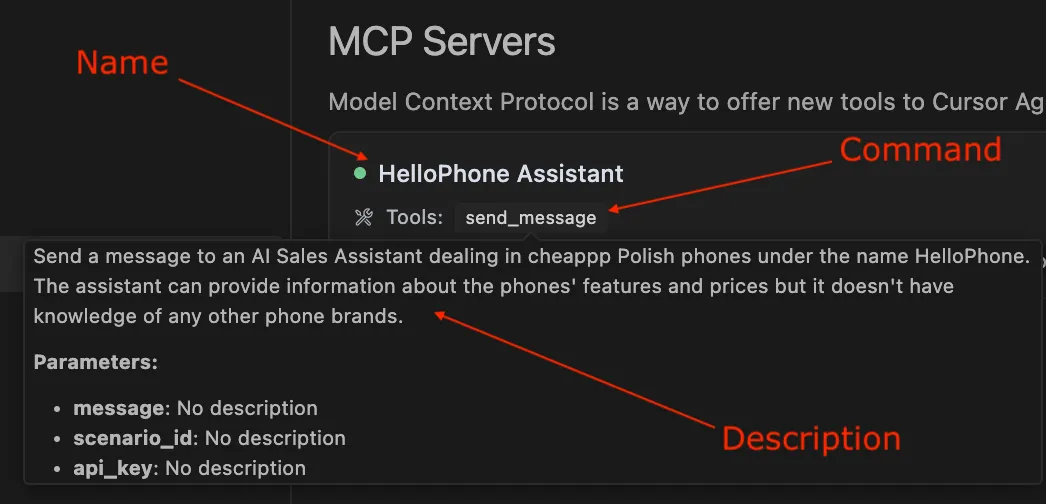 *Cursor tool anatomy*
## Prerequisite
[Section titled “Prerequisite”](#prerequisite)
Install `uv` using:
`curl -LsSf https://astral.sh/uv/install.sh | sh`
or read more [here](https://docs.astral.sh/uv/getting-started/installation/).
## Test with Claude Desktop
[Section titled “Test with Claude Desktop”](#test-with-claude-desktop)
### Configuration
[Section titled “Configuration”](#configuration)
Go to Settings > Developer > Edit Config. Open the *claude\_desktop\_config.json* file in a text editor.
If you’re just starting out, the file is going to look like this:
```typescript
{
"mcpServers": {}
}
```
This is where you can define all the MCPs your Claude Desktop has access to.
Here is how you add your Quickchat AI MCP:
```typescript
{
"mcpServers": {
"< QUICKCHAT AI MCP NAME >": {
"command": "uvx",
"args": ["quickchat-ai-mcp"],
"env": {
"SCENARIO_ID": "< QUICKCHAT AI SCENARIO ID >",
"API_KEY": "< QUICKCHAT AI API KEY >"
}
}
}
}
```
Go to the Quickchat AI app > MCP > Integration to find the above snippet with the values of MCP Name, SCENARIO\_ID and API\_KEY filled out.
## Test with Cursor
[Section titled “Test with Cursor”](#test-with-cursor)
### Configuration
[Section titled “Configuration”](#configuration-1)
Go to Settings > Cursor Settings > MCP > Add new global MCP server and include the Quickchat AI MCP snippet:
```typescript
{
"mcpServers": {
"< QUICKCHAT AI MCP NAME >": {
"command": "uvx",
"args": ["quickchat-ai-mcp"],
"env": {
"SCENARIO_ID": "< QUICKCHAT AI SCENARIO ID >",
"API_KEY": "< QUICKCHAT AI API KEY >"
}
}
}
}
```
As before, you can find values for MCP Name, SCENARIO\_ID and API\_KEY at Quickchat AI app > MCP > Integration.
## Test with other AI apps
[Section titled “Test with other AI apps”](#test-with-other-ai-apps)
Other AI apps will most likely require the same configuration but the actual steps to include it in the App itself will be different. We will be expanding this blog post as we go along.
## Launch your Quickchat AI MCP to the world!
[Section titled “Launch your Quickchat AI MCP to the world!”](#launch-your-quickchat-ai-mcp-to-the-world)
**⛔️ Do not publish your Quickchat API key to your users!**
Once you’re ready to let other users connect your Quickchat AI MCP to their AI apps, share configuration snippet with them!
However, you need to make sure they can use your Quickchat AI MCP **without your Quickchat API key**.
Here is how to do that:
1. On the Quickchat App MCP page, turn the **Restrict Access with API Key** toggle **OFF**.
2. Share the configuration snippet *without the API key*:
```typescript
{
"mcpServers": {
"< QUICKCHAT AI MCP NAME >": {
"command": "uvx",
"args": ["quickchat-ai-mcp"],
"env": {
"SCENARIO_ID": "< QUICKCHAT AI SCENARIO ID >"
}
}
}
}
```
### Cool features
[Section titled “Cool features”](#cool-features)
* You can control all aspects of your MCP from the Quickchat AI dashboard. With one click, your changes are deployed. That includes the MCP name and description — all your users need to do is refresh their MCP connection.
* View all conversations in the Quickchat Inbox. Remember: those won’t be the exact messages your users send to their AI app but rather the transcript of the AI-AI interaction between their AI app and your Quickchat AI.
* Unlike most MCP implementations, this isn’t just a static tool handed to an AI.
* It’s an open-ended way to send messages to Quickchat AI Agents you create.
## Running from source
[Section titled “Running from source”](#running-from-source)
### Debugging with the [MCP inspector](https://modelcontextprotocol.io/docs/tools/inspector)
[Section titled “Debugging with the MCP inspector”](#debugging-with-the-mcp-inspector)
uv run mcp dev src/**main**.py
### Debugging with Claude Desktop, Cursor or other AI apps
[Section titled “Debugging with Claude Desktop, Cursor or other AI apps”](#debugging-with-claude-desktop-cursor-or-other-ai-apps)
Use the following JSON configuration:
```typescript
{
"mcpServers": {
"< QUICKCHAT AI MCP NAME >": {
"command": "uv",
"args": [
"run",
"--with",
"mcp[cli]",
"--with",
"requests",
"mcp",
"run",
"< YOUR PATH>/quickchat-ai-mcp/src/__main__.py"
],
"env": {
"SCENARIO_ID": "< QUICKCHAT AI SCENARIO ID >",
"API_KEY": "< QUICKCHAT AI API KEY >"
}
}
}
}
```
### Testing
[Section titled “Testing”](#testing)
Make sure your code is properly formatted and all tests are passing:
```shell
ruff check --fix
ruff format
uv run pytest
```
## Ready to go?
[Section titled “Ready to go?”](#ready-to-go)
With just a few steps, you can make your Quickchat AI Agent accessible from anywhere. Whether you’re building internal tools or sharing your AI with the world, our MCP integration makes it easy.
You also get:
* ✅ A shared Inbox to view conversations
* 🔄 Conversation analytics via the Dashboard
### **Useful Links**
[Section titled “Useful Links”](#useful-links)
* [GitHub Repository](https://github.com/quickchatai/quickchat-ai-mcp)
* [PyPI Package](https://pypi.org/project/quickchat-ai-mcp/)
* [YouTube Walkthrough](https://www.youtube.com/watch?v=JE3dNiyZO8w)
* [MCP Official Website](https://modelcontextprotocol.io/)
*Ready to go?*
Go to the [Quickchat AI app](https://app.quickchat.ai) and let the world connect to your AI.
And if you build something cool with your MCP, we’d love to see it! Share it with us on [Twitter](https://x.com/quickchatai) or [LinkedIn](https://www.linkedin.com/company/quickchatai/).
# Shopify
> Add the Quickchat AI shopping assistant to your Shopify store. Install via the Shopify App Marketplace or embed the widget manually.
In this guide, we’ll show how to add Quickchat AI Widget to your Shopify store.
## What you’ll need
[Section titled “What you’ll need”](#what-youll-need)
* A Shopify store
* The [**Shopping Agent by Quickchat AI**](https://apps.shopify.com/quickchat-ai) app installed from the Shopify App Marketplace (if you don’t want to install it and you’d rather connect it manually, [scroll down to the second part of the tutorial](#how-to-manually-add-a-widget-script))
* User permission to edit themes
*Time to complete: \~2 minutes*
***
## What are Shopping AI Agents?
[Section titled “What are Shopping AI Agents?”](#what-are-shopping-ai-agents)
In this short video you will learn the basics: how to turn your Shopify store into a Shopping AI Agent using Quickchat AI and Shopify MCP.
[Play](https://youtube.com/watch?v=NPZEg4OVSRE)
## Step 1: Open your Theme Editor
[Section titled “Step 1: Open your Theme Editor”](#step-1-open-your-theme-editor)
There are two ways to do it:
### Option A (recommended): from Quickchat AI App
[Section titled “Option A (recommended): from Quickchat AI App”](#option-a-recommended-from-quickchat-ai-app)
From the [Quickchat AI App](https://app.quickchat.ai) home/welcome page, find the Shopify card (“Welcome, Shopify User!”) and click **Open Shopify Theme Editor**.
This deep-links to your store’s Shopify Theme Editor directly in the App embeds context, where the app embed can be enabled.
Note
**Open Shopify Theme Editor** only appears for stores already connected to Quickchat AI via the Shopify app (OAuth).
### Option B: from Shopify Admin
[Section titled “Option B: from Shopify Admin”](#option-b-from-shopify-admin)
Go to [Shopify Admin](https://admin.shopify.com/) → **Online Store → Themes** → on your current theme click **Customize**.
***
## Step 2: Enable the app embed
[Section titled “Step 2: Enable the app embed”](#step-2-enable-the-app-embed)
Inside the Theme Editor, open the left sidebar and go to **App embeds**.
Find **Quickchat AI Widget** and toggle it **on**.
Then click **Save** (top-right).
***
## Step 3: Confirm on your storefront
[Section titled “Step 3: Confirm on your storefront”](#step-3-confirm-on-your-storefront)
Open your storefront (preview or live site) and look for the Quickchat AI chat bubble in the bottom-right corner of the page.
That’s it!
**Quickchat AI Agent is live on Shopify Store 🎉**
***
## How to manually add a widget script
[Section titled “How to manually add a widget script”](#how-to-manually-add-a-widget-script)
If you don’t want to install our Shopify App because you already have an AI Agent built in Quickchat AI App, you can add a simple script that displays it on your Shopify Store.
Have you connected your AI to Shopify data already?
To connect your AI Agent to your Shopify store’s data such as product catalog and cart, please do the following:
1. Paste your store link on this page: [quickchat.ai/shopify](https://quickchat.ai/shopify)
2. Claim it, customize, and embed on your site
### 1. Open the theme code editor
[Section titled “1. Open the theme code editor”](#1-open-the-theme-code-editor)
1. Go to your [Shopify Admin Panel](https://admin.shopify.com/).
2. In the left menu, click **Online Store → Themes**.
3. In the “Current theme” section, click the **three dots (⋯)** next to the **Customize** button.
4. Select **Edit code** from the dropdown.
### 2. Find `theme.liquid`
[Section titled “2. Find theme.liquid”](#2-find-themeliquid)
1. In the code editor, expand the **layout** folder on the left.
2. Click on `theme.liquid` to open the main layout file of your theme.
### 3. Paste the script
[Section titled “3. Paste the script”](#3-paste-the-script)
1. In the [Quickchat App](https://app.quickchat.ai), navigate to **Your Website → Install**.
2. Copy the generated script.
3. Paste it just **above the `