

What your AI Agent can do during a conversation: the built-in Quickchat AI Actions, and Custom Actions that call your own API, an MCP server, or a shortcut like Google Sheets.
Define what your AI Agent can do during conversation. From answering questions using real-time API data, collecting leads and market research data, to performing custom tasks.
Quickchat AI Agents have two kinds of Action.
Quickchat AI Actions are built in, so you only switch them on and configure them:
- Human Handoff passes the conversation to a person.
- Smart Data Gathering collects leads and other data during the chat.
Custom Actions reach outside Quickchat AI:
- API Actions call any HTTP endpoint. They are covered on this page.
- MCP Actions connect a whole MCP server at once.
- Google Sheets is a one-click shortcut that sets up a logging Action for you.
Every Action can read live conversation data through AI Action Variables, and the Jira example builds one end to end.
Custom Actions
Section titled “Custom Actions”Custom Actions let your AI call external tools during a conversation — search internal systems, create tickets, trigger alerts, or fetch fresh data that isn’t in the Knowledge Base. Find them in Actions & MCPs under the Custom Actions section.
Click + Add Action to create one. The dropdown offers:
- API Action — call any REST endpoint over HTTP. The most general option; use this for anything that has a URL and accepts JSON.
- MCP — connect an external MCP server in one click and let the AI use the tools it exposes. See MCP Actions.
- HubSpot Action: pre-built connection to your HubSpot CRM. Use it to work with contacts, deals, and tickets, including adding private ticket notes, without managing API tokens yourself.
- Discord Action: install editable support and moderation API Action templates. Requires your own Discord app. See Discord Actions.
- Google Sheets — read and write a spreadsheet you connect.
- Shopify MCP — connect a Shopify store via the Shopify Storefront MCP server so the AI can search your catalog and store policies, read product details, and build a cart. Only one Shopify MCP action per scenario. It does not cover order lookup — see the note below.
How Custom Actions work
Section titled “How Custom Actions work”- Choose an action type: API Action, MCP, HubSpot Action, Discord Action, Google Sheets, or Shopify MCP. Configure the connection and instructions the AI needs.
- During a chat, the AI normally uses the action description and available tool or parameter details to decide when to run it. An API Action can instead run automatically before the first reply or when metadata conditions first match.
- Quickchat executes the call. For an Action the AI chooses, or one that runs before the first reply, the AI can use the response. A metadata-triggered Action runs silently and its output is not added to the chat.
- Test or connect the action from its editor before using it in conversations.
Create an API Action
Section titled “Create an API Action”- Go to Actions & MCPs.
- Click + Add Action in Custom Actions and choose API Action.
- Fill in Details:
- Name: clear and descriptive.
- Description: when to use it and what to include in parameters.
- Under When to run, choose AI decides, Before first reply, or When metadata matches.
- Configure Connection:
- Action Type: HTTP method (GET, POST, etc.).
- Action endpoint URL: full API URL.
- Headers: add any required headers like
Authorizationorcontent-type: application/json.
- Define Parameters: give each parameter a name, location (query, body, or header), and a description that tells the AI how to compose the value. Path values aren’t a parameter location; insert them directly in the endpoint URL using
{{placeholder}}templating. - Test request and verify the response. Then click Done.
Beyond the request itself, an API Action has three optional settings worth knowing: Save to memory, Run only when, and Response filter.
Choose when an API Action runs
Section titled “Choose when an API Action runs”Use When to run to select one of three modes:
The section is collapsed by default and shows the mode currently in force next to its heading; expand it to change the mode.
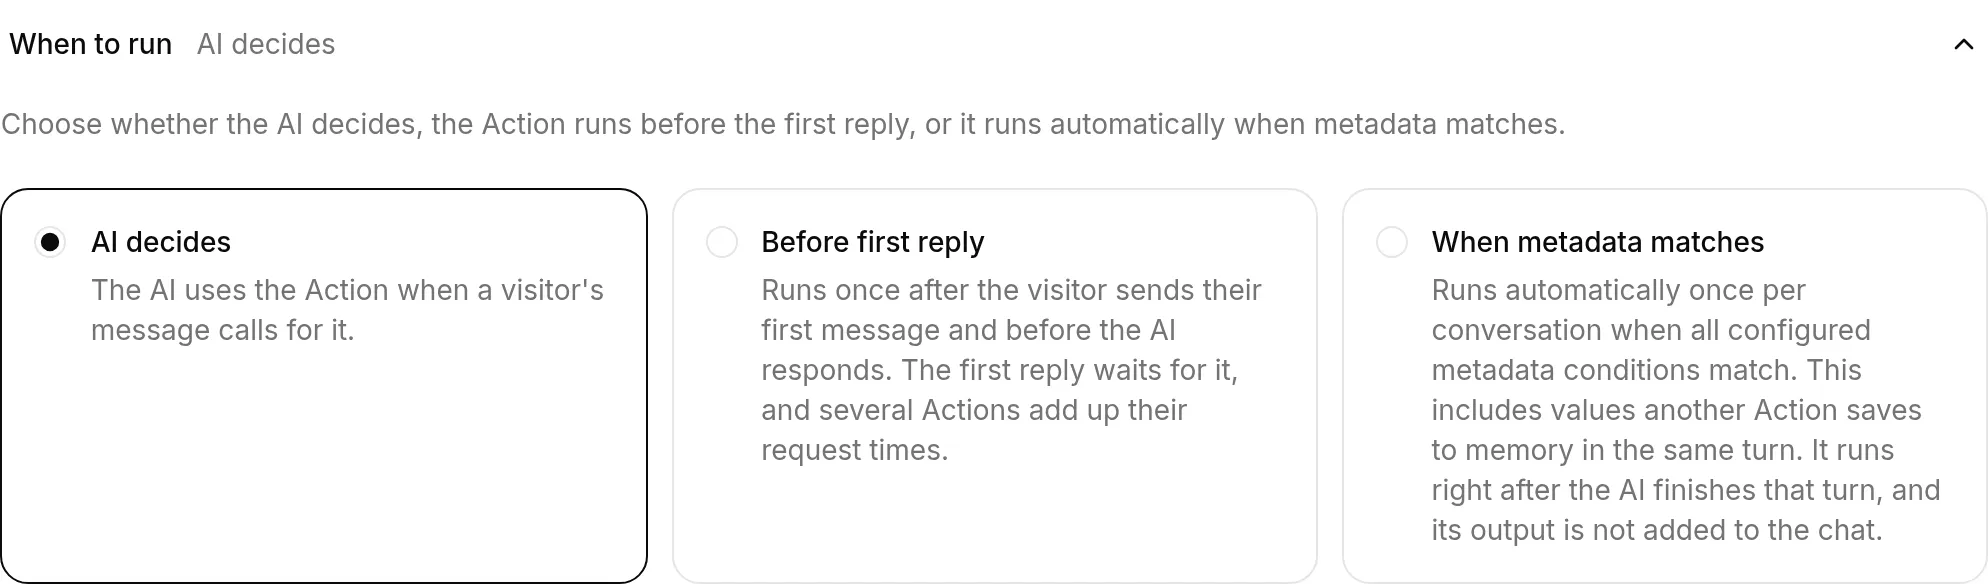
- AI decides: the default. The AI reads the Action description and decides whether the visitor’s request needs the Action. Use this when the Action should run only for particular questions or after the AI collects information from the visitor.
- Before first reply: Quickchat runs the Action once after the visitor sends the first message and before the AI writes its first reply. The normal AI reply receives the response and any values saved with Save to memory. The AI can no longer choose this Action as a tool, so it runs on the first turn only and not again later in the conversation. Use this for customer identification, account context, entitlement checks, or other setup that every real conversation needs.
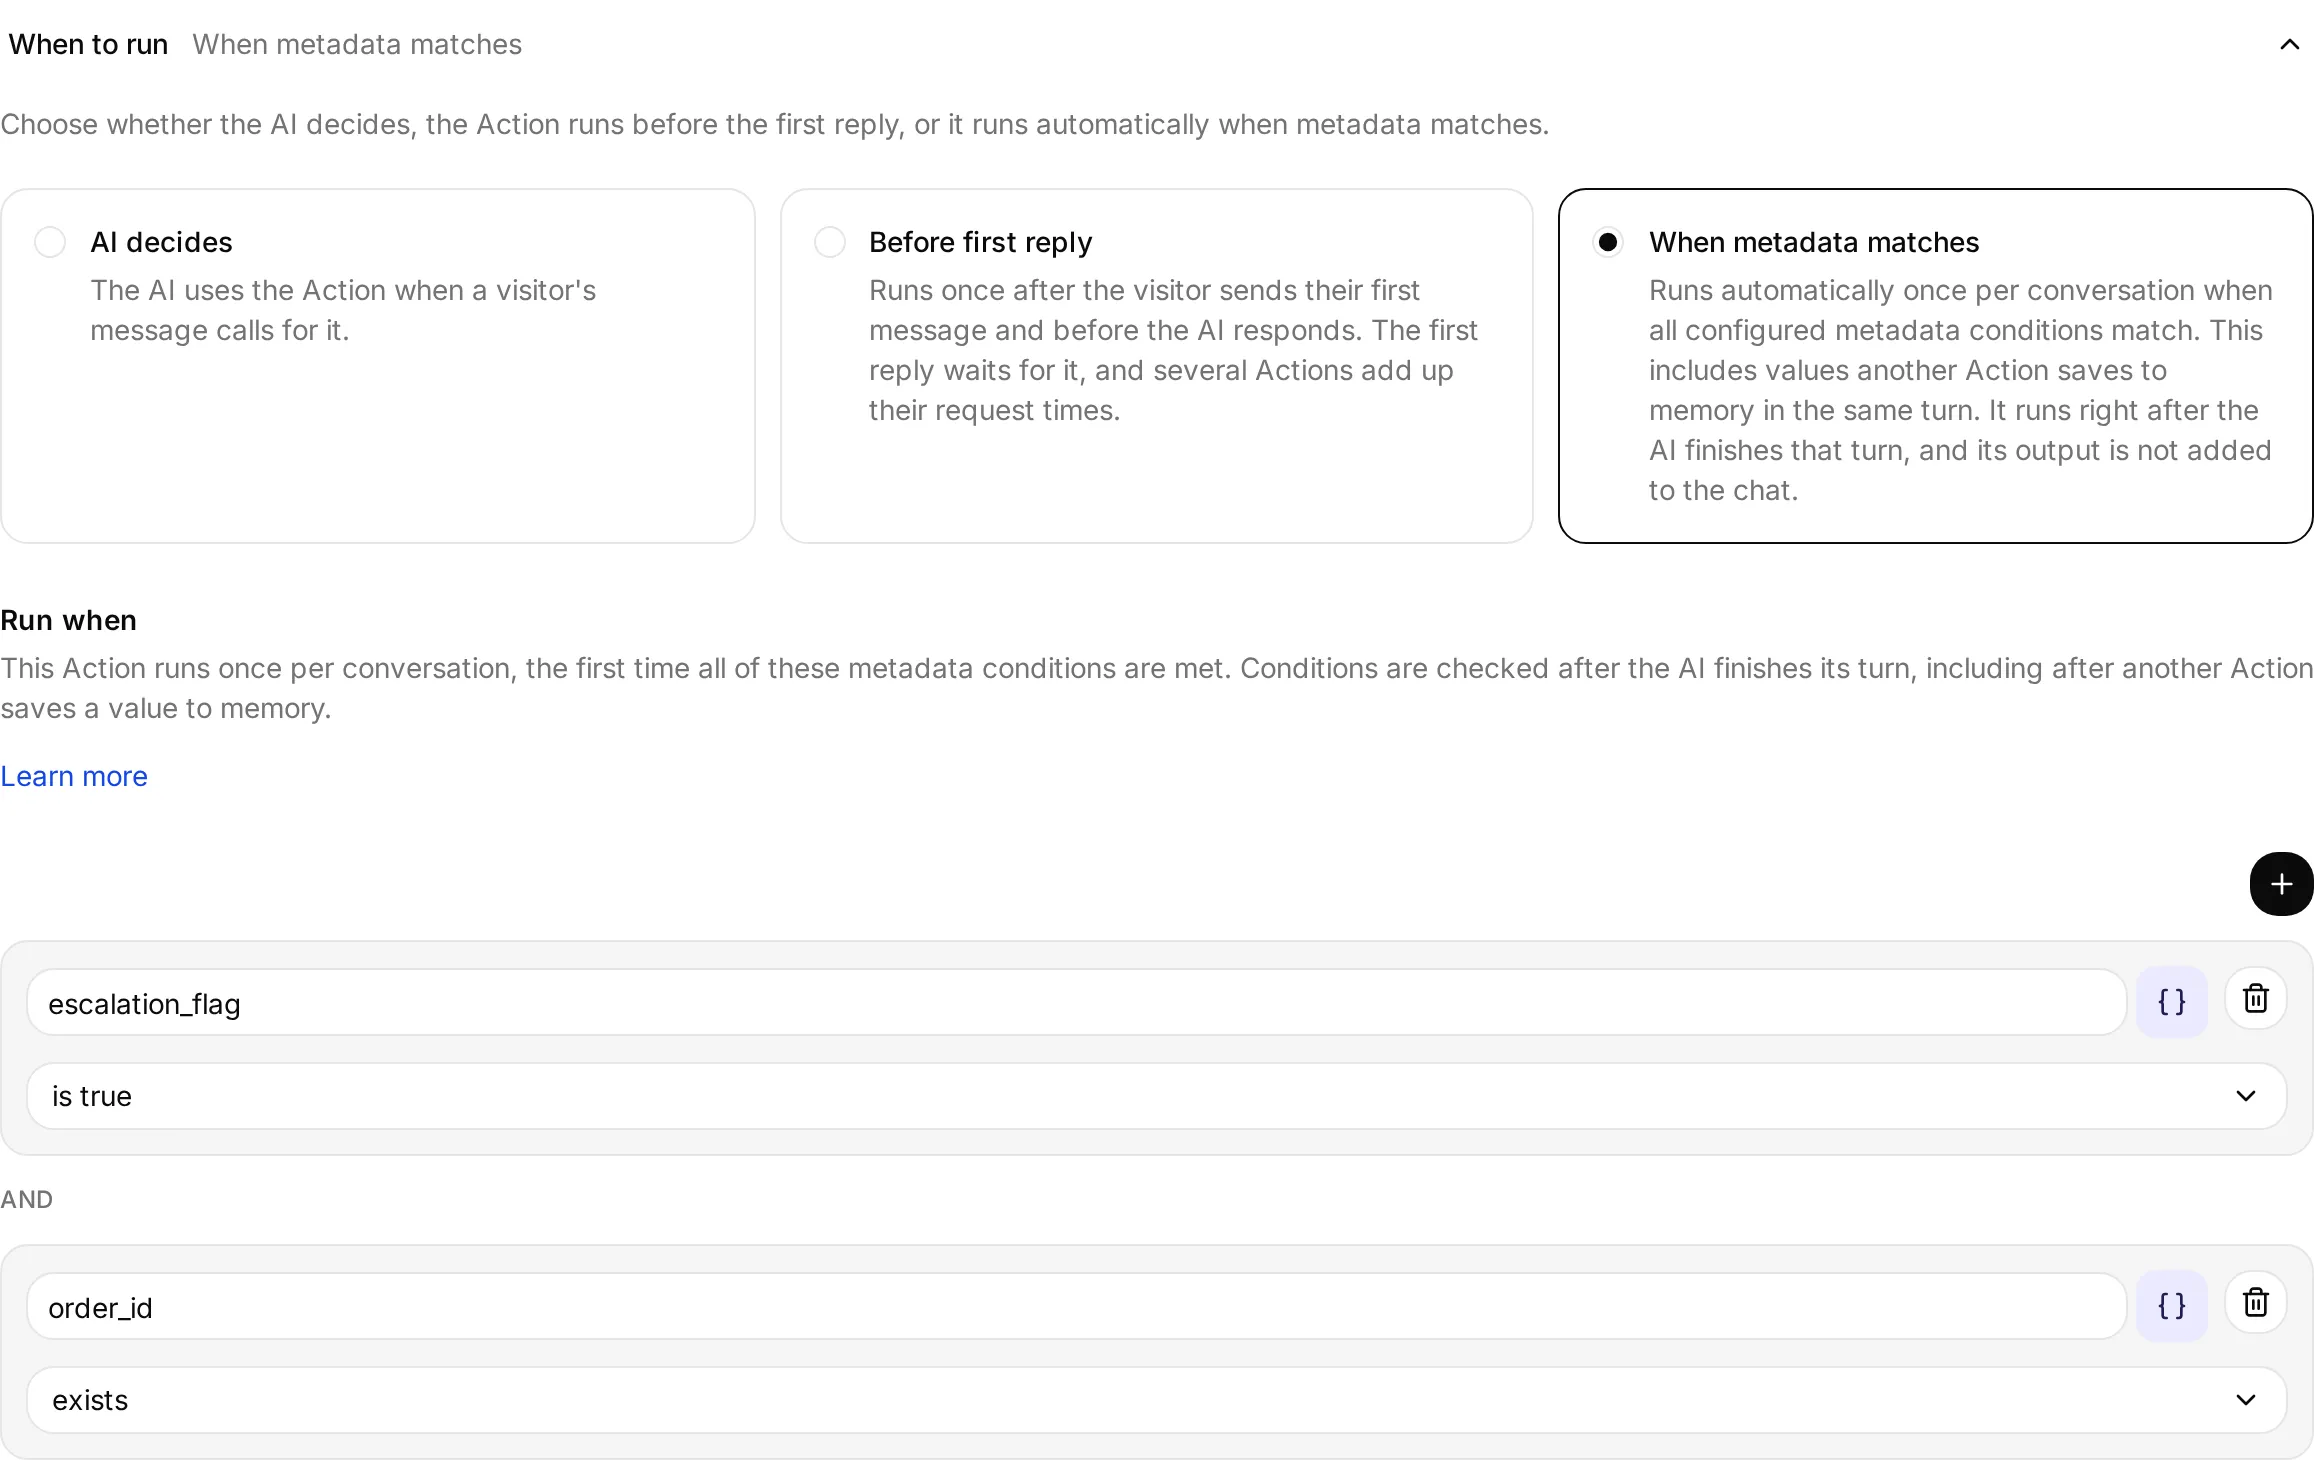
- When metadata matches: Quickchat checks the Action’s Run when conditions after every AI turn and runs it the first time all conditions match. Values another Action saves to memory during that turn are available immediately. The AI cannot choose this Action as a tool, and its response is not added to the chat. Use it for internal notifications, CRM updates, or follow-up requests that should happen automatically when conversation data becomes available.
Before first reply is tied to the visitor’s first message, not conversation creation. Opening a chat or receiving a welcome message does not run it, so abandoned chats make no request. Quickchat records the run before calling the endpoint, so it is not retried in the same conversation even if the request fails or its outcome is uncertain.
The first reply waits for the request, so this mode can add latency. If several Actions use this mode, they run one after another and their request times add up. If required metadata is missing, the endpoint is unavailable, or a request fails, the AI still replies. Open Request log on the Action to see what happened.
Because the Action runs before the AI can choose parameter values, every AI parameter it uses must have a default value. Metadata and built-in variables can be inserted directly into the URL, headers, query, or body.
When metadata matches requires at least one Run when condition and a default value for every AI parameter. Quickchat records the attempt before calling the endpoint, so once a request has been sent the Action is not retried in the same conversation, whether it succeeded, failed, or its outcome is uncertain. A request that could not be built at all, because a value it needs is still missing, is not recorded and stays eligible for a later turn. The Action runs right after the AI finishes its turn, so a failure never replaces the AI’s reply. On channels that do not stream the reply, the request’s round trip is added to the time the visitor waits for it.
Choosing When metadata matches reveals the Run when editor inside the same section, so the trigger and its conditions stay together.
HubSpot Actions
Section titled “HubSpot Actions”HubSpot Action opens a gallery of pre-filled, editable API Actions that use your connected HubSpot account.
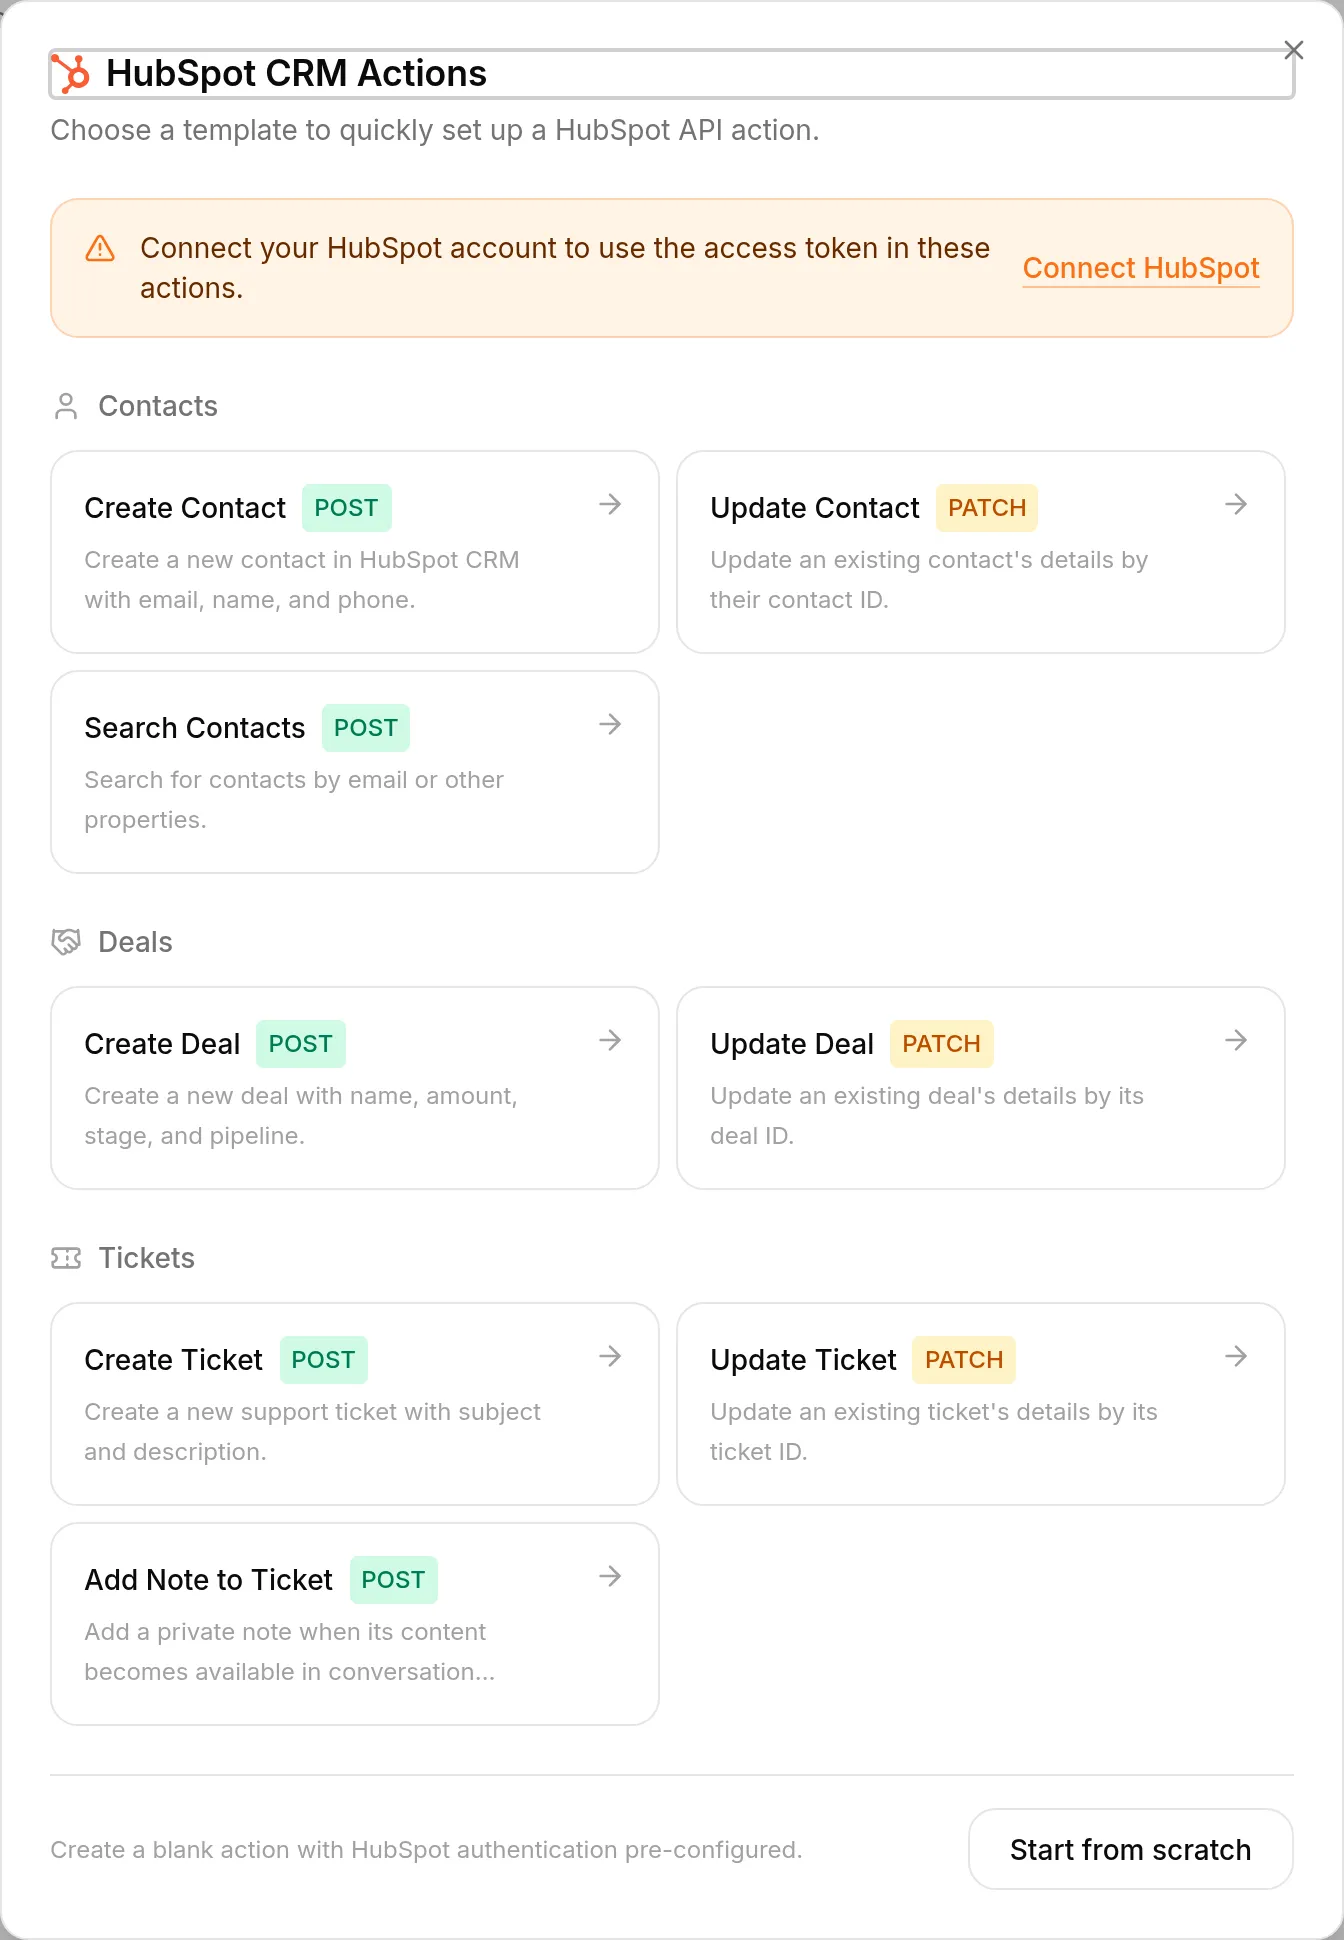
The Add Note to Ticket template creates a private note on the HubSpot ticket linked to the conversation. Save the note content to conversation memory as hubspot_note_body, then add the template and activate it. It is preconfigured with When metadata matches and waits until both hubspot_note_body and Quickchat’s server-provided hubspot_ticket_id are present. You can edit the note_body parameter’s default value to add fixed text around {{metadata_hubspot_note_body}}.
The note is internal to HubSpot and is not shown to the visitor. The template attempts the request once per Quickchat conversation. Open the Action’s Request log to confirm delivery or investigate a failed request.
Discord Actions
Section titled “Discord Actions”Discord Action opens a gallery of pre-filled, editable API Actions:
- Support & Tickets: Open Support Ticket asks you to select a server and text channel. You can optionally select a mentionable support role. It creates three Actions that open a private thread, add the current requester, and post a summary with the optional role mention.
- Moderation: Timeout Member, Kick Member, Ban Member, Unban Member, Assign Role, Set Slowmode, and Send Announcement. Each template installs with one click and uses the server, member, role, or channel from the current Discord request.
Quickchat creates the HTTP method, URL, headers, body, parameters, description, response settings, and run conditions on the backend. The resulting cards are ordinary HTTP Request Actions. You can inspect and edit every field.
All seven moderation templates include author_is_admin is true under Run only when. Discord calculates the current author’s Administrator permission, the Discord gateway supplies that value, and Quickchat checks it before sending the request. Public chat and API metadata cannot set this key. Test moderation Actions in Discord with both an administrator and a non-administrator account; AI Preview does not provide an authorized Discord sender.
The templates add no automation of their own. The Agent runs them only when an administrator asks in the conversation; there is no strike counting across conversations, no verification of screenshots or other evidence, and no scheduled or self-initiated sanctions.
The bot itself still needs the Discord permission required by each request:
| Action | Bot permission or access |
|---|---|
| Timeout Member | Moderate Members |
| Kick Member | Kick Members |
| Ban Member, Unban Member | Ban Members |
| Assign Role | Manage Roles |
| Set Slowmode | Manage Channels |
| Send Announcement | View Channels and Send Messages |
Discord also enforces role hierarchy. Put the bot’s role above members and roles it should manage. The template does not perform an additional hierarchy or per-permission check for the requesting administrator.
Set Slowmode and Send Announcement accept a channel ID parameter. Without an additional fixed target, the template does not verify that the channel belongs to the server where the administrator sent the request. If the same bot belongs to multiple servers, edit these Actions to use a fixed channel ID or separate the servers across Agents and bot credentials.
The Support Ticket installation uses existing Action features to pass data:
open_support_ticketcreates a private thread in the selected channel, captures$.id, and saves it to conversation memory asdiscord_ticket_thread_id. It requiresdiscord_message is true, runs only in the selected server, and runs only while that memory key does not exist.add_ticket_requesterreads{{metadata_discord_ticket_thread_id}}and the Discord-supplied{{metadata_discord_author_id}}. It requiresdiscord_message is trueand runs only in the selected server after the thread ID exists.post_in_ticketreads the same saved thread ID, posts the Agent’s one-line issue summary, and mentions the requester. If you selected a support role, it mentions that role too. It has the same Discord-message, server, and saved-thread conditions. Its Discordallowed_mentionsbody is limited to the requester and, when configured, that role.
The descriptions and your Agent prompt should tell the Agent to run those Actions in that order. There is no separate workflow state, lock, confirmation, retry, recovery, reconciliation, or replay-protection layer. If a result is uncertain, inspect Discord and the Action log before retrying because Discord might already have completed the request.
discord_ticket_thread_id is not cleared automatically. The starter therefore supports one ticket per Quickchat conversation. Start a new Discord conversation or thread for another ticket, or edit the Actions to add the memory lifecycle you need.
For Support Ticket, grant the bot View Channels, Send Messages, Read Message History, Create Private Threads, Send Messages in Threads, and Manage Threads in the selected ticket channel. Leave Notify a role (optional) set to Don’t notify a role if no role should be mentioned. If you select a role, it must be mentionable and its members need access to the private threads. When no mentionable roles are available, tickets still open normally without a role notification. The gallery lists text channels and mentionable roles, but it does not validate all channel permission overrides.
The gallery is a setup shortcut, not an extra policy layer. If you edit a generated Action or create a custom Discord API Action, review its credentials, targets, parameters, response exposure, and Run only when conditions before enabling it.
Save to memory
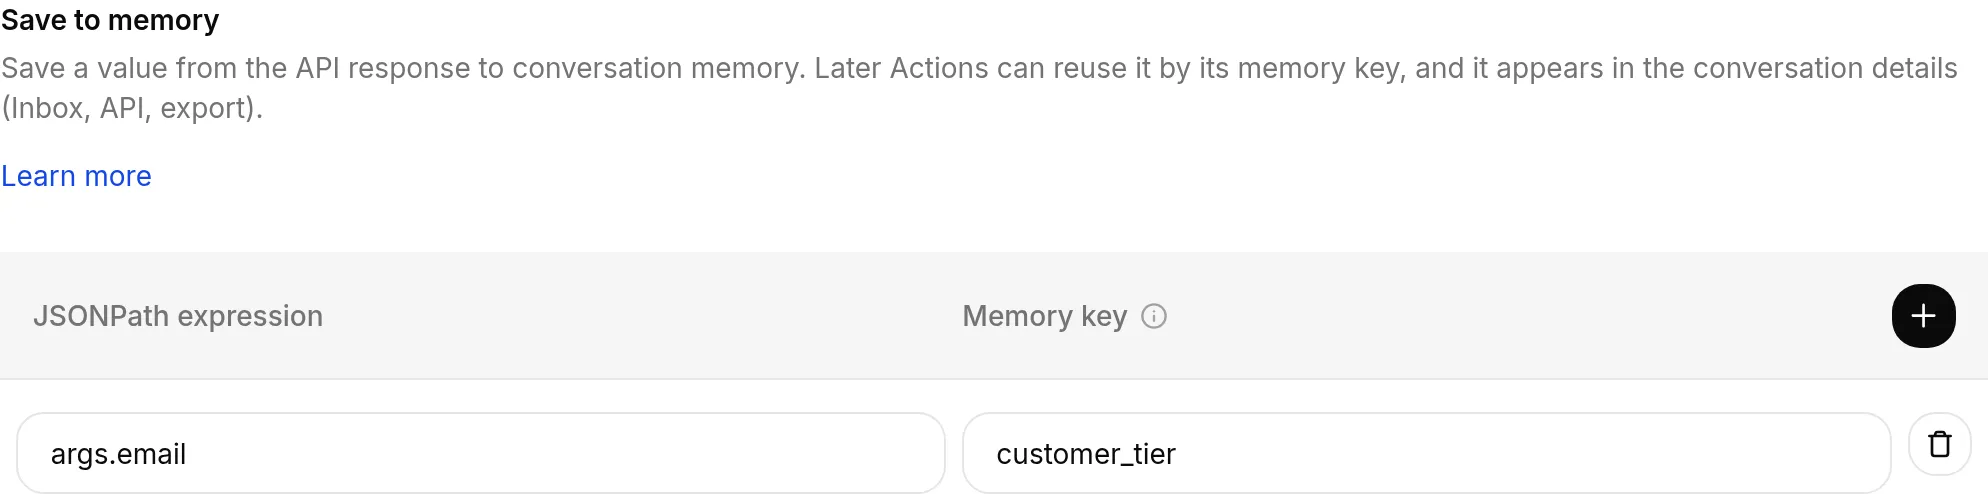
Section titled “Save to memory”Capture a value from the API response and store it in the conversation’s memory under a key you choose. Later Actions can reuse it as {{metadata_<key>}}, and it appears in the conversation details (Inbox, the API, and exports).
Reach for this when one Action produces something a later Action needs. A lookup Action can save a customer_id from its response; a follow-up Action then sends {{metadata_customer_id}} without the AI having to copy the value across.
In the Save to memory section of the API Action editor, give the captured value a memory key and point it at the part of the response you want to keep. From then on it’s a metadata variable like any other.
Memory keys are shared with the Agent’s Remote MCP tools. If an MCP tool already saves to the same key, the memory key field reports the clash when you save, so pick a different key.
Run only when
Section titled “Run only when”Restrict an Action so it runs only when conditions on the conversation metadata hold. Conditions are always checked on our side, outside the model. With AI decides or Before first reply, Quickchat checks them immediately before sending the request. With When metadata matches, the conditions themselves trigger the request after an AI turn, without waiting for the AI to choose the Action.
This is the right tool for privileged or irreversible Actions (banning a member, issuing a refund, deleting a record). A line in your prompt that says “only admins can do this” is a helpful instruction, but it isn’t a security boundary: a determined user can argue with the model or attempt a prompt injection. A run-condition is deterministic and lives outside the prompt, so it holds regardless of what the conversation says.
- The run-condition is the boundary. It’s evaluated server-side and isn’t part of the prompt the model reads. This is what actually stops the Action from running.
- The prompt rule is the user experience. Keep a line in your prompt too, so the AI declines politely and explains why instead of going silent.
Add conditions in the Run only when section of the Action editor. This section is labelled Run when for a When metadata matches Action. Click Add condition, pick a metadata key (for example telegram_sender_is_admin), and choose how to compare it:
| Condition | Passes when the metadata value… |
|---|---|
| is true | is truthy |
| is false | is falsy |
| exists | is present on the conversation |
| does not exist | is absent |
| equals | matches a value you specify |
| does not equal | differs from a value you specify |
| is one of | exactly matches any of the listed values, including capitalization and whitespace |
| contains text | is text containing the specified literal, case-sensitive text |
The Action runs only when every condition holds. The editor shows AND between rows. When a condition blocks an Action chosen by the AI, the AI can explain that the Action is unavailable. A When metadata matches Action remains silent until its conditions pass.
Use is one of for alternatives on the same key, entering each as a separate value chip. For example, modelName is one of [K-65XR95M2, K-75XR95M2, K-85XR95M2] can sit alongside country equals UK; both rows must pass. You can add up to 50 alternatives of up to 500 characters each. Commas are literal parts of a value. Separate equals rows for different values of the same key cannot all match.
contains text checks a literal substring, not a wildcard or regular expression. XR95M2 also matches model-name variants beyond the three listed above. Both new conditions reject missing keys, null, lists and objects; contains text also rejects numbers and booleans. Empty comparison text is not allowed. Existing is false, does not equal, and does not exist conditions can match missing keys.
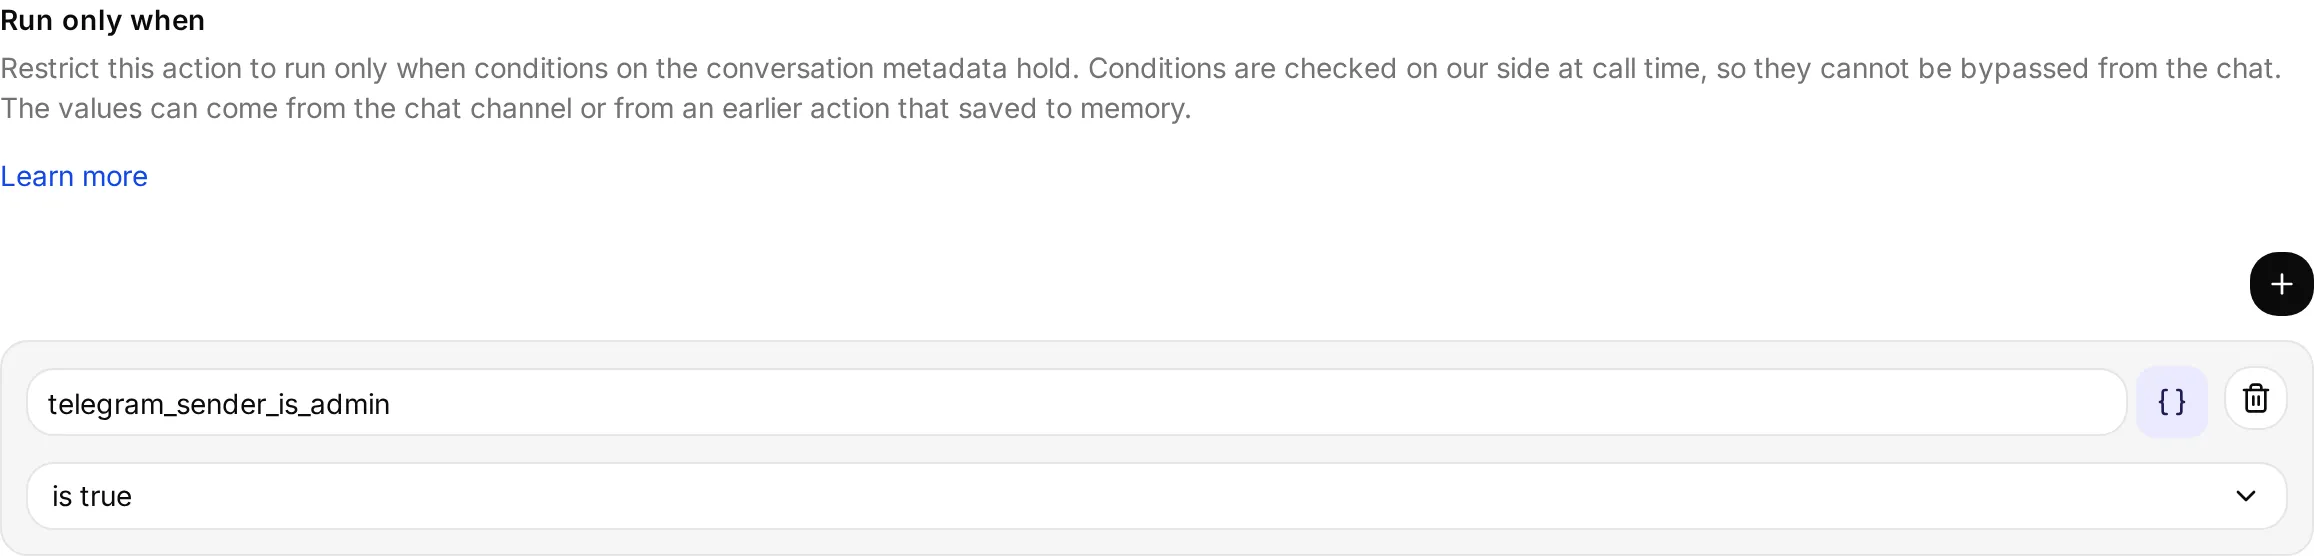
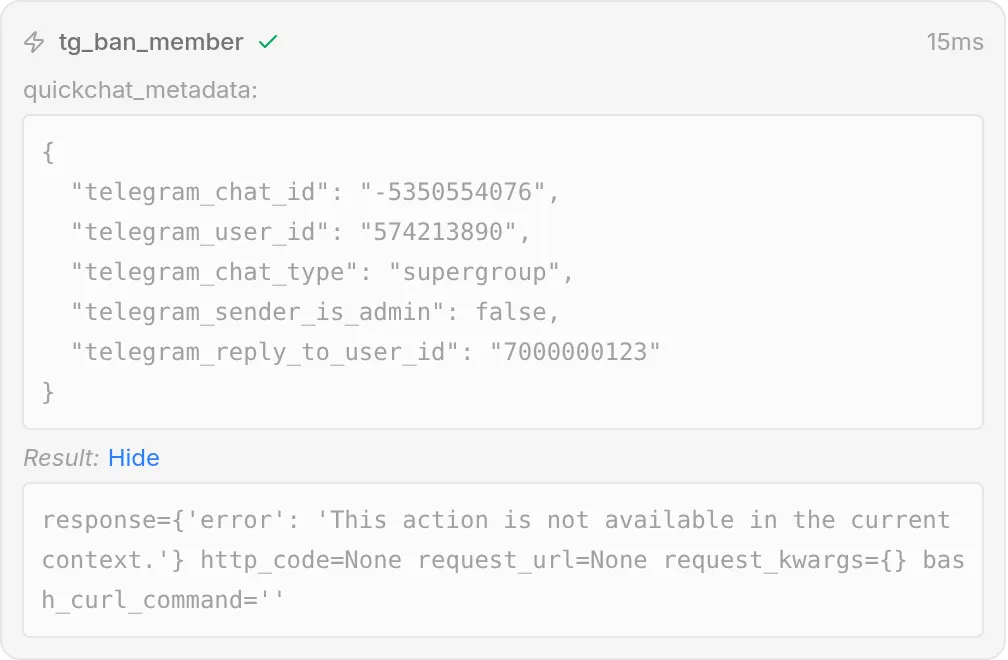
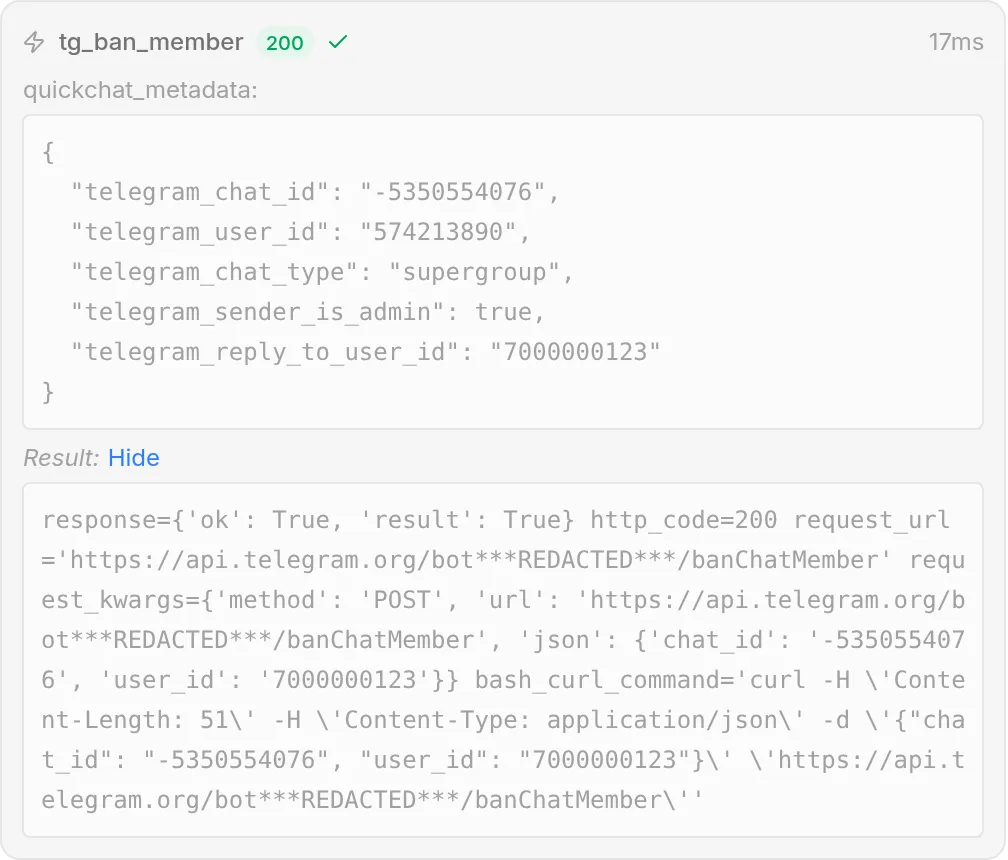
When a condition fails, no request is sent and the AI tells the user it can’t do that. Below, the same ban request is blocked for a non-admin and allowed for an admin, with nothing changed but who is asking:
Response filter
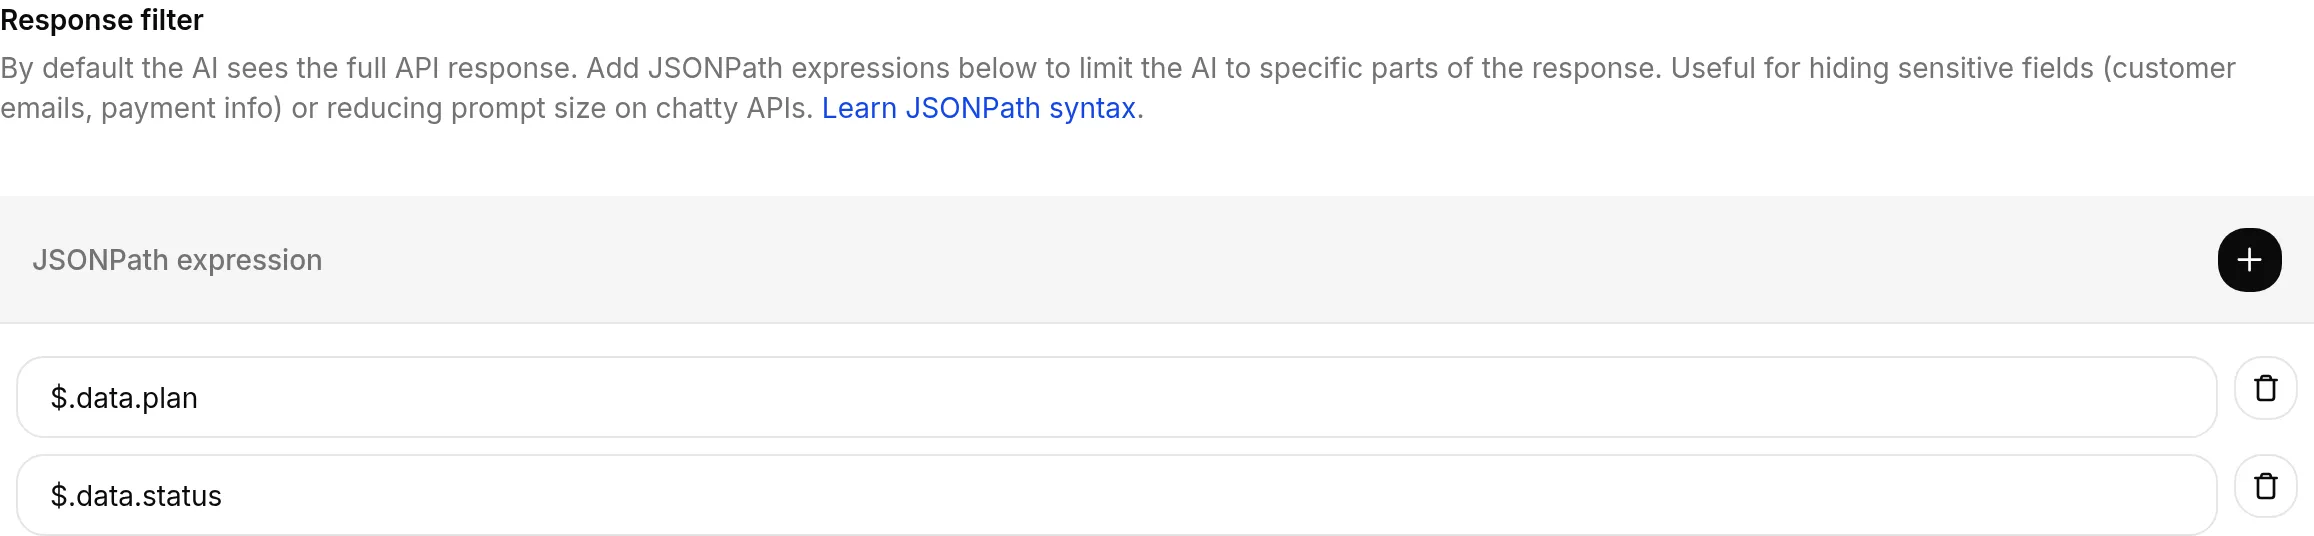
Section titled “Response filter”By default the AI sees the full API response. Add JSONPath expressions in the Response filter section to limit the AI to specific parts of it.
Two common reasons to filter:
- Hide sensitive fields. Keep customer emails, payment details, or internal ids out of the model’s context when the endpoint returns more than the AI needs.
- Shrink the prompt. Chatty APIs can return large payloads; filtering to the few fields that matter keeps the response small and the AI focused.
Add one or more JSONPath expressions and the AI receives only the matched parts. For example, $.data.items[*].name keeps just the item names from a larger response.
Check Action health and logs
Section titled “Check Action health and logs”A warning beside Actions & MCPs in the sidebar means an Action needs attention. Open the page and hover over or focus the badge on its card to see why:
- Failing: recent calls have repeatedly failed. The badge shows the failure count and the latest error when available.
- Not running: the Action has repeatedly been skipped, with no executed calls in its current health window. Check the reported reason, such as missing conversation values or a configuration problem.
- Reconnect needed: an MCP connection lost authorization and was switched off. Open Edit, reconnect it, and switch it back on.
Health uses recent real conversations from the last seven days, or since the Action was last edited if that is more recent. It is separate from test requests. After correcting and saving an Action, check new conversations to confirm the fix; clearing an old warning alone does not prove it works.
For Failing or Not running, click View details to open the Request log with Issues only enabled. View logs opens the log with all calls. Turn Issues only off to compare problem calls with successful ones.
Skipped conversations lists conversations where the Action could not run, separately from calls that were executed. Use View conversation to inspect the context and Show more to load older entries. An Action can run successfully in some conversations and be skipped in others, so this list can appear even without a warning badge.
When the reason lists missing values such as {{metadata_visitor_email}}, supply them through your website or channel metadata, or have an earlier Action save them to memory. Then check the execution mode:
- AI decides: the Action is offered to the AI only in conversations that already have the required values.
- Before first reply: the values must be present when the visitor sends the first message.
- When metadata matches: add an exists condition for each required value so the Action waits for it.
See AI Action Variables for where conversation values come from.
Activity summary emails also include an AI Actions need attention section when an HTTP or remote MCP Action needs attention. It lists up to five Actions, with a reason and a link to Actions & MCPs; an overflow count shows how many more need attention. The section is omitted when everything is healthy.
The email shows current health, which can cover more than the daily summary’s activity window. After you save a corrected API Action, its health assessment starts from that edit. Reconnecting or disconnecting an affected MCP connection clears its authorization warning. Existing summary email preferences and eligibility rules apply, and no separate alert email is sent.
Best practices
Section titled “Best practices”- Be explicit in descriptions. Tell the AI when to use the action and what each parameter should contain.
- Keep scopes minimal. Only include the headers and tokens the endpoint needs. For Jira, use the Basic header derived from your Atlassian email and API token.
- Test before rollout using the Test request panel. Confirm status codes and sample payloads look right in the target tool.
Tutorials
Section titled “Tutorials”- Connect an AI Agent to Jira tickets (canonical reference) or the narrated blog walkthrough
- Send Slack notification with an AI Action