Deploy Quickchat AI on your website as a floating Widget, an inline Embed, or a hosted Chat Page. Covers install, access control, appearance, text content, and custom parameters.
There are three ways to put your Quickchat AI Agent on the web — pick whichever fits the surface you want to show:
- Widget — the floating chat bubble in the corner of your site. Best for general-purpose support.
- Embed — an inline chat window that sits exactly where you want it on a page. Best for embedding the AI inside a specific app screen, help-centre page, or product detail page.
- Chat Page — a hosted, full-screen chat experience served by Quickchat (no installation, no code). Best when you want to share a link with someone (e.g., support email, internal Slack, beta testers) without touching their browser.
Install your chosen surface from Channels → Your Website → Install. The page has three sub-tabs that mirror the structure of this article: Install (snippets + access), Appearance (visual styling), and Text Content (the prompts and labels visible to the visitor).
Widget
Section titled “Widget”The Widget allows you to embed your Quickchat AI Agent directly into your website, providing users with a seamless way to interact with the AI. The Widget is typically displayed as a chat bubble in the bottom-right corner of your webpage. When clicked, it expands into a chat window, enabling users to ask questions, get assistance, or access information.
How to embed the Widget on your website
Section titled “How to embed the Widget on your website”-
Locate your page’s code
Open your webpage’s HTML file or access the code editor of your website builder.
-
Get the Widget Code
- Log into the Quickchat AI App.
- Go to the Website section under the Channels category in the left sidebar.
- Click the Install tab.
- Copy the Widget script code.
-
Paste the Code
Insert the Widget script just before the closing
</body>tag on all pages where you want the Widget to appear.
If you use WordPress
Section titled “If you use WordPress”The easiest way is our official Quickchat AI Agent plugin: install it from the WordPress Plugin Directory, paste your Scenario ID, and the Widget appears automatically, with no theme code to edit. The WordPress guide has step-by-step instructions, plus a manual-script option if you’d rather not use the plugin.
If you use a Website Builder
Section titled “If you use a Website Builder”If you use platforms like WordPress, Webflow, or Wix, refer to their documentation on adding custom code.
For help, contact us at contact@quickchat.ai.
Chat Page
Section titled “Chat Page”Chat Page is a hosted, full-screen version of your AI Agent that lives on a Quickchat URL. There’s nothing to install — share the link and your visitors can chat with your Agent directly in their browser. Use it when:
- You want a chat experience but don’t have a website (or don’t want to touch its code).
- You’re sharing the AI internally with a small group (beta testers, support team, sales prospects) and need an access-controlled link instead of a public widget.
- You want to send the AI as a follow-up channel in email, Slack, or your CRM.
Configure who can open the Chat Page from Install → Chat Page Access (see Access control below).
Access control
Section titled “Access control”The Install tab has two access controls that apply to your deployment:
Widget & Embed access
Section titled “Widget & Embed access”A master toggle at the top of the Install tab. When enabled, the Widget and Embed scripts work normally on visitors’ browsers. When disabled, the Widget and Embed are unavailable on your site even if the script is still pasted in — useful for taking the AI offline temporarily without removing the snippet, or for restricting public access while you keep the Chat Page open to invited users.
Chat Page Access
Section titled “Chat Page Access”Independent of the Widget & Embed toggle, you can restrict who can open the Chat Page:
- Anyone — the Chat Page URL is public. Anyone with the link can use it.
- Invited users only — only Chat Users you’ve invited (by email) can use the Chat Page. They’ll need to authenticate.
- Nobody — the Chat Page is fully disabled.
To grant access under Invited users only, click Invite Chat Users next to the radio — that takes you to Account Settings → Chat Users, where you can send invitations by email and manage who has access.
Customizing
Section titled “Customizing”The Appearance and Text Content sub-tabs let you tailor how the Widget, Embed, and Chat Page look and what copy your visitors see. All three deployment surfaces share these settings — change them once and they apply everywhere your Agent is deployed.
The right pane of the Install/Appearance/Text Content tabs has its own preview controls — toggle between Widget, Embed, and Chat Page previews, and between Desktop and Mobile viewports, to see your changes before you publish.
Appearance
Section titled “Appearance”Visual styling for the chat surfaces, grouped into Branding, Size & Position, Theme, and Other Settings.
Branding
Section titled “Branding”- AI Agent Avatar — a single image used both in the chat header and on the launcher button (max 5 MB). This is one setting, not two: upload one image and it appears in both places (it replaces the old separate “header logo” and “launcher icon”). Every Agent starts with a built-in default avatar. Reset to default restores it, and deleting it shows no avatar at all.
Size & Position
Section titled “Size & Position”- Launcher size — Classic, Input Only, or Small. Controls how the chat launcher looks before it’s opened.
- Launcher label — shown only when Small is selected: custom text on the small launcher button (up to 25 characters), e.g. “Ask AI” or “Chat”. Leave it empty for an icon-only launcher.
- Widget position — bottom-right or bottom-left.
- Chat window dimensions — width (300–700px) and height (400–1200px) of the chat window.
- Draggable launcher — let visitors drag the launcher to a different spot on the page. Useful when it covers important content.
Choose how the chat surfaces are colored:
- Light and Dark are fixed presets that look the same on every account.
- Custom unlocks a full palette of your own. When Custom is selected, color controls appear for the background, header and header text, accent (used for buttons such as the pre-chat start button, suggestion chips, and rating actions), message bubble and its text, AI message text, link color, the input field, borders, and more. Each color is checked for WCAG AA contrast against its background and warns you when a pairing is hard to read.
Branded header and accent colors live in the Custom theme. Light and Dark stay neutral presets, so switching between them never carries a custom color over.
When Custom is selected, the Chat Page also gets its own sidebar colors: Sidebar background, Sidebar text, Sidebar hover, and Sidebar hover text. These apply only to the full-page Chat Page view, not the Widget bubble or Embed. Leave the text colors unset and the Chat Page picks a readable color automatically for the background you choose.
You can also set the corner radius (roundness of bubbles, inputs, and buttons) and the text size. Both apply in every theme mode.
Other Settings
Section titled “Other Settings”- Auto-open Widget — automatically open the Widget when the page loads.
- Remove Quickchat AI branding — hide the “Powered by Quickchat AI” footer for a fully white-labeled experience (available on plans that include white-labeling).
- Conversation rating — let visitors rate the conversation at the end. Results appear in Insights → Conversation Rating.
Text Content
Section titled “Text Content”The Text Content sub-tab controls every piece of copy visible to the visitor:
- Header text — text shown at the top of the chat window.
- Welcome message — the first message from the AI Agent at the start of each conversation (e.g., “Hey, do you need help?”).
- Show as a pop-up — toggle that shows the welcome message as a floating speech bubble next to the launcher to grab attention before the visitor clicks.
- Conversation starters — up to 3 example messages shown to the visitor before they start typing. Clicking one sends it as the first message — useful for nudging visitors towards your AI’s strengths (“How do I install the widget?”, “What integrations do you support?”).
- Input placeholder — hint text in the empty message input.
- Disclaimer text — text shown behind the conversation, typically informing users they’re talking to an AI. We recommend keeping this clear and visible.
Advanced Features: Custom Parameters
Section titled “Advanced Features: Custom Parameters”The Quickchat AI Widget and Embed allow you to pass custom parameters on initialization. They can be used to:
- enhance analytics (they are available in the CSV export on the Quickchat platform)
- customize the conversation (Quickchat AI is aware of all provided parameters)
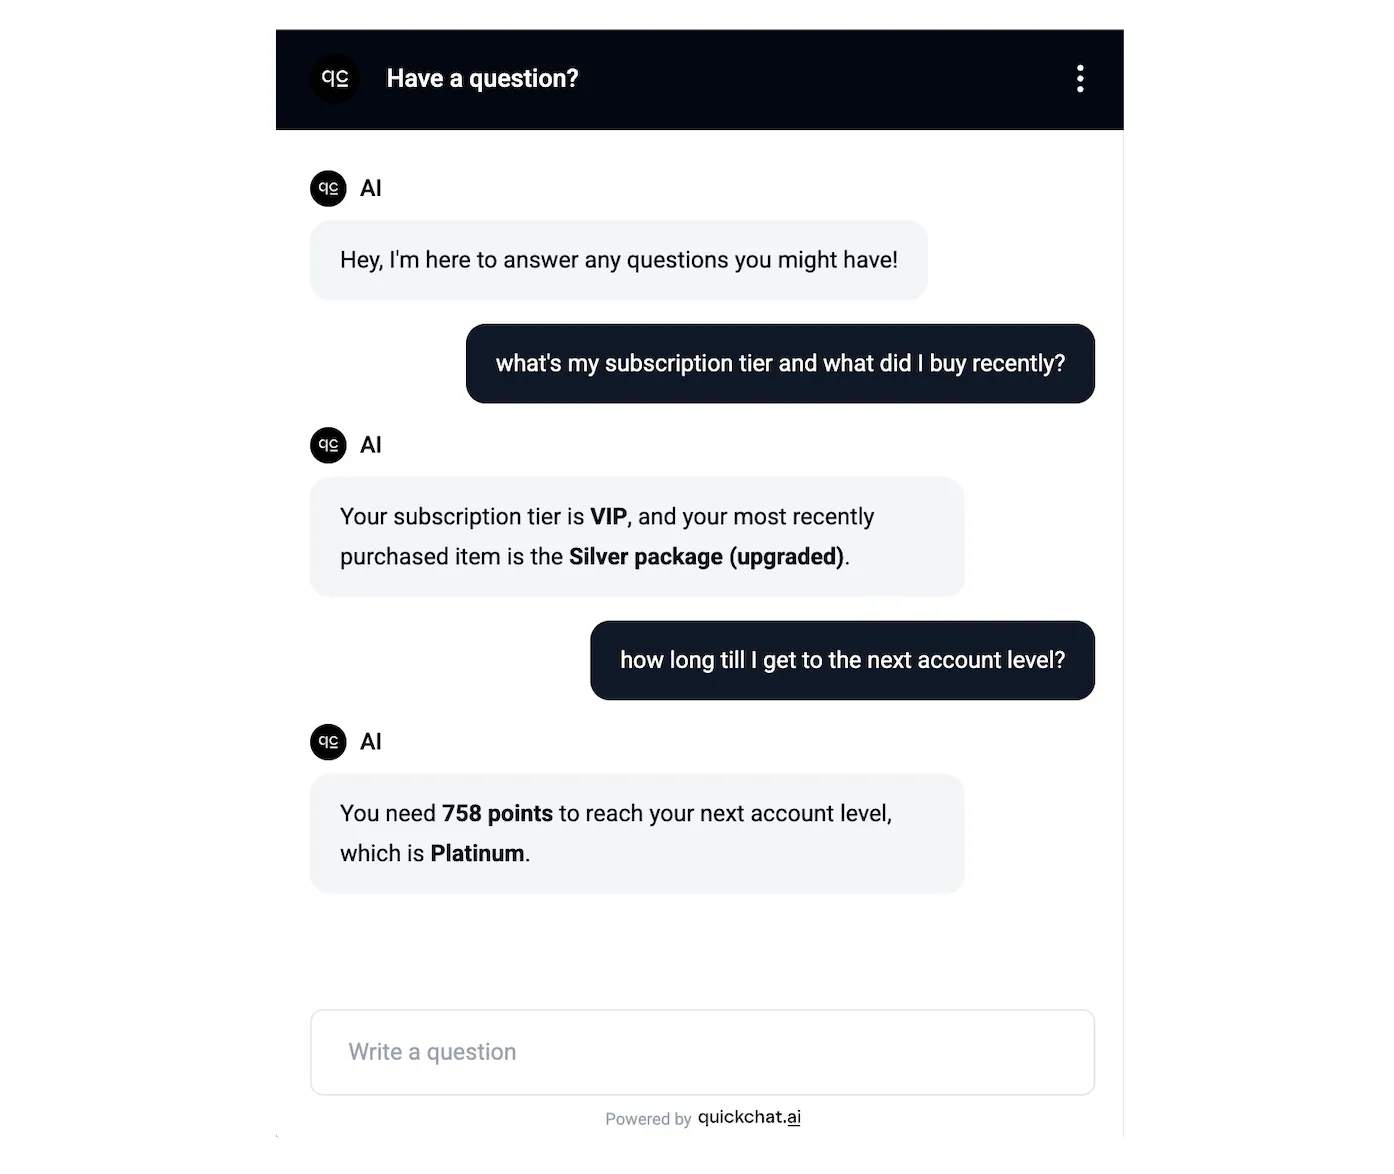
Here are examples of useful custom parameters:
- User name:
Mike - Subscription Tier:
VIP - Most recently purchased item:
Silver package (upgraded) - Next account level:
Platinum - Points required to reach the next account level:
758
Here is an example conversation showing an AI Agent aware of values provided in custom parameters:
In order to add custom parameters like the ones above, include the following like in the script you found under Your Website > Install.
Widget and Embed use the same call signature:
_quickchat("custom_params", { "User name": "Mike", "Subscription Tier": "VIP", "Most recently purchased item": "Silver package (upgraded)", "Next account level": "Platinum", "Points required to reach the next account level": "758",});These attributes are assigned to every new conversation; we recommend keeping this to a handful of keys.
Example script:
widget
<script> (function(e,a,d,i,c,t=a.createElement(d)){e[c]=e[c]||function(){(e[c].q=e[c].q||[]).push(arguments)},t.src=i,t.async=1,a.body.insertAdjacentElement("beforeend",t)})(window,document,"script","https://bubble.quickchat.ai/chat.js","_quickchat"); _quickchat("custom_params", {"User name": "Mike", "Subscription Tier": "VIP", "Most recently purchased item": "Silver package (upgraded)", "Next account level": "Platinum", "Points required to reach the next account level": "758"}); _quickchat("init", "abcdefghij");</script>Embed
<div id="quickchat-embedded" style="height:600px;overflow:hidden;"></div><script> (function(e,a,d,i,c,t=a.createElement(d)){e[c]=e[c]||function(){(e[c].q=e[c].q||[]).push(arguments)},t.src=i,t.async=1,a.body.insertAdjacentElement("beforeend",t)})(window,document,"script","https://bubble.quickchat.ai/chat.js","_quickchat"); _quickchat("containerId", "quickchat-embedded"); _quickchat("custom_params", {"User name": "Mike", "Subscription Tier": "VIP", "Most recently purchased item": "Silver package (upgraded)", "Next account level": "Platinum", "Points required to reach the next account level": "758"}); _quickchat("init", "abcdefghij");</script>Embed lets you place the Quickchat AI Agent directly inside a page as an inline chat window, instead of a floating bubble. Use it when you want the chat to sit in a specific spot on the page — a help-centre column, a contact page, an in-app sidebar, etc.
How to add the Embed
Section titled “How to add the Embed”-
Get the Embed code
- Log into the Quickchat AI App.
- Go to Channels → Your Website in the left sidebar.
- Click the Install tab.
- Copy the Embed snippet (it includes both the
<div id="quickchat-embedded">container and the loader script).
-
Open your website’s HTML file or website builder’s code editor.
-
Paste the code
- Insert the Embed snippet into the
<body>of your page. - Place it at the exact spot where you want the chat window to appear. The
<div>controls the size — adjust the inlinestyle="height:600px"to match the slot in your layout.
- Insert the Embed snippet into the