Widget
In this guide, we will go through integrating the Quickchat AI Assistant into your website. You have the option to add this feature through either a Widget or an iFrame. Below are the steps to embed the AI Assistant using either of these methods.
Through this quickstart, you will learn:
- The difference between a Widget and an iFrame;
- How to integrate your AI Assistant into your website through a Widget;
- How to integrate your AI Assistant into your website through an iFrame;
- How to add custom attributes to the messages via Widget;
- How to change the styling of the widget;
What is the difference between a Widget and an iFrame?
A widget is a reusable, often interactive component embedded within a webpage or application to add specific functionality or features.
In contrast, an iFrame is an HTML element used to embed and isolate content from another source within a webpage, maintaining a separate browsing context.

Embed the Widget on your website
To embed the Widget onto your website, you will need to edit your page's code by adding the Widget's script to it.
The steps are the following:
- Locate your page's code.
- Get the script code by either navigating to the Quickchat AI App, go to Integrations and and clicking the 'Embed on your website' tile, then copying the 'Widget' code.
- Paste the script code before the closing
</body>tag on every page where you want the Widget to appear.
If you use a Website builder such as Webflow, Wordpress, Wix.com, etc., you will need to find the instruction on how to find the page's code and embed custom code.
Embed the iFrame on your website
- Locate your page's code.
- Get the script code by either navigating to the Quickchat AI App, go to Integrations and and clicking the 'Embed on your website' tile, then copying the 'iFrame' code.
- Paste the snippet below into the
<body>tag at the precise location where you want to display the iFrame.
Below is a simple demo on how to locate the Widget / iFrame code in the Quickchat AI App.
Adding to WordPress
Below we demonstrate how to embed the Quickchat AI Widget into the popular website creation tool WordPress.
Adding to WordPress using footer.php
Adding to WordPress using Plugin
For details how to embed the Widget into other website creation tools, search 'Adding custom code to ...' in your web browser or reach out to us at contact@quickchat.ai.
Add custom attributes to the messages via Widget
You can export all your conversations' data using the Export in the Inbox. By default the data columns are: conversation ID, timestamp, message ordinal number, role (AI / User / Your agent if it was Handed Off), message.
In the Widget you can add custom attributes to the messages, which will be displayed as data columns in the conversation export.
You can do it by adding _quickchat("custom_params", PARAM); to the script for iFrame / Widget. PARAM should be a JSON object, for instance {userId: 12, website: mywebsite.com},
and can hold maximum 5 keys at a time. These parameters will be assigned to every new conversation.
Example
You add it to the script in the following way. Please note the below is only an example, do not copy it to your website.
<script>
  (function(e,a,d,i,c,t=a.createElement(d)){e[c]=e[c]||function(){(e[c].q=e[c].q||[]).push(arguments)},t.src=i,t.async=1,a.body.insertAdjacentElement("beforeend",t)})(window,document,"script","https://widget.quickchat.ai/embed.js","_quickchat_embedded");
  _quickchat_embedded("host", "server.quickchat.ai");
  _quickchat("custom_params", {userId: 12, website: mywebsite.com});
  _quickchat_embedded("init", "aaaaaaaaa");
</script>
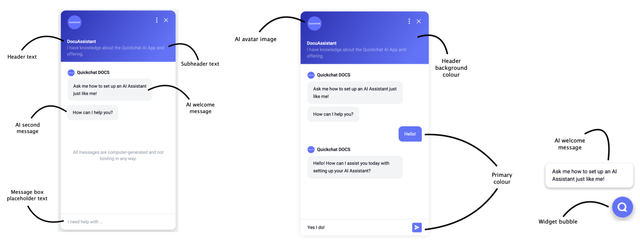
Change styling of the Widget / iFrame
You can customise the Widget / iFrame to match your branding. You can change the textual components, style, widget and bubble size and the size of the chat window.
To change the settings of your Widget / iFrame, navigate to Integrations, click onto 'Embed on your website' and scroll to 'Text content' and 'Appearance sections'.
You can also:
- Change the Widget bubble size and Widget bubble position (left or right bottom corner of the page)
- Adjust the Widget chat window width (320 - 720 px) and height (520 - 1020 px)
- Choose to auto-open the Widget or display the Widget bubble as default
- Enable voice and speech support for primary language (see Languages Setting)